# Laravel
This guide is a demonstration of how official Laravel Admin (opens new window) can heavily facilitates Vuetify Admin integration within laravel backend for full top to bottom development experience. We will also made usage of server and client code generator commands for YAML driven development showcase. Simply quick and done !
REQUIREMENTS
- You must have PHP 7.4.
- Laravel installer (opens new window) 4.x.
- Vue CLI (opens new window) 4.x.
- Should be installed on fresh Laravel 8 installation.
- Docker (opens new window) as option.
SOURCE CODE
You will find complete source code of this tutorial in the main repo (opens new window).
# Installation
Simply init your project by this simple steps :
laravel new my-laravel-admin-app
cd my-laravel-admin-app
composer require okami101/laravel-admin
php artisan admin:install
2
3
4
Then follow wizard.
# Required and suggested packages
Following required packages will be installed :
- Laravel Spatie Query Builder (opens new window) for api resource browsing with all pagination, fields select, sorting and filters support.
- Laravel Spatie MediaLibrary (opens new window) for easier centralized media files solution.
- Laravel Spatie Translatable (opens new window) for simple translatable model support saved on JSON format.
- Laracasts Generators (opens new window) for advanced migration with fields and foreign generation feature.
The installer will suggest you to install :
- Very helpful optional dev packages as :
- IDE Helper (opens new window), for IDE integration and laravel intellisense.
- PHP CS Fixer (opens new window) for coding formatter with Laravel preset.
- Clockwork (opens new window), for easy API profiling.
- Dump Server (opens new window), for CLI dump, ideal for API debugging.
- Other suggested production packages :
- Laravel Sanctum (opens new window), a secured cookie-based authentication for SPA apps, which is ideal for Vuetify Admin.
- Laravel elFinder (opens new window) for file browser support with Wysiwyg bridges.
IDE HELPER
If you have selected ide helper package, you may add this lines into your main composer.json file :
"scripts": {
    "post-update-cmd": [
        "Illuminate\Foundation\ComposerScripts::postUpdate",
        "@php artisan ide-helper:generate",
        "@php artisan ide-helper:meta"
    ]
}
2
3
4
5
6
7
# Provided features and generated code
Finally, the installer will integrate some additional boilerplate code to get basic features working within Vuetify Admin :
- Modify some configs as cors for ready-to-go API SPA plugging.
- Impersonation feature
- User controller for admin users management.
- Simple account controller for profile editing and password change.
- Inject docker files with ready to use MySQL, phpMyAdmin, Nginx and Redis !
SPA auth & impersonation
If you choose to install Laravel Sanctum, the installer will inject both EnsureFrontendRequestsAreStateful as well as Impersonate middlewares into following Http Kernel file :
app/Http/Kernel.php
<?php

namespace App\Http;

use Illuminate\Foundation\Http\Kernel as HttpKernel;

class Kernel extends HttpKernel
{
    /* ... */
        'api' => [
            \Laravel\Sanctum\Http\Middleware\EnsureFrontendRequestsAreStateful::class,
            \Okami101\LaravelAdmin\Http\Middleware\Impersonate::class,
            'throttle:60,1',
            \Illuminate\Routing\Middleware\SubstituteBindings::class,
        ],
    /* ... */
}
2
3
4
5
6
7
8
9
10
11
12
13
14
15
16
17
Note as Impersonate must be placed just right AFTER the EnsureFrontendRequestsAreStateful middleware in order to fetch initial main authenticated admin user.
# Vue CLI admin UI project
At the end of installation, a full ready Vue CLI Admin project will be installed inside admin sub folder (default) with all required dependencies by using this preset (opens new window).
UI ADMIN GENERATE COMMAND
You can still regenerate new admin UI without reuse full installer by using php artisan admin:ui.
DIRECTORY STRUCTURE
See this getting started section for more detail of what you get inside the admin folder.
# Usage
# Run backend API
# With docker
After the installation, don't forget to adapt your environment variables with those outputted by installer when finished as following :
APP_URL=http://localhost:8000
APP_TIMEZONE=UTC

SANCTUM_STATEFUL_DOMAINS=localhost:8080

DB_HOST=mysql
DB_DATABASE=laravel
DB_USERNAME=laravel
DB_PASSWORD=laravel

REDIS_HOST=redis
CACHE_DRIVER=redis
SESSION_DRIVER=redis

DOCKER_PUID=1000
DOCKER_PGID=1000
NGINX_HTTP_PORT=8000
PMA_PORT=9000
MYSQL_ROOT_PASSWORD=root
2
3
4
5
6
7
8
9
10
11
12
13
14
15
16
17
18
19
Adapt SANCTUM_STATEFUL_DOMAINS to your local url of Vue CLI admin app.
SANCTUM
SANCTUM_STATEFUL_DOMAINS environnement variable is always needed even if admin app is on same API domain. It allows cookie auth sharing between local client app and API server. On production you may set the full domain. For example if your app will be accessible on https://my.company.com : SANCTUM_STATEFUL_DOMAINS=my.company.com.
DOCKER_PUID AND DOCKER_PGID
You need to set properly this IDs according to your local linux user IDs in order to prevent all boring permissions issues inside Laravel storage folder. In general the first created linux user is 1000 by default.
You can finally launch docker-compose up and take a pastis (opens new window). Don't forget to put docker-compose exec laravel before each next artisan command.
Then you have to prepare laravel installation with migration and all dummy data (if you have some) :
docker-compose exec laravel php artisan storage:link
docker-compose exec laravel php artisan migrate:fresh --seed
2
If not included on your dummy data, you may need to create your first user by docker-compose exec laravel php artisan admin:user [email protected]. You will be prompted for the user name and password.
ADMIN URL
By default admin URL is configured at http://localhost:8080 (opens new window) which is default Vue CLI dev serve URL.
Don't forget to edit it on production. Just edit ADMIN_URL environment variable for that.
# Classic install
First don't forget to put SANCTUM_STATEFUL_DOMAINS=localhost:8080 inside .env, where localhost:8080 is the default local url of Vue CLI admin app.
Then you have to prepare laravel installation as usual with all migrations and seeders :
php artisan storage:link
php artisan migrate:fresh --seed
php artisan admin:user [email protected] # only if no already dummy users from your seeders
php artisan serve
2
3
4
# Run Admin UI
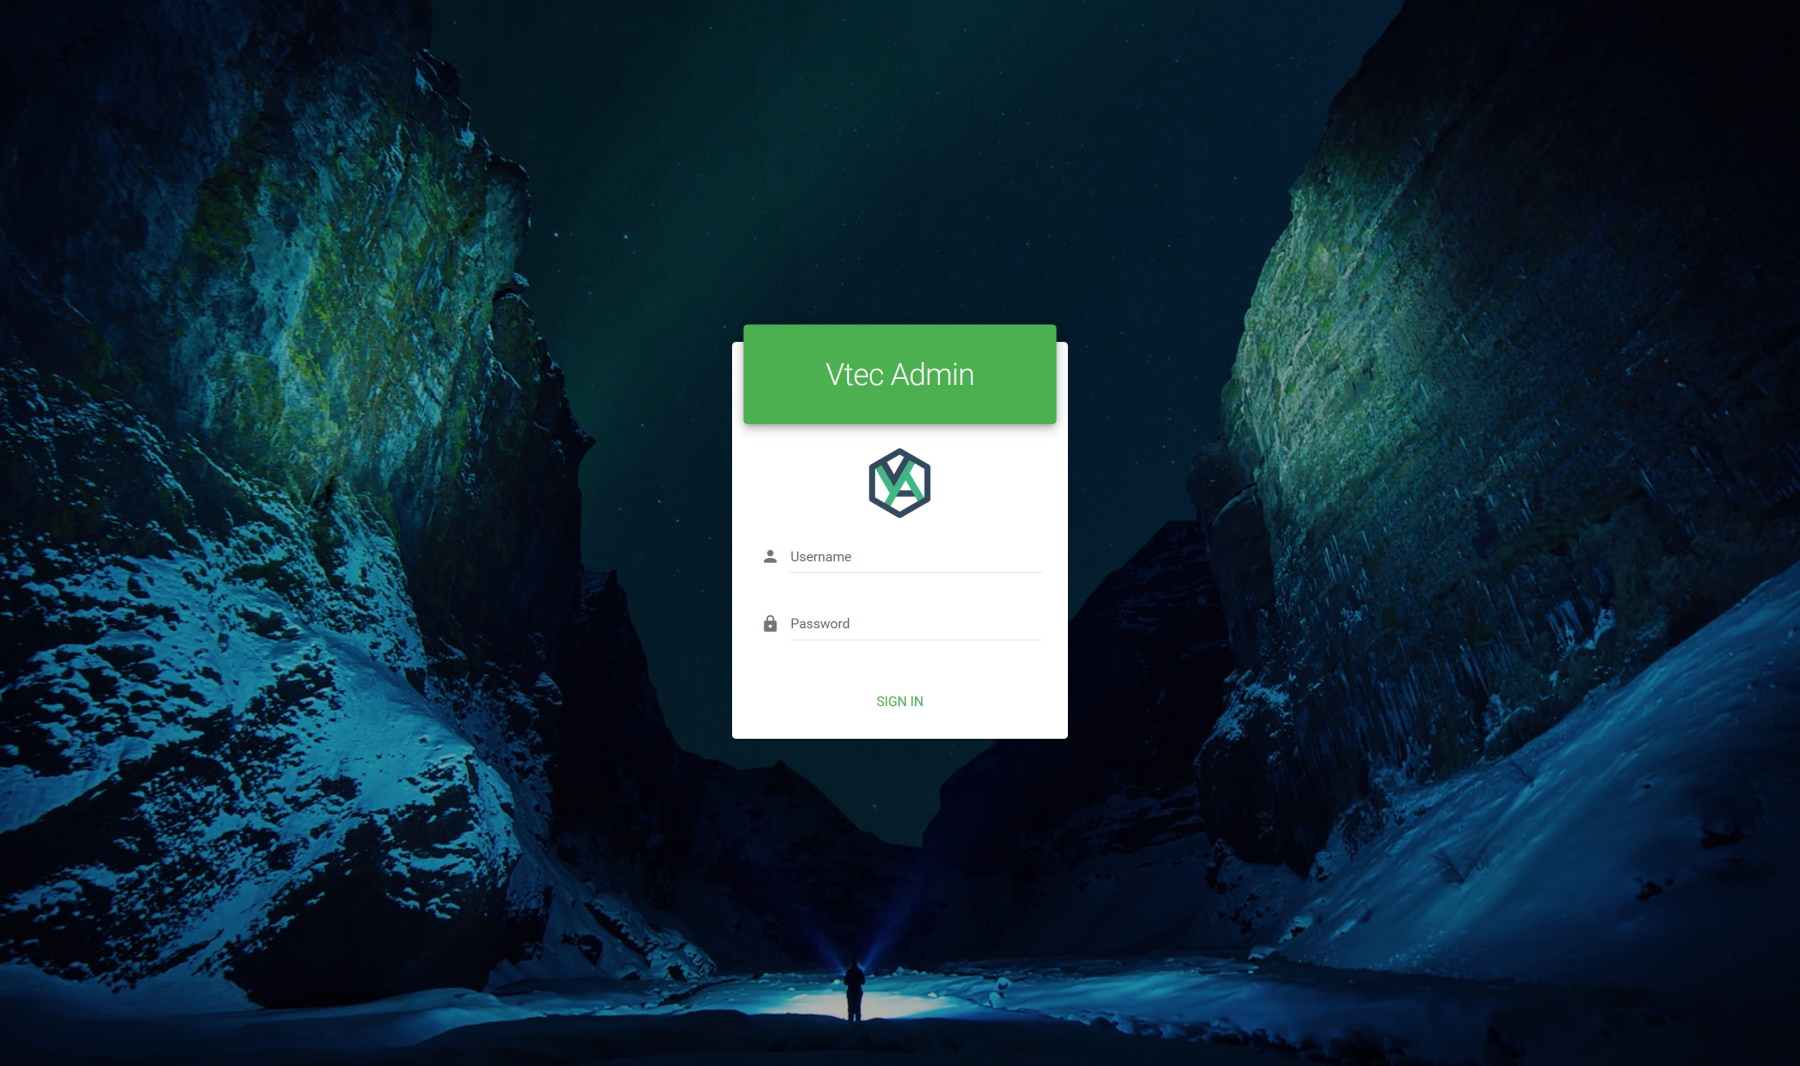
You're finally ready to get up and running the Admin UI by cd admin && yarn serve --open. It will redirect you to this customizable login page :
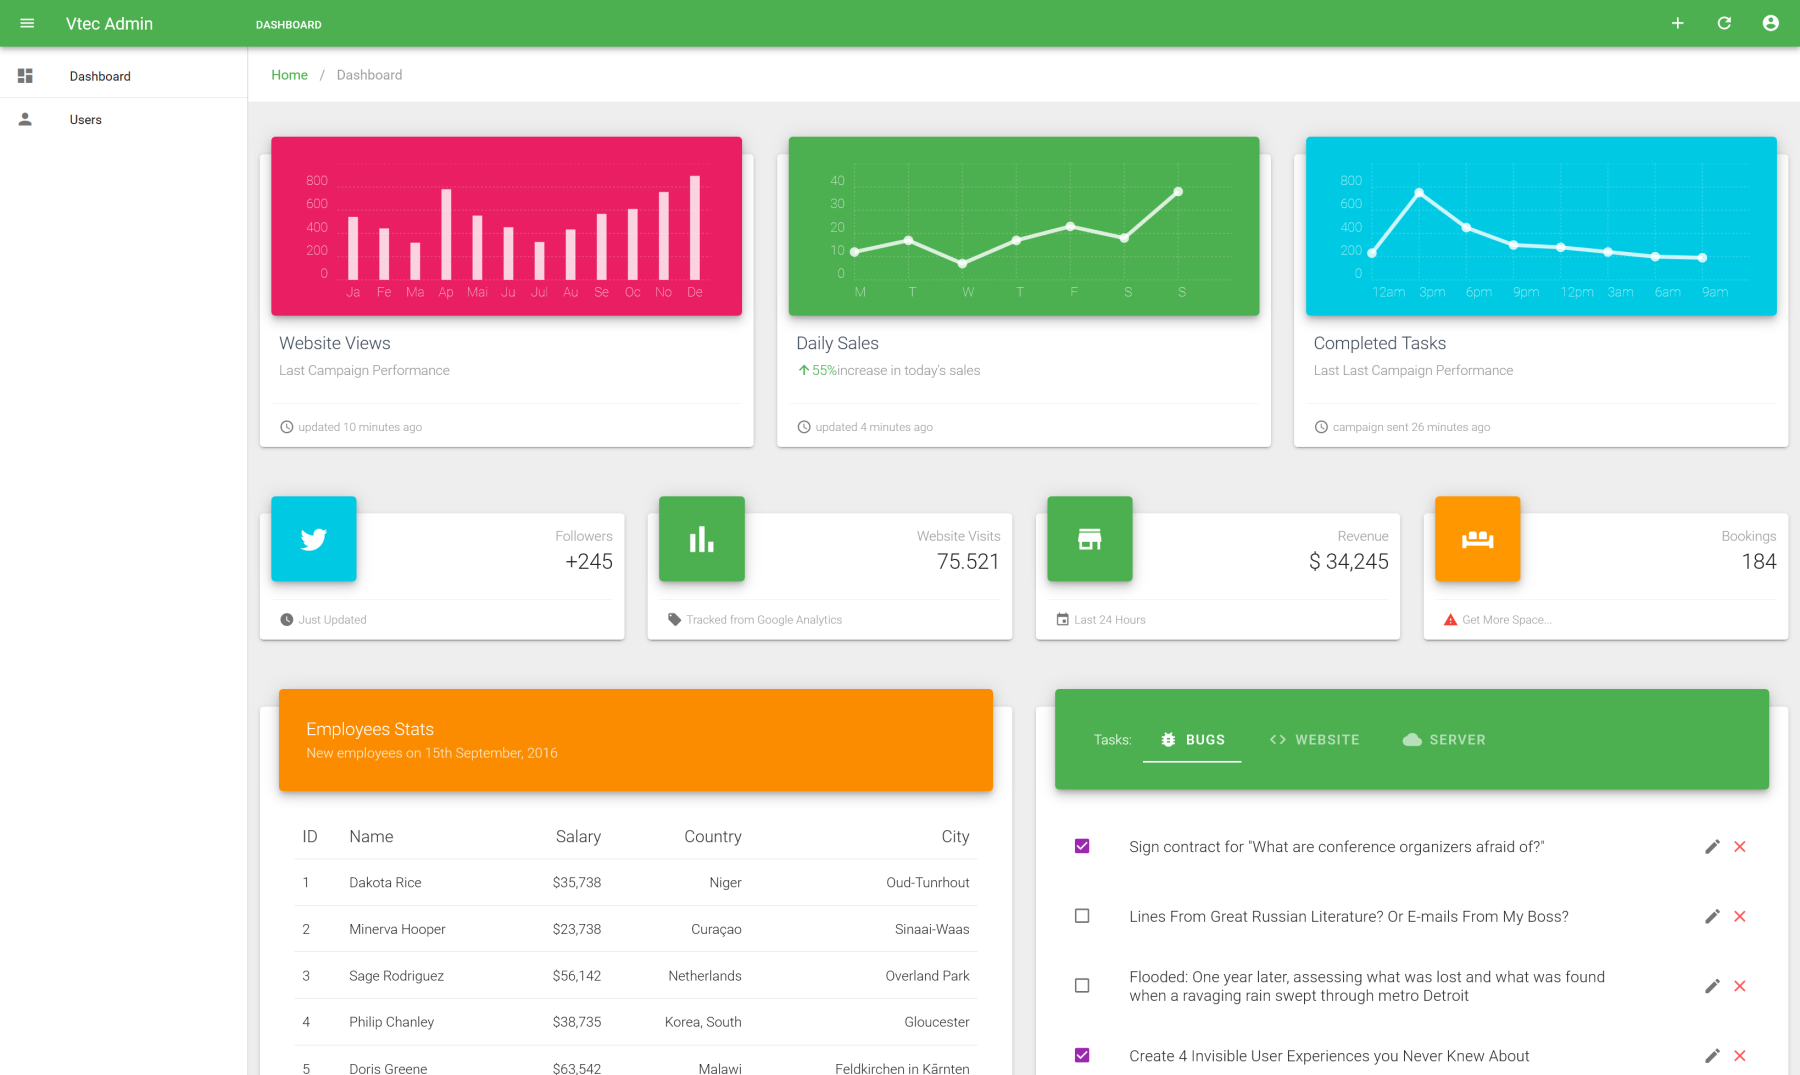
After login you will be redirect to this nice static dashboard, which is entirely customizable at src/views/Dashboard.vue file :
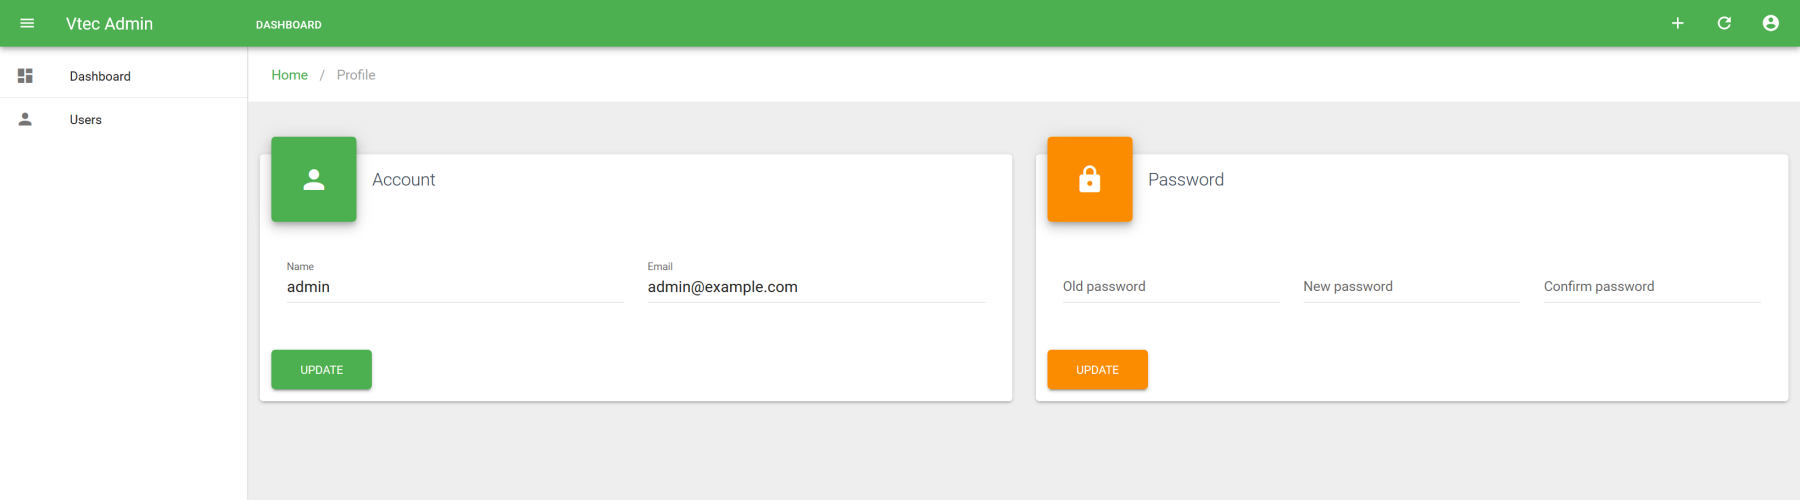
Customizable profile page that allow basic user editing and password change is also fully functional and available under top right user dropdown menu :
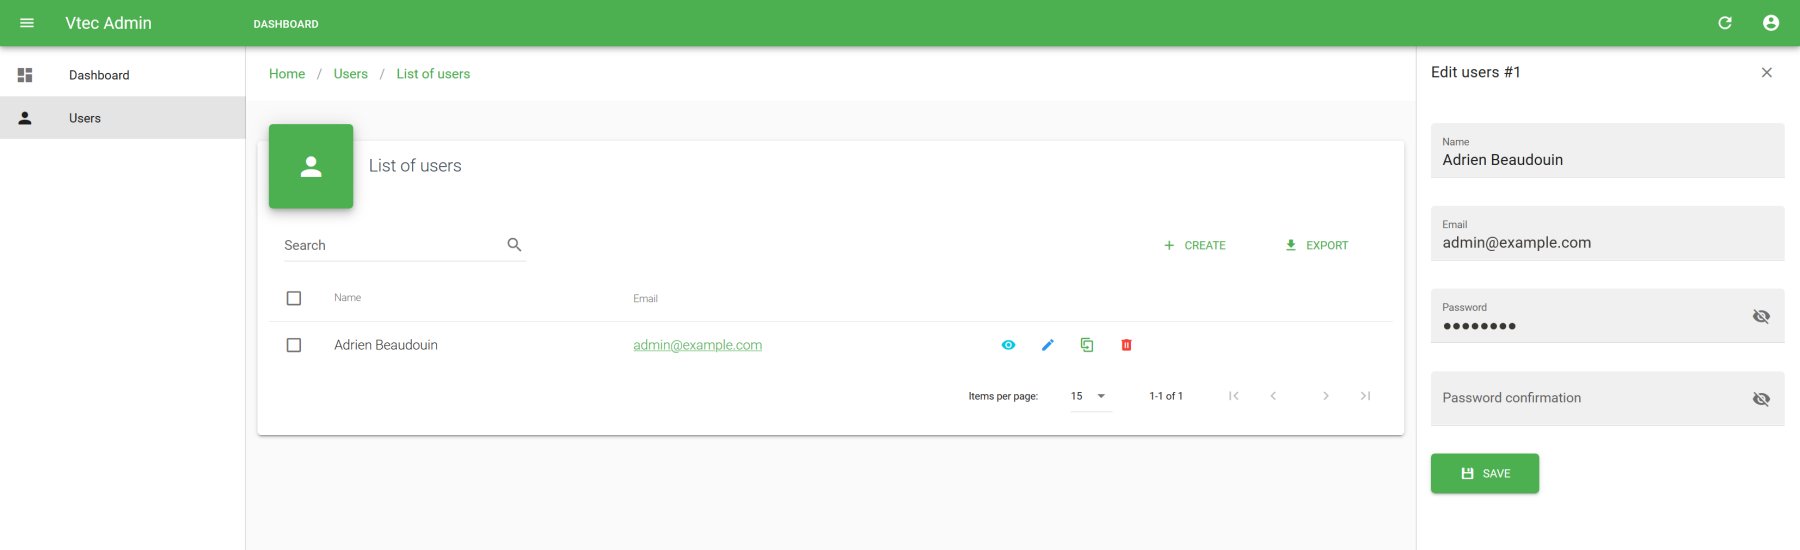
Finally a users section that allows users management with direct aside edit is also provided, as well as possibility of impersonation.
# Generators
This package provides 2 specific crud generator commands. Use php artisan crud:make [MyNewResource] [options] with many as options as possible in order to scaffolding following files :
- Model
- Controller with all crud operations
- Policy for authorization
- Store and update requests for validation rules (empty by default, so don't forget to add your own rules)
- Http Resource for API data transformer
- Migration with all pre-generated fields (including foreign !)
- Factory and seeder (empty by default)
In addition, api routes should be registered automatically at routes/api.php file in this place :
Route::apiResources([
    /** previous entities */
    'my_new_resource' => 'MyNewResourceController',
]);
2
3
4
HELP COMMAND
Launch php artisan crud:make --help for all options documentation.
IDE AUTOCOMPLETION
Use php artisan ide-helper:models after in order to have full model autocompletion !
OVERRIDES
Use --force option for overwrite existing files.
DATABASE RELATED FILES
For both generator commands, you may add -mfs options to generate full migration file with all pre-generated fields, in addition to factory and seeder files.
RELATIONSHIP
In case of model relation, even if foreign keys can be generated in migration file by foreign on schema, you must manually add related eloquent relation in you model.
VALIDATION
For server-side validation, you must manually add rules to generated store and update request files inside app/Http/Requests directory.
# Generate your first entity
You're now ready for development. Let's try the power of above generators for initiate our first entity on API side. We will create a new Book model with followed fields : isbn, category, title, description, author, price, commentable, formats and publication_date. We will also set title and description as translatable fields. So we can use next command :
php artisan crud:make Book \
  --schema="isbn:string:unique, category:string, title:json, description:json, summary:json, author:string, price:float, commentable:boolean, formats:json, publication_date:date" \
  --translatable="title, description, summary" --searchable="title, description, author" \
  --filterable="title, author, commentable" \
  --sortable="isbn, title, author, price, publication_date" \
  -mfs --force
2
3
4
5
6
JSON
As title and description are translatable, we'll use JSON for storing all localized labels keyed by locale code.
All necessary files are now generated :
Additional generated files : BookPolicy, StoreBook, UpdateBook, BookSeeder and BookFactory.
# Dummy data
You may needs to write some factory code for dummy data. Let's write it on next file :
database/factories/BookFactory.php
<?php

/** @var \Illuminate\Database\Eloquent\Factory $factory */

use App\Book;
use Faker\Generator as Faker;
use Okami101\LaravelAdmin\Faker\Provider\Html;

$factory->define(Book::class, function (Faker $faker) {
    $faker->addProvider(new Html($faker));

    return [
        'isbn' => $faker->isbn13,
        'title' => [
            'en' => ucfirst($faker->words($faker->numberBetween(1, 5), true)),
            'fr' => ucfirst($faker->words($faker->numberBetween(1, 5), true)),
        ],
        'category' => $faker->randomElement(['novel', 'comic', 'cook', 'economy', 'politics', 'history', 'fantasy', 'biography']),
        'description' => [
            'en' => $faker->paragraph(10),
            'fr' => $faker->paragraph(10),
        ],
        'summary' => [
            'en' => $faker->htmlParagraphs(10, 10, 10),
            'fr' => $faker->htmlParagraphs(10, 10, 10),
        ],
        'author' => $faker->name,
        'formats' => $faker->randomElements(
            ['pocket', 'paperback', 'pdf', 'epub', 'kindle'],
            $faker->numberBetween(1, 5)
        ),
        'price' => $faker->randomFloat(2, 10, 50),
        'commentable' => $faker->boolean(80),
        'publication_date' => $faker->dateTime,
    ];
});
2
3
4
5
6
7
8
9
10
11
12
13
14
15
16
17
18
19
20
21
22
23
24
25
26
27
28
29
30
31
32
33
34
35
36
Now let's add dummy generation on seeder :
database/seeds/BookSeeder.php
<?php

use Illuminate\Database\Seeder;
use Illuminate\Support\Facades\DB;

class BookSeeder extends Seeder
{
    /**
     * Run the database seeds.
     *
     * @return void
     */
    public function run()
    {
        DB::table('books')->truncate();

        factory(\App\Book::class, 500)->create();
    }
}
2
3
4
5
6
7
8
9
10
11
12
13
14
15
16
17
18
19
Finally we can migrate and seed dummy data :
php artisan migrate
php artisan db:seed --class BookSeeder
2
You're now ready to implement the admin UI !
# Generate CRUD UI
We can of course use the same way of previous tutorials for generate our CRUD book pages via guesser's code, but now you've been thinking can we generate UI side same as previously for API ?
Of course we can ! Vue CLI Plugin will install same separate npm scripts commands but for UI side. Let's try crud:make npm script. Go to admin sub folder and launch next crud:make command :
yarn crud:make books --locale="en" --name="Book | Books" --icon="mdi-book" --label="title" --translatable \
  --fields="isbn, category:select, title, description, summary, author, price:number, commentable:boolean, formats:array, publication_date:date" \
  --columns="isbn, title, author, commentable, price, publication_date" \
  --filterable="title, author, commentable" \
  --sortable="isbn, title, author, sortable, publication_date" \
  --lint
2
3
4
5
6
HELP COMMAND
Use yarn vue-cli-service help crud:make for all options documentation.
It will register a new books resource, add link to books on sidebar and generate all CRUD files.
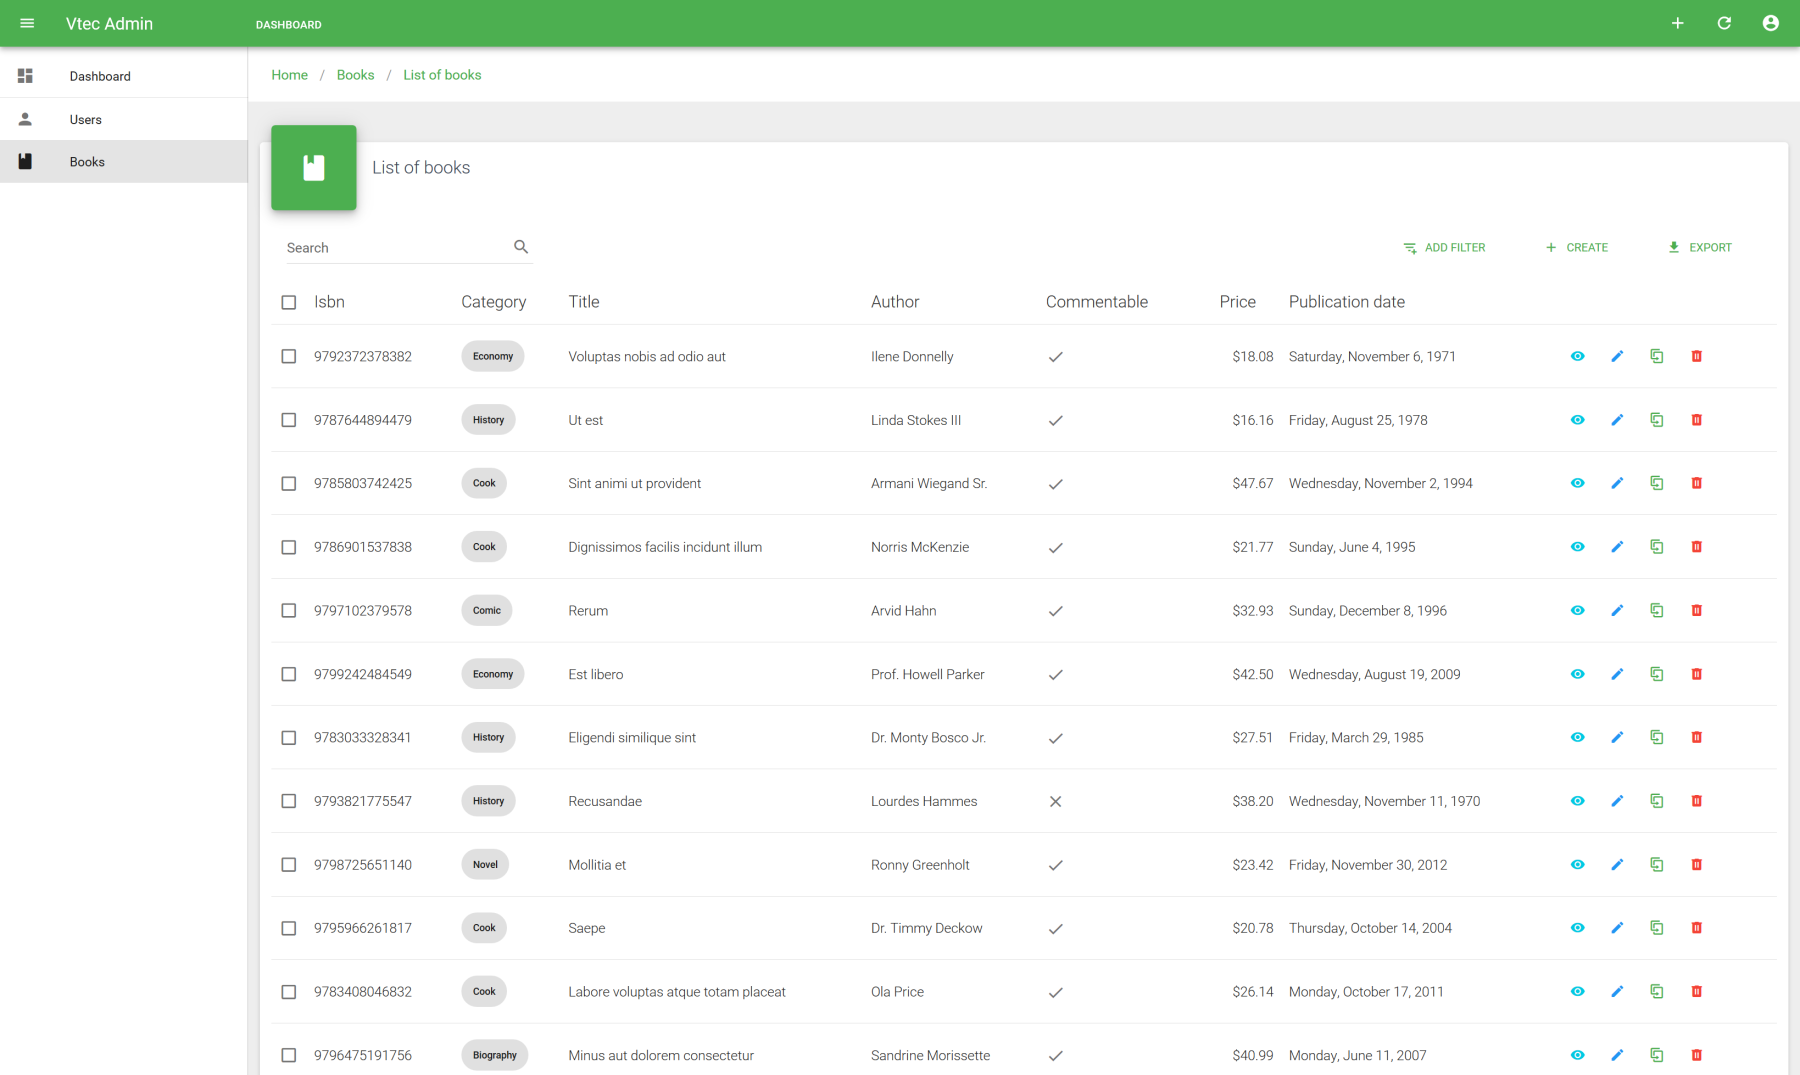
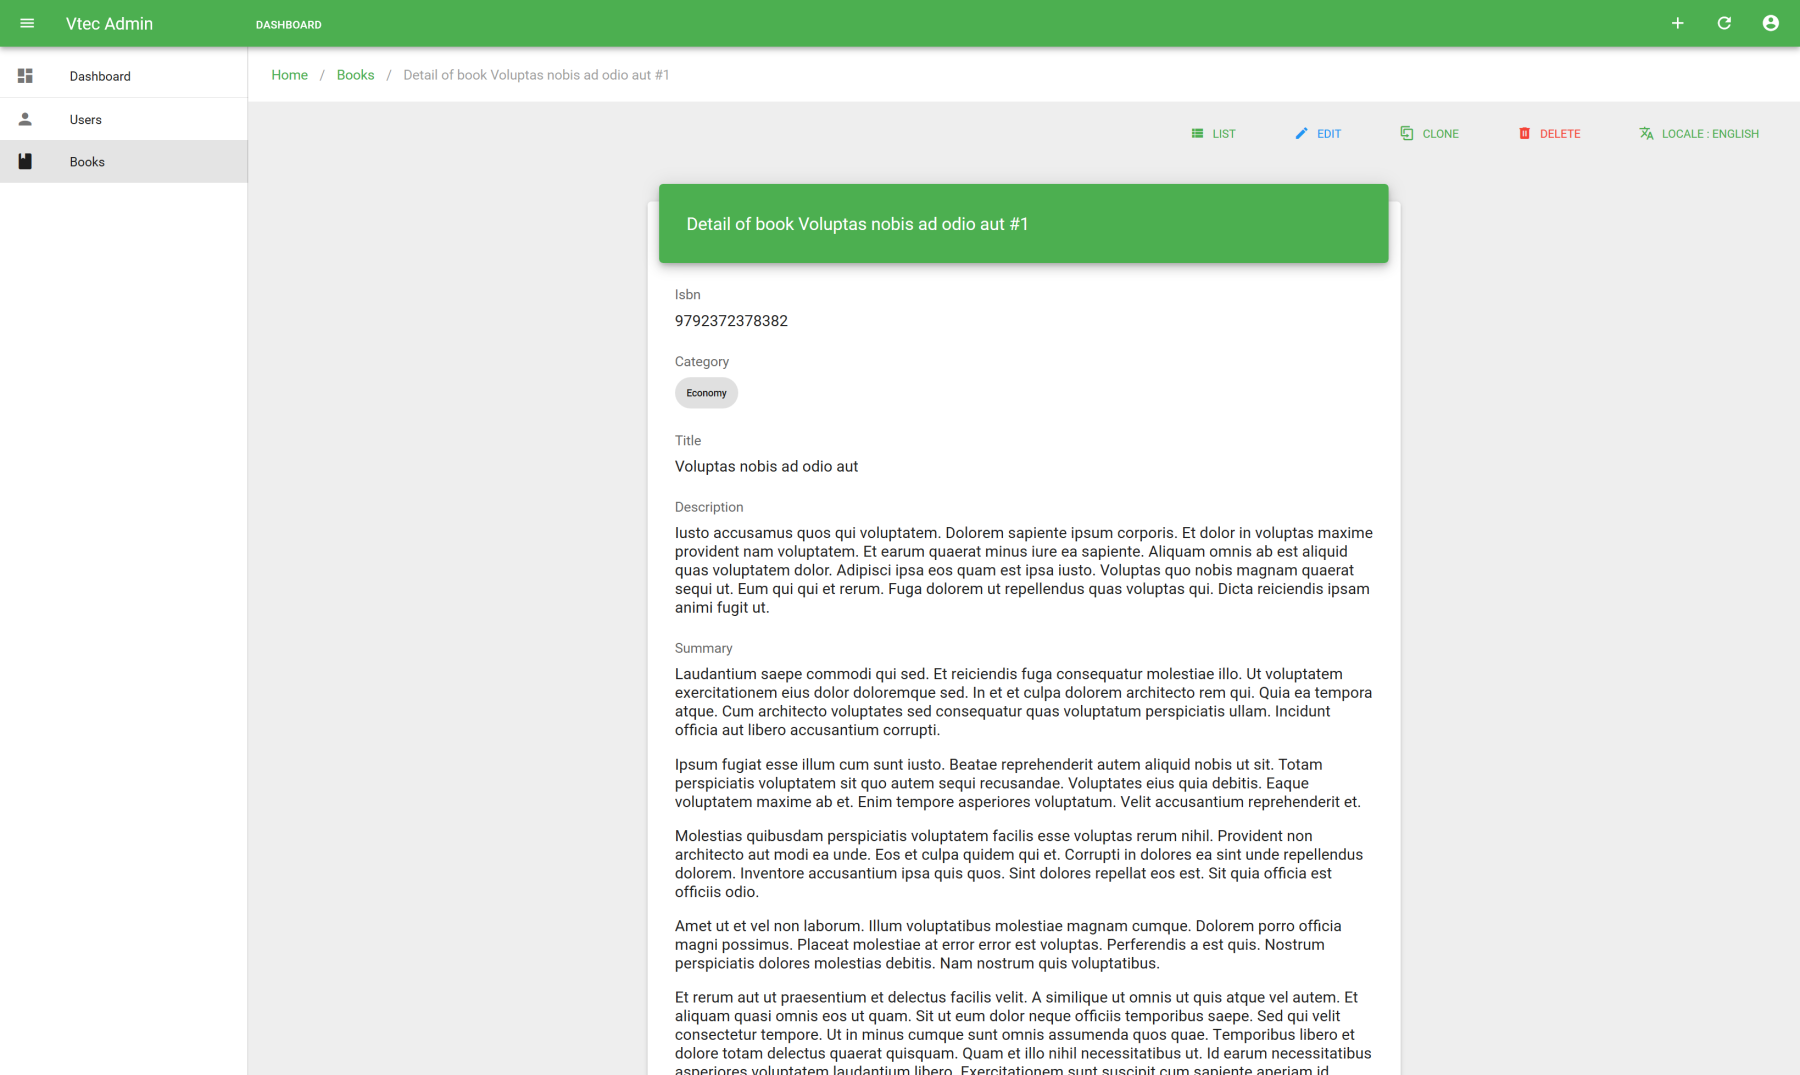
To finish you may readapt some fields or inputs for better representation :
- On list and show views :
- Add currency format for all price fields.
- Change summary of show view to rich text type.
- Add localized enums for category and formats.
- Precise
selecton formats on show view for use localized enums (as array field don't use it by default).
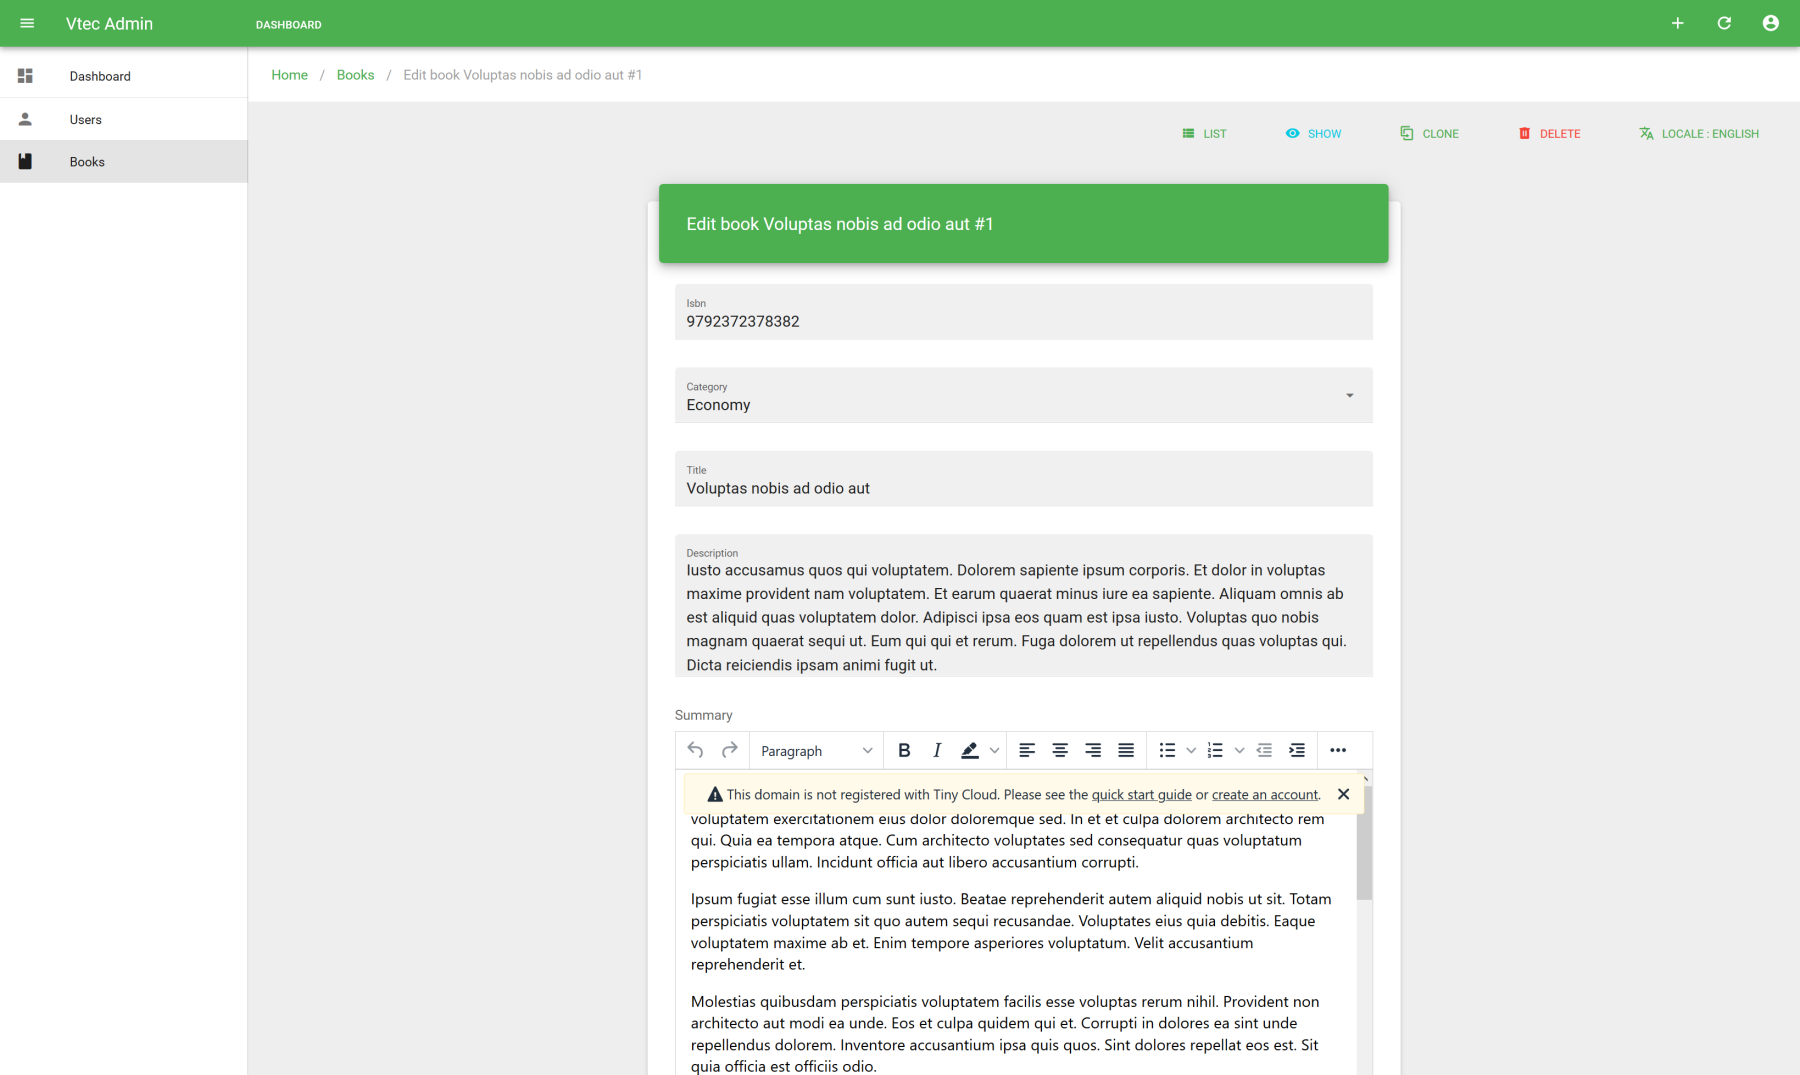
- On form views :
- Add
multilineprop on form for description in order to use textarea. - Use rich text input for summary (use TinyMCE editor).
- Use multiple select for
formatsinstead of input array.
- Add
Here the final code templates of all locales and book CRUD views, all above manual modifications are highlighted.
# YAML
For even more auto generation power and reusability, a direct resources yaml file descriptor can be used via php artisan crud:yaml my-new-resource.yml [options] for API and yarn crud:yaml my-new-resource.yml [options] for UI. You can also directly provide a directory which contains all necessary YAML resource descriptor files as needed.
Use name option in order to import only targeted resource.
# API & UI resources development
The first step is to create a YAML resource descriptor file that must validate specific JSON schema, which will be consumed by API and UI CRUD commands that will generate all basic working code, instead of creating all boring stuff all by hand.
In this tutorial we will use existing YAML files as sample. Take one of this YAML files descriptors (opens new window) according to your preferred locale and put it inside admin/generators folder (or anywhere you want). This file contains 2 resources :
- Monsters : sample for show all different type of fields.
- Child monsters : essentially for resource relationship purpose.
# API generator commands
DOCKER
For all next artisan commands, don't forget to add docker-compose exec laravel before.
Finally it's time to generate our basic CRUD boilerplate code.
First begin with server-side commands by using php artisan crud:yaml admin/generators/monsters.en.yml -mfs. That will generate all API based backend files as well as registering all crud resource API routes. See laravel specific section for all detail of what's going on.
# Add specific model relations
Foreign DB keys are already done by migration, but you need to manually add all needed eloquent relationship for each model.
app/Monster.php
public function children()
{
    return $this->hasMany(MonsterChild::class);
}
2
3
4
app/MonsterChild.php
public function monster()
{
    return $this->belongsTo(Monster::class);
}
2
3
4
# Additional dummy data
The next step is to write you seed data. Use generated factory and seeder for that. For get quicker start, pick this files from tutorial source code :
- MonsterFactory (opens new window)
- MonsterChildFactory (opens new window)
- MonsterSeeder (opens new window)
USER SEEDER
Take this user seeder file (opens new window) in order to not have to create your admin each time you reset the database.
FILE SAMPLES
For proper media files generation, you may need to download this sample media directory and copy this main DatabaseSeeder file (opens new window).
COMPOSER AUTOLOAD
Don't forget to launch composer dump-autoload if you don't pass via php artisan make:seed command.
Then generate all DB with dummy data by php artisan migrate:fresh --seed.
# Server-side data validation
We will not use them for this tutorial, but for real app it's heavily recommended to write your server-side validations on both store and update form requests for each resource (generated inside app/Http/Requests).
# UI generator commands
Note at this above commands generate only API side code. For UI side go to admin folder and launch yarn crud:yaml generators/monsters.en.yml --locale en --lint (for english sample). This will generate all CRUD pages for each entity inside src/resources with full searchable data table list, show, create and edit forms.
In short, only factory, seed data, validation rules and model eloquent relation on server-side has been written by hand.
Now you can run all backend API as well as admin UI and see the result !
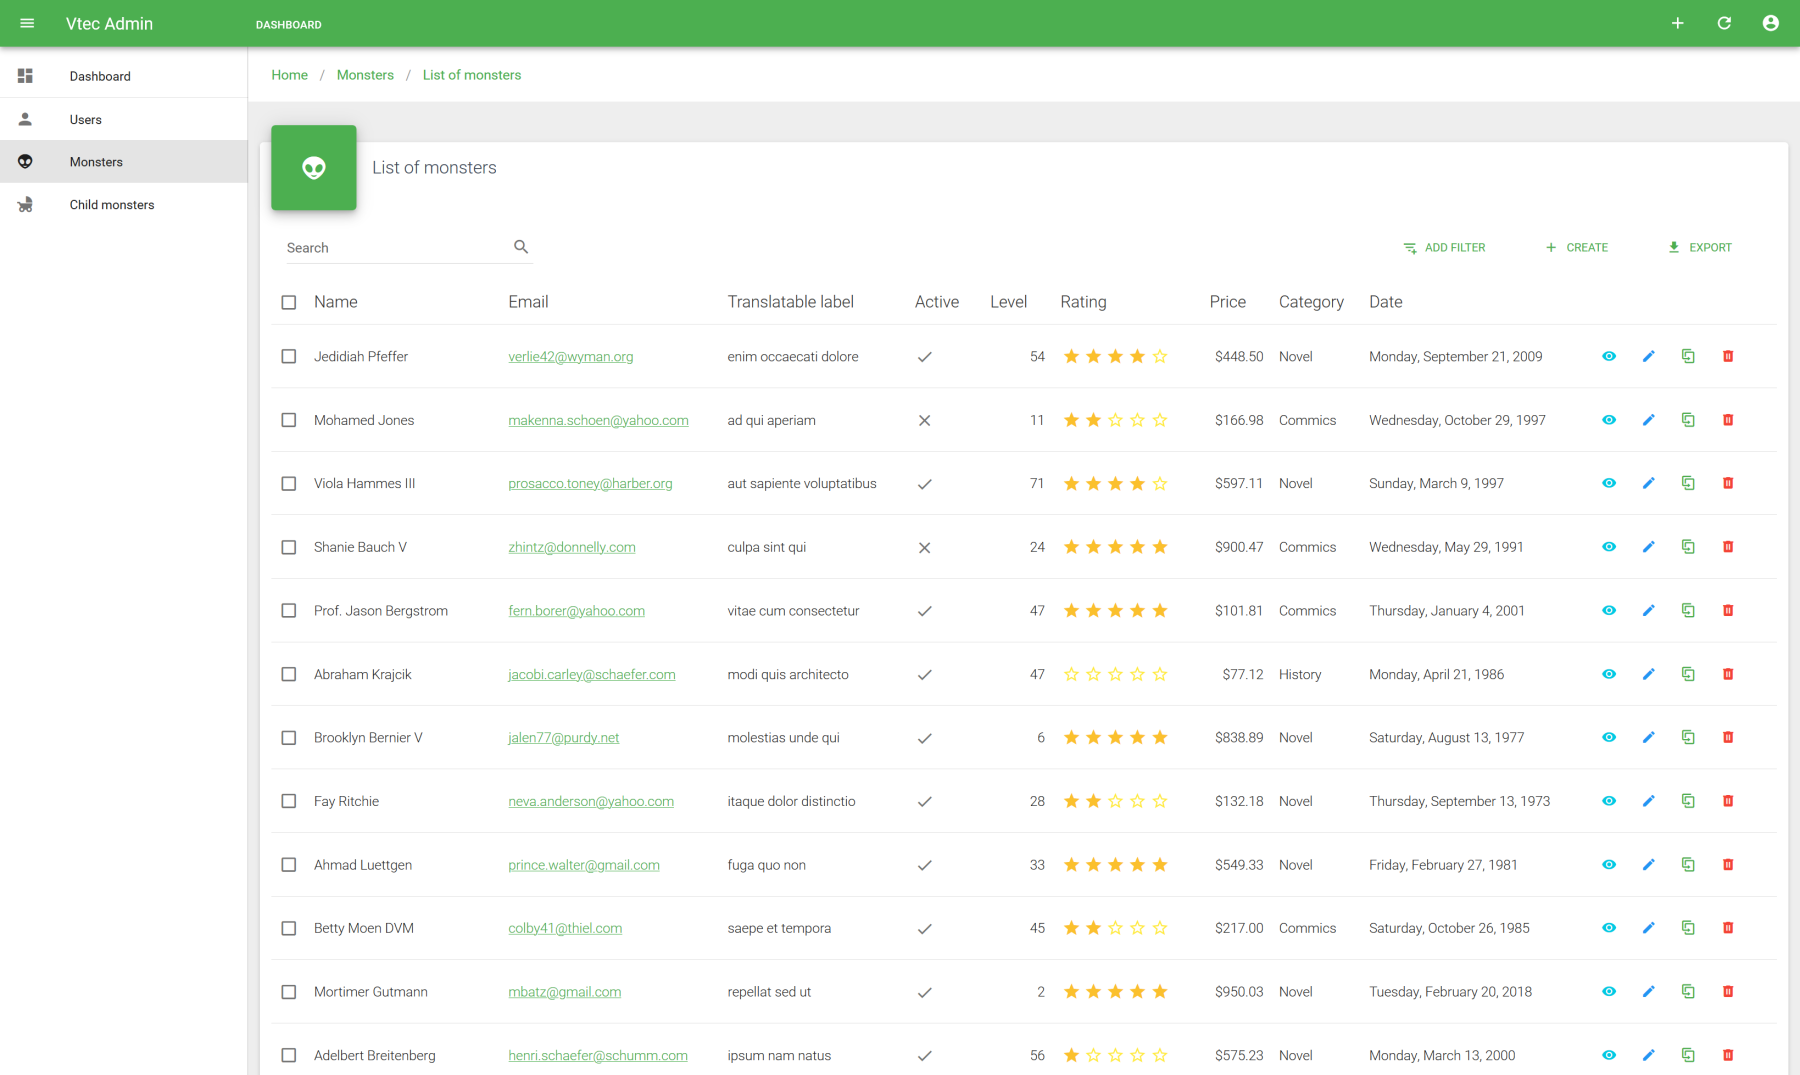
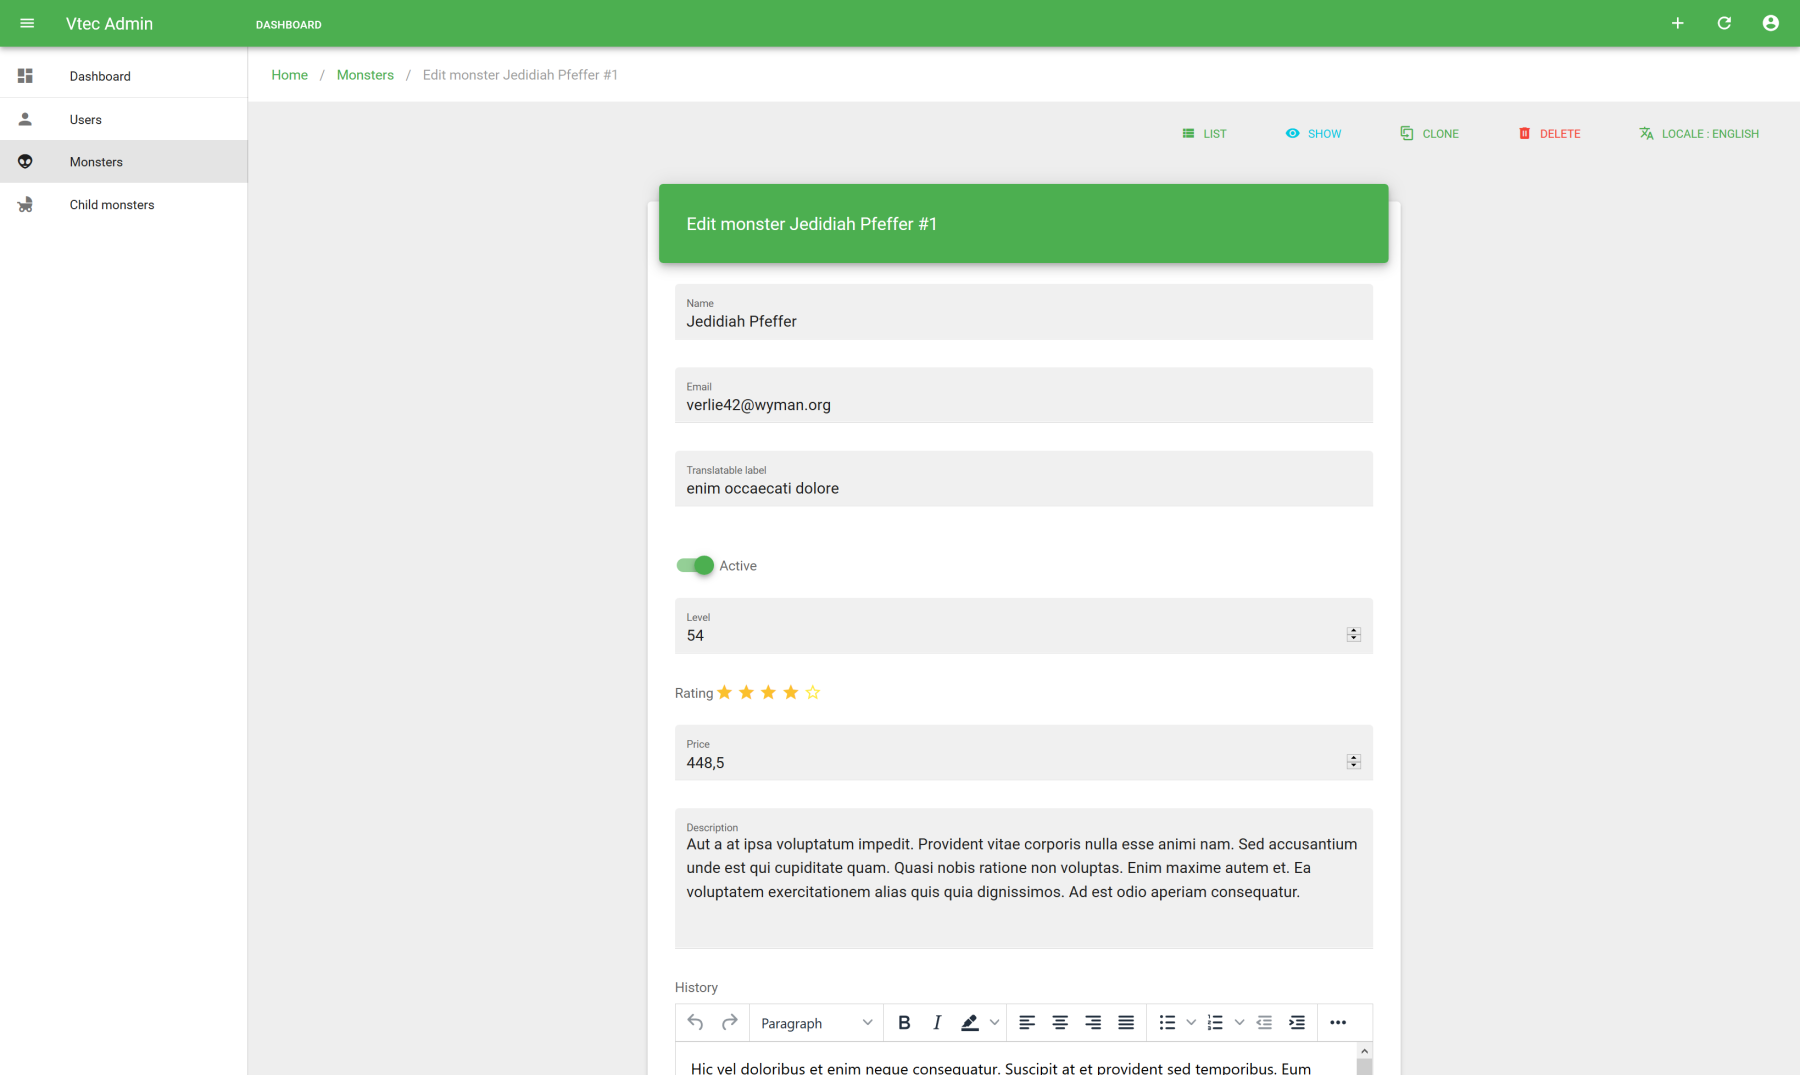
Example of generated list of monsters page :
The show view :
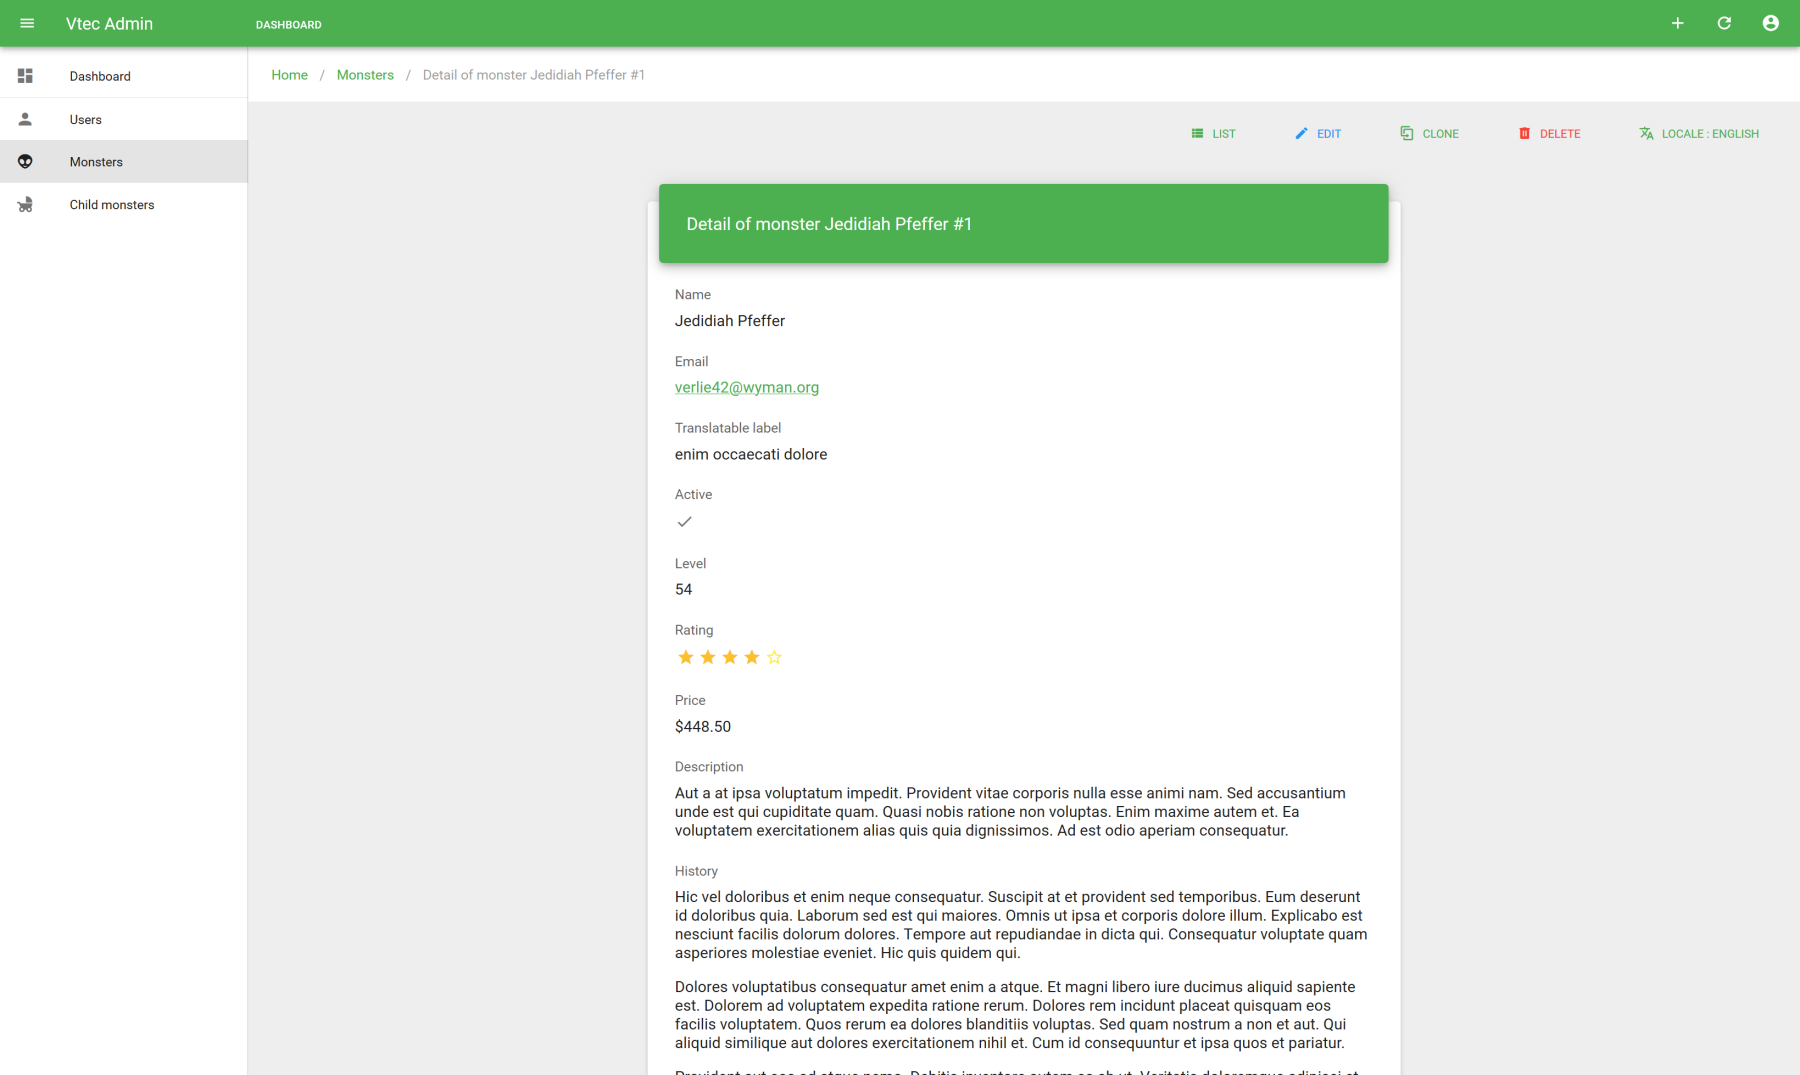
And finally the form view :
# Internal services and traits included
# Specific resource base
For API resource definition, you may use Eloquent Resources (opens new window) that extends Okami101\LaravelAdmin\Http\Resources\BaseResource in case you need media or translatable fields support within Vuetify Admin.
This class will do 2 things :
- Automatically get only the target locale for each translatable field.
- Fetch some file info (id, title, url,...) with existing thumbnails for each media files attached to the model.
# Available model traits
This package includes some third party request related model traits in order to reduce controller code boilerplate.
# RequestMediaTrait
This trait will import InteractsWithMedia from Spatie MediaLibrary (opens new window) with additional of request file save management.
This trait will be responsible for taking all valid request files that correspond to a valid collection name, as well as delete asked media for given collection.
Let's take this model media registration :
public function registerMediaCollections(): void
{
    $this->addMediaCollection('logo')->singleFile();
    $this->addMediaCollection('local');
}
2
3
4
5
This trait will automatically search for all logo and local for uploaded file.
For media deletion, he looks for logo_delete and local_delete with valid media ids (can be array or single value).
The Vuetify Admin file upload component va-file-input will take care of all of that.
# Search filter
If you want use global search in Vuetify Admin Iterator, use Okami101\LaravelAdmin\Filters\SearchFilter with all searchable fields inside allowedFilters method of Spatie Query Builder (opens new window) as next :
return new BookCollection(
  QueryBuilder::for(Book::class)
      ->allowedFilters([
          AllowedFilter::custom('q', new SearchFilter(['isbn', 'title', 'description'])),
      ->exportOrPaginate()
    );
}
2
3
4
5
6
7
TIP
Use exportOrPaginate specific macro after end of each QueryBuilder in order to add both export and pagination with only one line of code. It will apply pagination only in case of perPage detection on request query string. In all cases, filtering and sorting are kept.
# Html Faker provider
You can use Okami101\LaravelAdmin\Faker\Provider\Html for easy html generation your factories :
use App\Book;
use Faker\Generator as Faker;
use Okami101\LaravelAdmin\Faker\Provider\Html;

$factory->define(Book::class, function (Faker $faker) {
    $faker->addProvider(new Html($faker));

    return [
        'isbn' => $faker->isbn13,
        'description' => [
            'en' => $faker->paragraph(10),
            'fr' => $faker->paragraph(10),
        ],
        'summary' => [
            'en' => $faker->htmlParagraphs(10, 10, 10),
            'fr' => $faker->htmlParagraphs(10, 10, 10),
        ],
        //
    ];
});
2
3
4
5
6
7
8
9
10
11
12
13
14
15
16
17
18
19
20