
Use GitOps workflow for building a production grade on-premise Kubernetes cluster on cheap VPS provider, with complete CI/CD 🎉
This is the Part VII of more global topic tutorial. Back to guide summary for intro.
Workflow
It’s now time to step back and think about how we’ll use our CI. Our goal is to build our above dotnet Web API with Concourse CI as a container image, ready to deploy to our cluster through Flux. So we finish the complete CI/CD pipeline. To resume the scenario:
- Concourse CI check the Gitea repo periodically (pull model) for any new code and trigger a build if applicable
- When container image build passed, Concourse CI push the new image to our private registry, which is already included into Gitea
- Image Automation, which is a component as part of Flux, check the registry periodically (pull model), if new image tag detected, it will write the last tag into Flux repository
- Flux check the flux GitHub registry periodically (pull model), if any new or updated manifest detected, it will deploy it automatically to our cluster
Note
Although it’s the most secured way and configuration less, instead of default pull model, which is generally a check every minute, it’s possible to use WebHook instead in order to reduce time between code push and deployment.
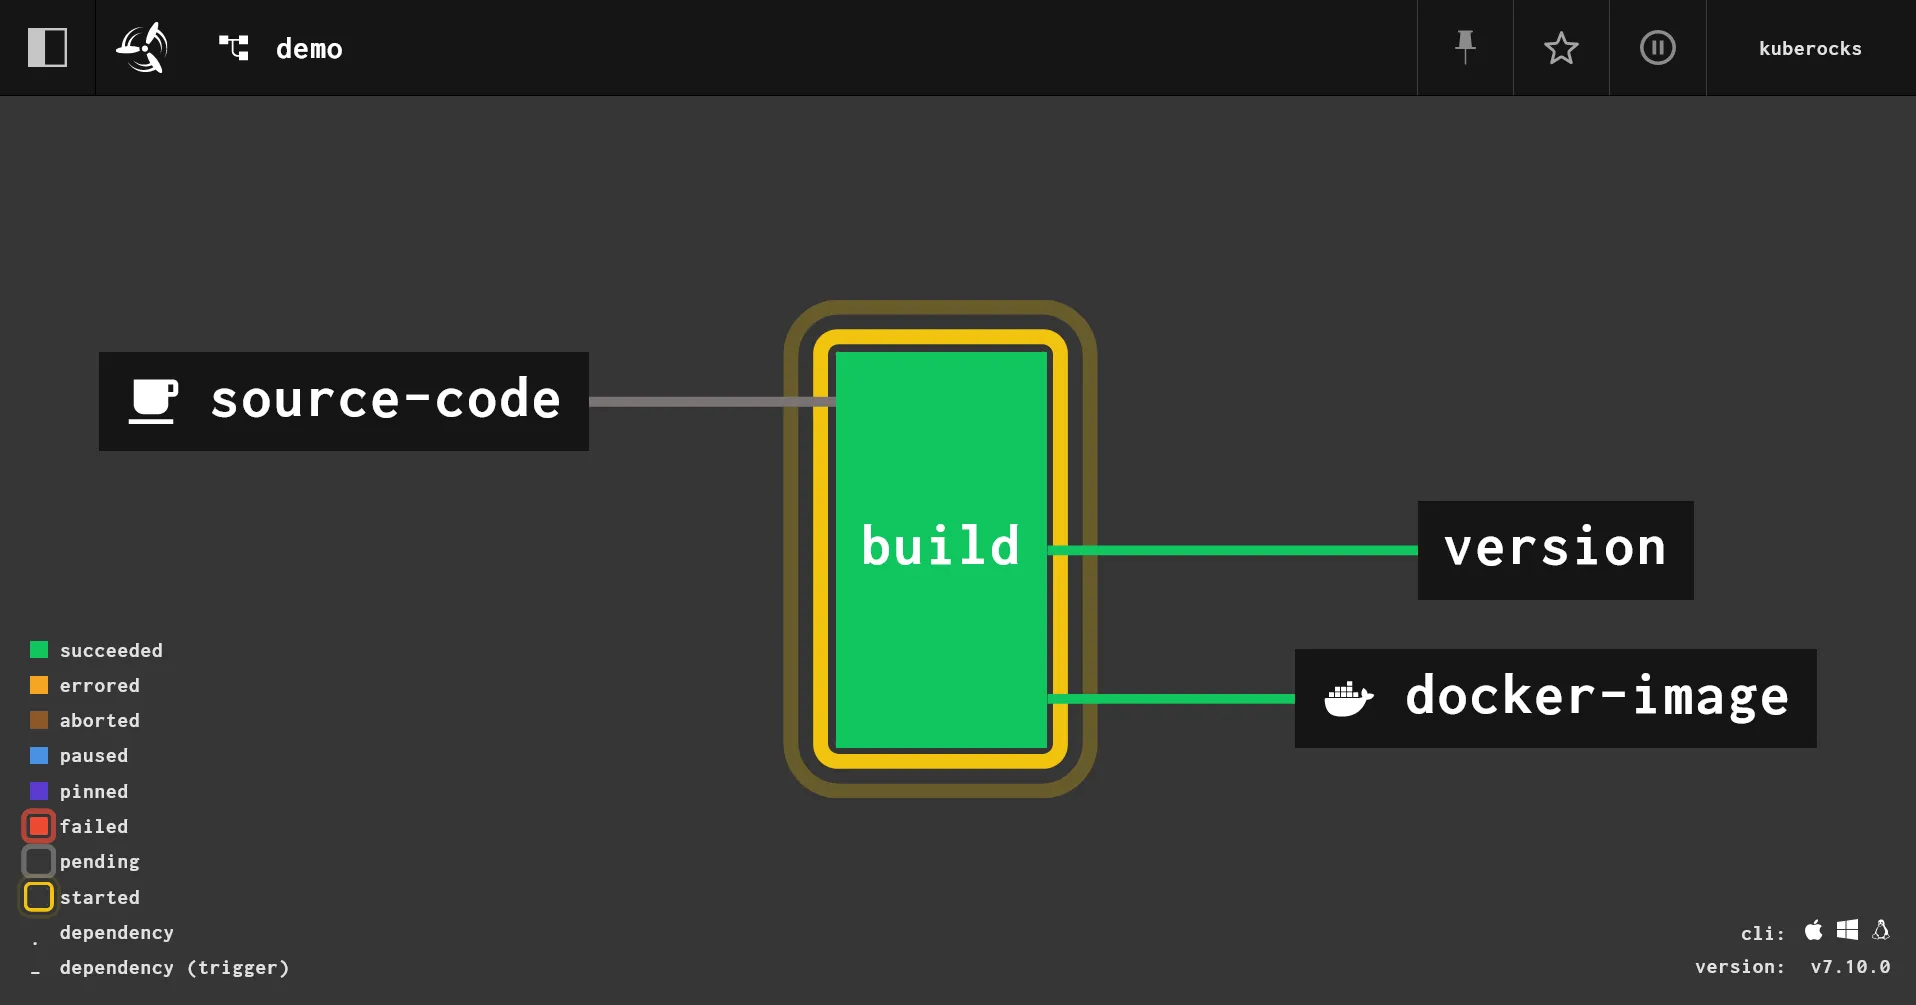
The flow pipeline is pretty straightforward:

CI part
The credentials
We need to:
- Give read/write access to our Gitea repo and container registry for Concourse. Note as we need write access in code repository for concourse because we need to store the new image tag. We’ll using semver resource for that.
- Give read registry credentials to Flux for regular image tag checking as well as Kubernetes in order to allow image pulling from the private registry.
Let’s create 2 new user concourse with admin acces and container as standard user on Gitea. Store these credentials on new variables:
variable "concourse_git_username" { type = string}
variable "concourse_git_password" { type = string sensitive = true}
variable "container_registry_username" { type = string}
variable "container_registry_password" { type = string sensitive = true}concourse_git_username = "concourse"concourse_git_password = "xxx"container_registry_username = "container"container_registry_password = "xxx"Apply the credentials for Concourse:
resource "kubernetes_secret_v1" "concourse_registry" { metadata { name = "registry" namespace = "concourse-main" }
data = { name = "gitea.${var.domain}" username = var.concourse_git_username password = var.concourse_git_password }
depends_on = [ helm_release.concourse ]}
resource "kubernetes_secret_v1" "concourse_git" { metadata { name = "git" namespace = "concourse-main" }
data = { url = "https://gitea.${var.domain}" username = var.concourse_git_username password = var.concourse_git_password git-user = "Concourse CI <concourse@kube.rocks>" commit-message = "bump to %version% [ci skip]" }
depends_on = [ helm_release.concourse ]}Note as we use concourse-main namespace, already created by Concourse Helm installer, which is a dedicated namespace for the default team main. Because of that, we should keep depends_on to ensure the namespace is created before the secrets.
Note
Don’t forget the [ci skip] in commit message, which is the commit for version bumping, otherwise you’ll have an infinite build loop !
Then same for Flux and the namespace that will receive the app:
resource "kubernetes_secret_v1" "image_pull_secrets" { for_each = toset(["flux-system", "kuberocks"]) metadata { name = "dockerconfigjson" namespace = each.value }
type = "kubernetes.io/dockerconfigjson"
data = { ".dockerconfigjson" = jsonencode({ auths = { "gitea.${var.domain}" = { auth = base64encode("${var.container_registry_username}:${var.container_registry_password}") } } }) }}Note
Create the namespace kuberocks first by k create namespace kuberocks, or you’ll get an error.
The Dockerfile
Now that all required credentials are in place, we have to tell Concourse how to check our repo and build our container image. This is done through a pipeline, which is a specific Concourse YAML file.
Firstly create following files in root of your repo that we’ll use for building a production ready container image:
**/bin/**/obj/FROM mcr.microsoft.com/dotnet/aspnet:8.0
WORKDIR /publishCOPY /publish .
EXPOSE 80ENTRYPOINT ["dotnet", "KubeRocks.WebApi.dll"]The pipeline
Let’s reuse our flux repository and create a file pipelines/demo.yaml with following content:
resources: - name: version type: semver source: driver: git uri: ((git.url))/kuberocks/demo branch: main file: version username: ((git.username)) password: ((git.password)) git_user: ((git.git-user)) commit_message: ((git.commit-message)) - name: source-code type: git icon: coffee source: uri: ((git.url))/kuberocks/demo branch: main username: ((git.username)) password: ((git.password)) - name: docker-image type: registry-image icon: docker source: repository: ((registry.name))/kuberocks/demo tag: latest username: ((registry.username)) password: ((registry.password))
jobs: - name: build plan: - get: source-code trigger: true
- task: build-source config: platform: linux image_resource: type: registry-image source: repository: mcr.microsoft.com/dotnet/sdk tag: "8.0" inputs: - name: source-code path: . outputs: - name: binaries path: publish caches: - path: /root/.nuget/packages run: path: /bin/sh args: - -ec - | dotnet format --verify-no-changes dotnet build -c Release dotnet publish src/KubeRocks.WebApi -c Release -o publish --no-restore --no-build
- task: build-image privileged: true config: platform: linux image_resource: type: registry-image source: repository: concourse/oci-build-task inputs: - name: source-code path: . - name: binaries path: publish outputs: - name: image run: path: build - put: version params: { bump: patch }
- put: docker-image params: additional_tags: version/number image: image/image.tarA bit verbose compared to other CI, but it gets the job done. The price of maximum flexibility. Now in order to apply it we may need to install fly CLI tool. Just a matter of scoop install concourse-fly on Windows. Then:
# login to your Concourse instancefly -t kuberocks login -c https://concourse.kube.rocks
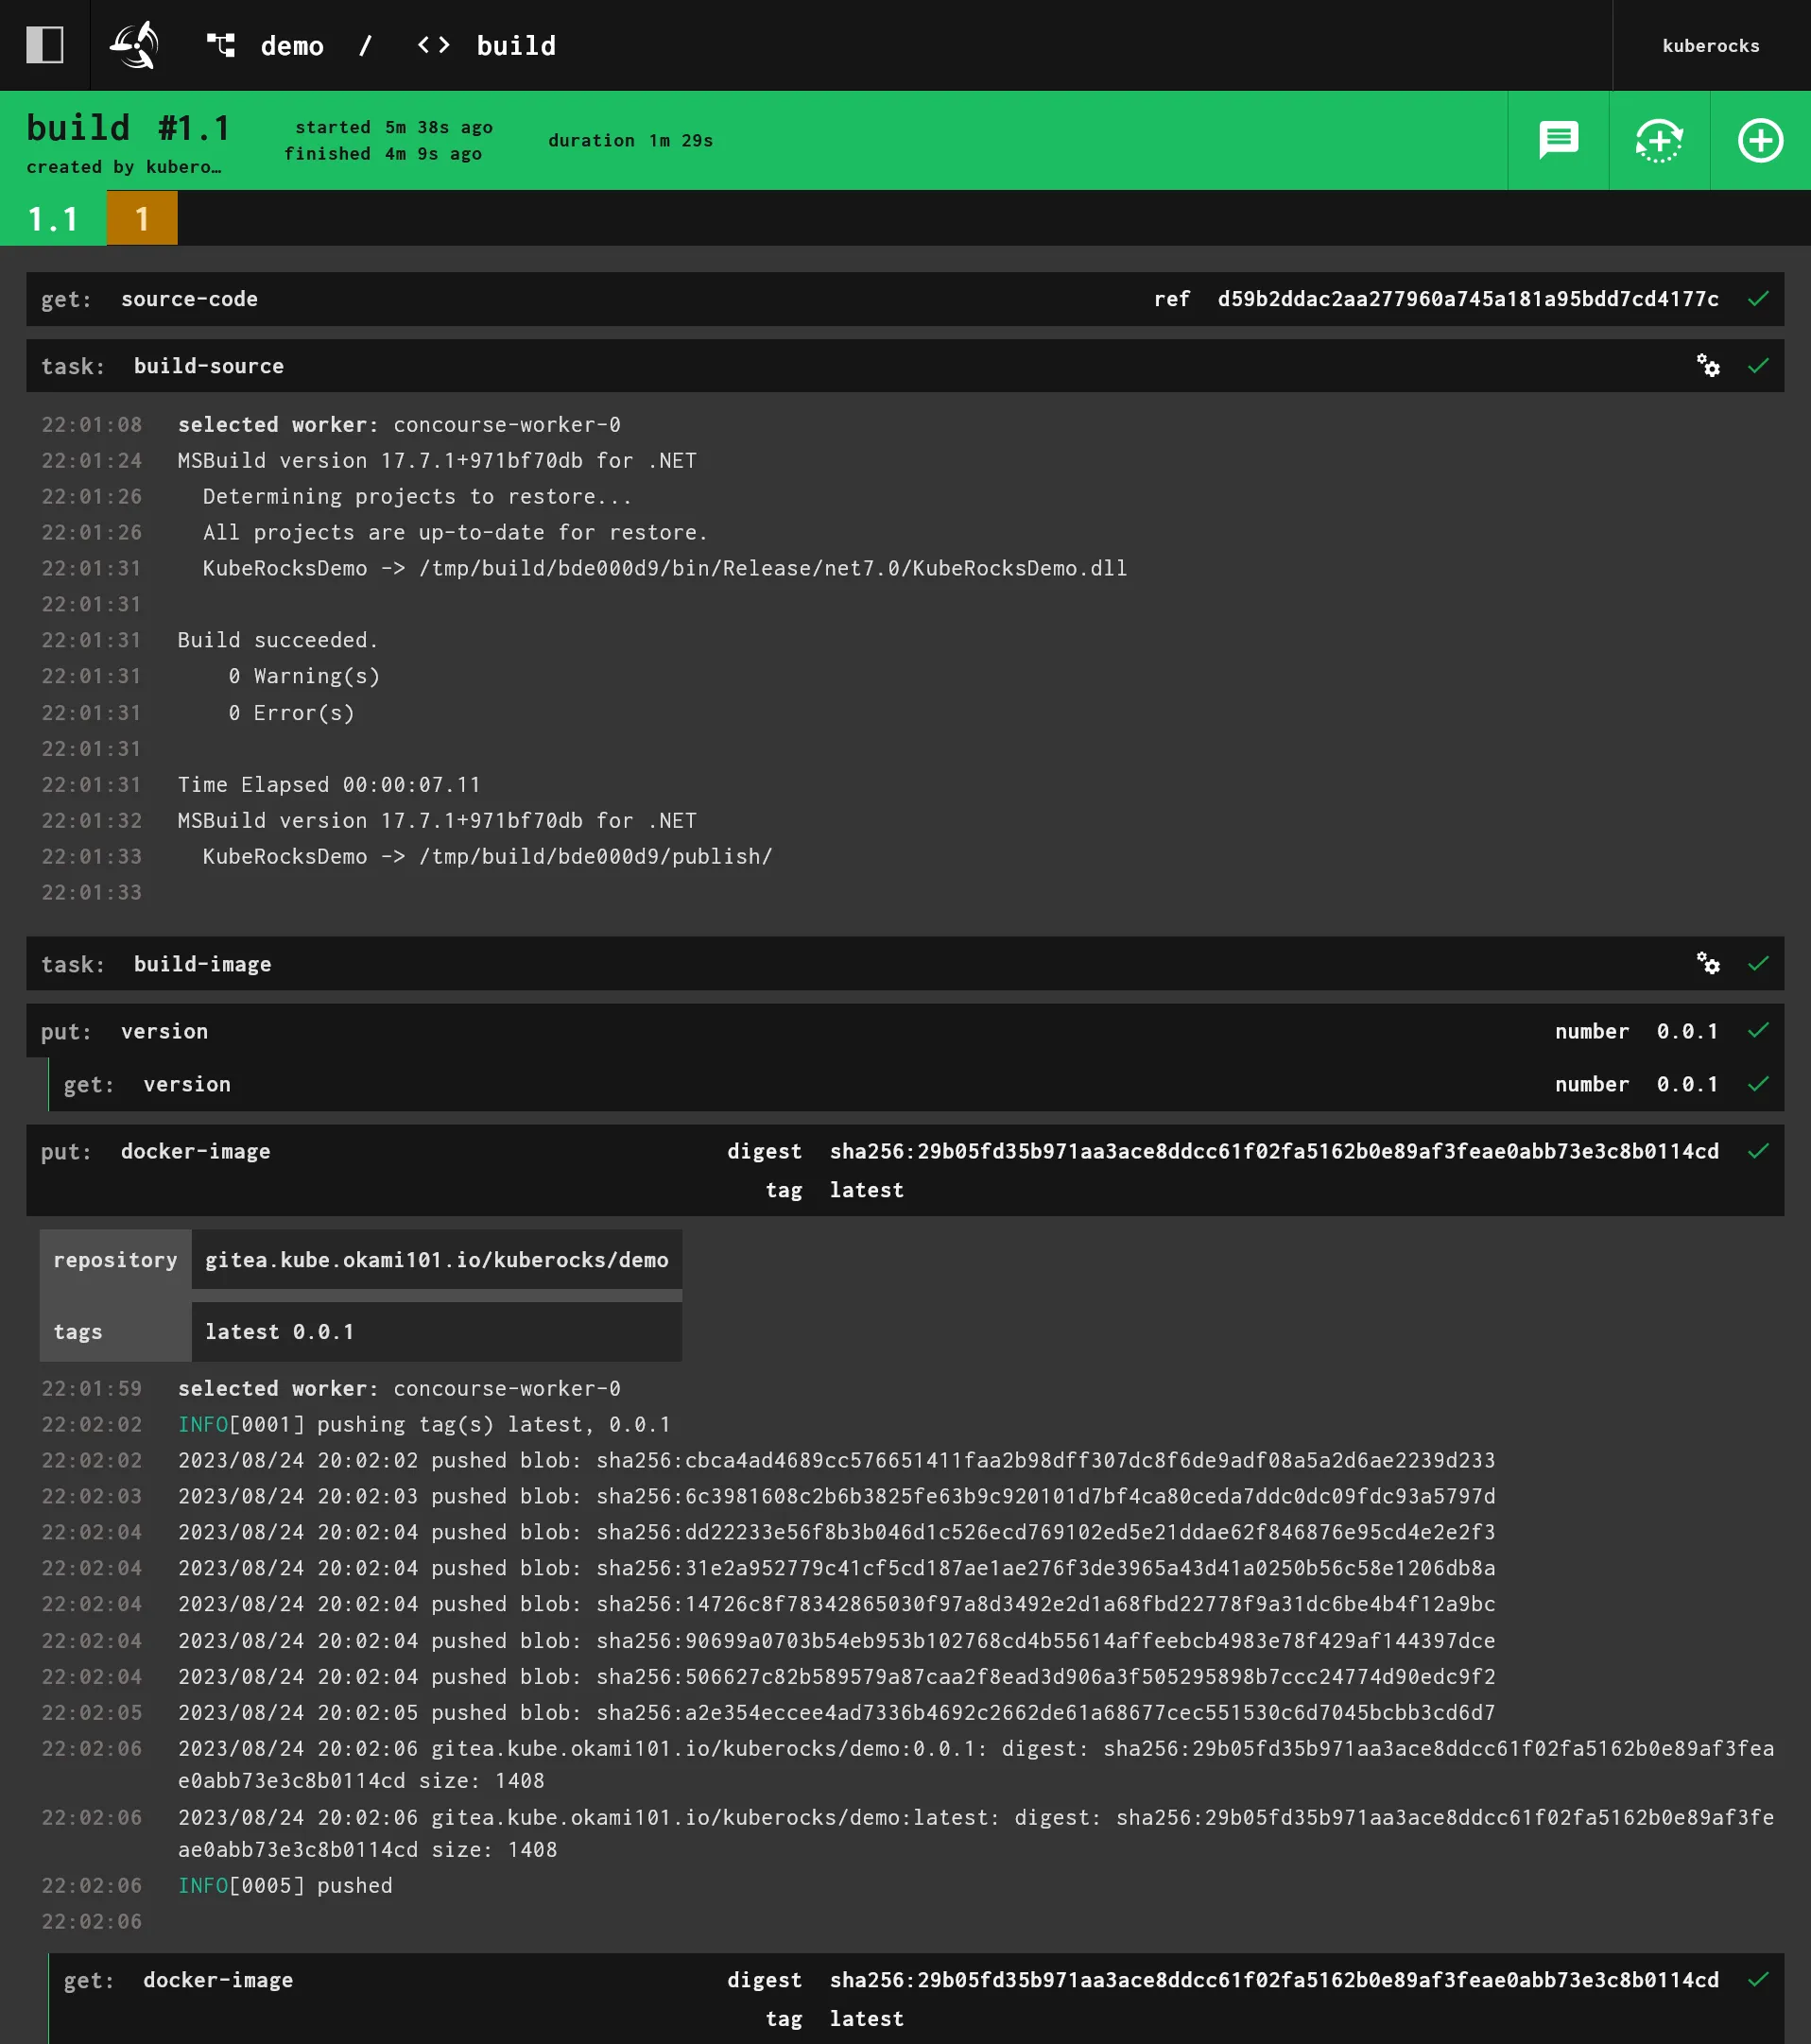
# create the pipeline and active itfly -t kuberocks set-pipeline -p demo -c pipelines/demo.yamlfly -t kuberocks unpause-pipeline -p demoA build will be trigger immediately. You can follow it on Concourse UI.
If everything is ok, check in https://gitea.kube.rocks/admin/packages, you should see a new image appear on the list ! A new file version is automatically pushed in code repo in order to keep tracking of the image tag version.
Automatic pipeline update
If you don’t want to use fly CLI every time for any pipeline update, you maybe interested in set_pipeline feature. Create following file:
resources: - name: ci type: git icon: git source: uri: https://github.com/kuberocks/demo-kube-flux
jobs: - name: configure-pipelines plan: - get: ci trigger: true - set_pipeline: demo file: ci/pipelines/demo.yamlThen apply it:
fly -t kuberocks set-pipeline -p main -c pipelines/main.yamlNow you can manually trigger the pipeline, or wait for the next check, and it will update the demo pipeline automatically. If you’re using a private repo for your pipelines, you may need to add a new secret for the git credentials and set username and password accordingly.
You almost no need of fly CLI anymore, except for adding new pipelines ! You can even go further with set_pipeline: self which is always an experimental feature.
CD part
The deployment
If you followed the previous parts of this tutorial, you should have clue about how to deploy your app. Let’s create deploy it with Flux:
apiVersion: apps/v1kind: Deploymentmetadata: name: demo namespace: kuberocksspec: replicas: 1 selector: matchLabels: app: demo template: metadata: labels: app: demo spec: imagePullSecrets: - name: dockerconfigjson containers: - name: api image: gitea.kube.rocks/kuberocks/demo:latest ports: - containerPort: 80---apiVersion: v1kind: Servicemetadata: name: demo namespace: kuberocks labels: app: demospec: selector: app: demo ports: - name: http port: 80---apiVersion: traefik.io/v1alpha1kind: IngressRoutemetadata: name: demo namespace: kuberocksspec: entryPoints: - websecure routes: - match: Host(`demo.kube.rocks`) kind: Rule services: - name: demo port: httpNote as we have set imagePullSecrets in order to use fetch previously created credentials for private registry access. The rest is pretty straightforward. Once pushed, after about 1 minute, you should see your app deployed in https://demo.kube.rocks. Check the API response on https://demo.kube.rocks/WeatherForecast.
However, one last thing is missing: the automatic deployment.
Image automation
If you checked the above flowchart, you’ll note that Image automation is a separate process from Flux that only scan the registry for new image tags and push any new tag to Flux repository. Then Flux will detect the new commit in Git repository, including the new tag, and automatically deploy it to K8s.
By default, if not any strategy is set, K8s will do a rolling deployment, i.e. creating new replica firstly before terminating the old one. This will prevent any downtime on the condition of you set as well readiness probe in your pod spec, which is a later topic.
Let’s define the image update automation task for main Flux repository:
apiVersion: image.toolkit.fluxcd.io/v1beta2kind: ImageUpdateAutomationmetadata: name: flux-system namespace: flux-systemspec: interval: 1m0s sourceRef: kind: GitRepository name: flux-system git: checkout: ref: branch: main commit: author: email: fluxcdbot@kube.rocks name: fluxcdbot messageTemplate: "{{range .Updated.Images}}{{println .}}{{end}}" push: branch: main update: path: ./clusters/demo strategy: SettersNow we need to tell Image Reflector how to scan the repository, as well as the attached policy for tag update:
apiVersion: image.toolkit.fluxcd.io/v1beta2kind: ImageRepositorymetadata: name: demo namespace: flux-systemspec: image: gitea.kube.rocks/kuberocks/demo interval: 1m0s secretRef: name: dockerconfigjson---apiVersion: image.toolkit.fluxcd.io/v1beta2kind: ImagePolicymetadata: name: demo namespace: flux-systemspec: imageRepositoryRef: name: demo namespace: flux-system policy: semver: range: 0.0.xNote
As usual, don’t forget dockerconfigjson for private registry access.
And finally edit the deployment to use the policy by adding a specific marker next to the image tag:
# ... containers: - name: api image: gitea.kube.rocks/kuberocks/demo:latest # {"$imagepolicy": "flux-system:demo"}# ...It will tell to Image Automation where to update the tag in the Flux repository. The format is {"$imagepolicy": "<policy-namespace>:<policy-name>"}.
Push the changes and wait for about 1 minute then pull the flux repo. You should see a new commit coming and latest should be replaced by an explicit tag like so:
# ... containers: - name: api image: gitea.kube.rocks/kuberocks/demo:0.0.1 # {"$imagepolicy": "flux-system:demo"}# ...Check if the pod as been correctly updated with kgpo -n kuberocks. Use kd -n kuberocks deploy/demo to check if the same tag is here and no latest.
Pod Template: Labels: app=demo Containers: api: Image: gitea.kube.rocks/kuberocks/demo:0.0.1 Port: 80/TCPRetest all workflow
Damn, I think we’re done 🎉 ! It’s time retest the full process. Add new controller endpoint from our demo project and push the code:
//...public class WeatherForecastController : ControllerBase{ //...
[HttpGet("{id}", Name = "GetWeatherForecastById")] public WeatherForecast GetById(int id) { return new WeatherForecast { Date = DateOnly.FromDateTime(DateTime.Now.AddDays(id)), TemperatureC = Random.Shared.Next(-20, 55), Summary = Summaries[Random.Shared.Next(Summaries.Length)] }; }}Wait the pod to be updated, then check the new endpoint https://demo.kube.rocks/WeatherForecast/1. The API should return a new unique random weather forecast with the tomorrow date.
7th check ✅
We have done for the set-up of our automated CI/CD workflow process. Go next part for going further with a real DB app that handle automatic migrations.