
Use GitOps workflow for building a production grade on-premise Kubernetes cluster on cheap VPS provider, with complete CI/CD 🎉
This is the Part XI of more global topic tutorial. Back to guide summary for intro.
Load testing
When it comes load testing, k6 is a perfect tool for this job and integrate with many real time series database integration like Prometheus or InfluxDB. As we already have Prometheus, let’s use it and avoid us a separate InfluxDB installation. First be sure to allow remote write by enable enableRemoteWriteReceiver in the Prometheus Helm chart. It should be already done if you follow this tutorial.
K6
We’ll reuse our flux repo and add some manifests for defining the load testing scenario. Firstly describe the scenario inside ConfigMap that scrape all articles and then each article:
apiVersion: v1kind: ConfigMapmetadata: name: scenario namespace: kuberocksdata: script.js: | import http from "k6/http"; import { check } from "k6";
export default function () { const size = 10; let page = 1;
let articles = []
do { const res = http.get(`${__ENV.API_URL}/Articles?page=${page}&size=${size}`); check(res, { "status is 200": (r) => r.status == 200, });
articles = res.json().articles; page++;
articles.forEach((article) => { const res = http.get(`${__ENV.API_URL}/Articles/${article.slug}`); check(res, { "status is 200": (r) => r.status == 200, }); }); } while (articles.length > 0); }Finally, add the k6 Job in the same file and configure it for Prometheus usage and mounting above scenario:
#...---apiVersion: batch/v1kind: Jobmetadata: name: k6 namespace: kuberocksspec: ttlSecondsAfterFinished: 0 template: spec: restartPolicy: Never containers: - name: run image: grafana/k6 env: - name: API_URL value: https://demo.kube.rocks/api - name: K6_VUS value: "30" - name: K6_DURATION value: 1m - name: K6_PROMETHEUS_RW_SERVER_URL value: http://prometheus-operated.monitoring:9090/api/v1/write command: ["k6", "run", "-o", "experimental-prometheus-rw", "script.js"] volumeMounts: - name: scenario mountPath: /home/k6 tolerations: - key: node-role.kubernetes.io/runner operator: Exists effect: NoSchedule nodeSelector: node-role.kubernetes.io/runner: "true" volumes: - name: scenario configMap: name: scenarioUse appropriate tolerations and nodeSelector for running the load testing in a node which have free CPU resource. You can play with K6_VUS and K6_DURATION environment variables in order to change the level of load testing.
Then you can launch the job with ka jobs/demo-k6.yaml. Check quickly that the job is running via klo -n kuberocks job/k6:
/\ |‾‾| /‾‾/ /‾‾/ /\ / \ | |/ / / / / \/ \ | ( / ‾‾\ / \ | |\ \ | (‾) |/ __________ \ |__| \__\ \_____/ .io
execution: local script: script.js output: Prometheus remote write (http://prometheus-operated.monitoring:9090/api/v1/write)
scenarios: (100.00%) 1 scenario, 30 max VUs, 1m30s max duration (incl. graceful stop): * default: 30 looping VUs for 1m0s (gracefulStop: 30s)After 1 minute of run, job should finish and show some raw result:
✓ status is 200
checks.........................: 100.00% ✓ 17748 ✗ 0data_received..................: 404 MB 6.3 MB/sdata_sent......................: 1.7 MB 26 kB/shttp_req_blocked...............: avg=242.43µs min=223ns med=728ns max=191.27ms p(90)=1.39µs p(95)=1.62µshttp_req_connecting............: avg=13.13µs min=0s med=0s max=9.48ms p(90)=0s p(95)=0shttp_req_duration..............: avg=104.22ms min=28.9ms med=93.45ms max=609.86ms p(90)=162.04ms p(95)=198.93ms { expected_response:true }...: avg=104.22ms min=28.9ms med=93.45ms max=609.86ms p(90)=162.04ms p(95)=198.93mshttp_req_failed................: 0.00% ✓ 0 ✗ 17748http_req_receiving.............: avg=13.76ms min=32.71µs med=6.49ms max=353.13ms p(90)=36.04ms p(95)=51.36mshttp_req_sending...............: avg=230.04µs min=29.79µs med=93.16µs max=25.75ms p(90)=201.92µs p(95)=353.61µshttp_req_tls_handshaking.......: avg=200.57µs min=0s med=0s max=166.91ms p(90)=0s p(95)=0shttp_req_waiting...............: avg=90.22ms min=14.91ms med=80.76ms max=609.39ms p(90)=138.3ms p(95)=169.24mshttp_reqs......................: 17748 276.81409/siteration_duration.............: avg=5.39s min=3.97s med=5.35s max=7.44s p(90)=5.94s p(95)=6.84siterations.....................: 348 5.427727/svus............................: 7 min=7 max=30vus_max........................: 30 min=30 max=30As we use Prometheus for outputting the result, we can visualize it easily with Grafana. You just have to import this dashboard:
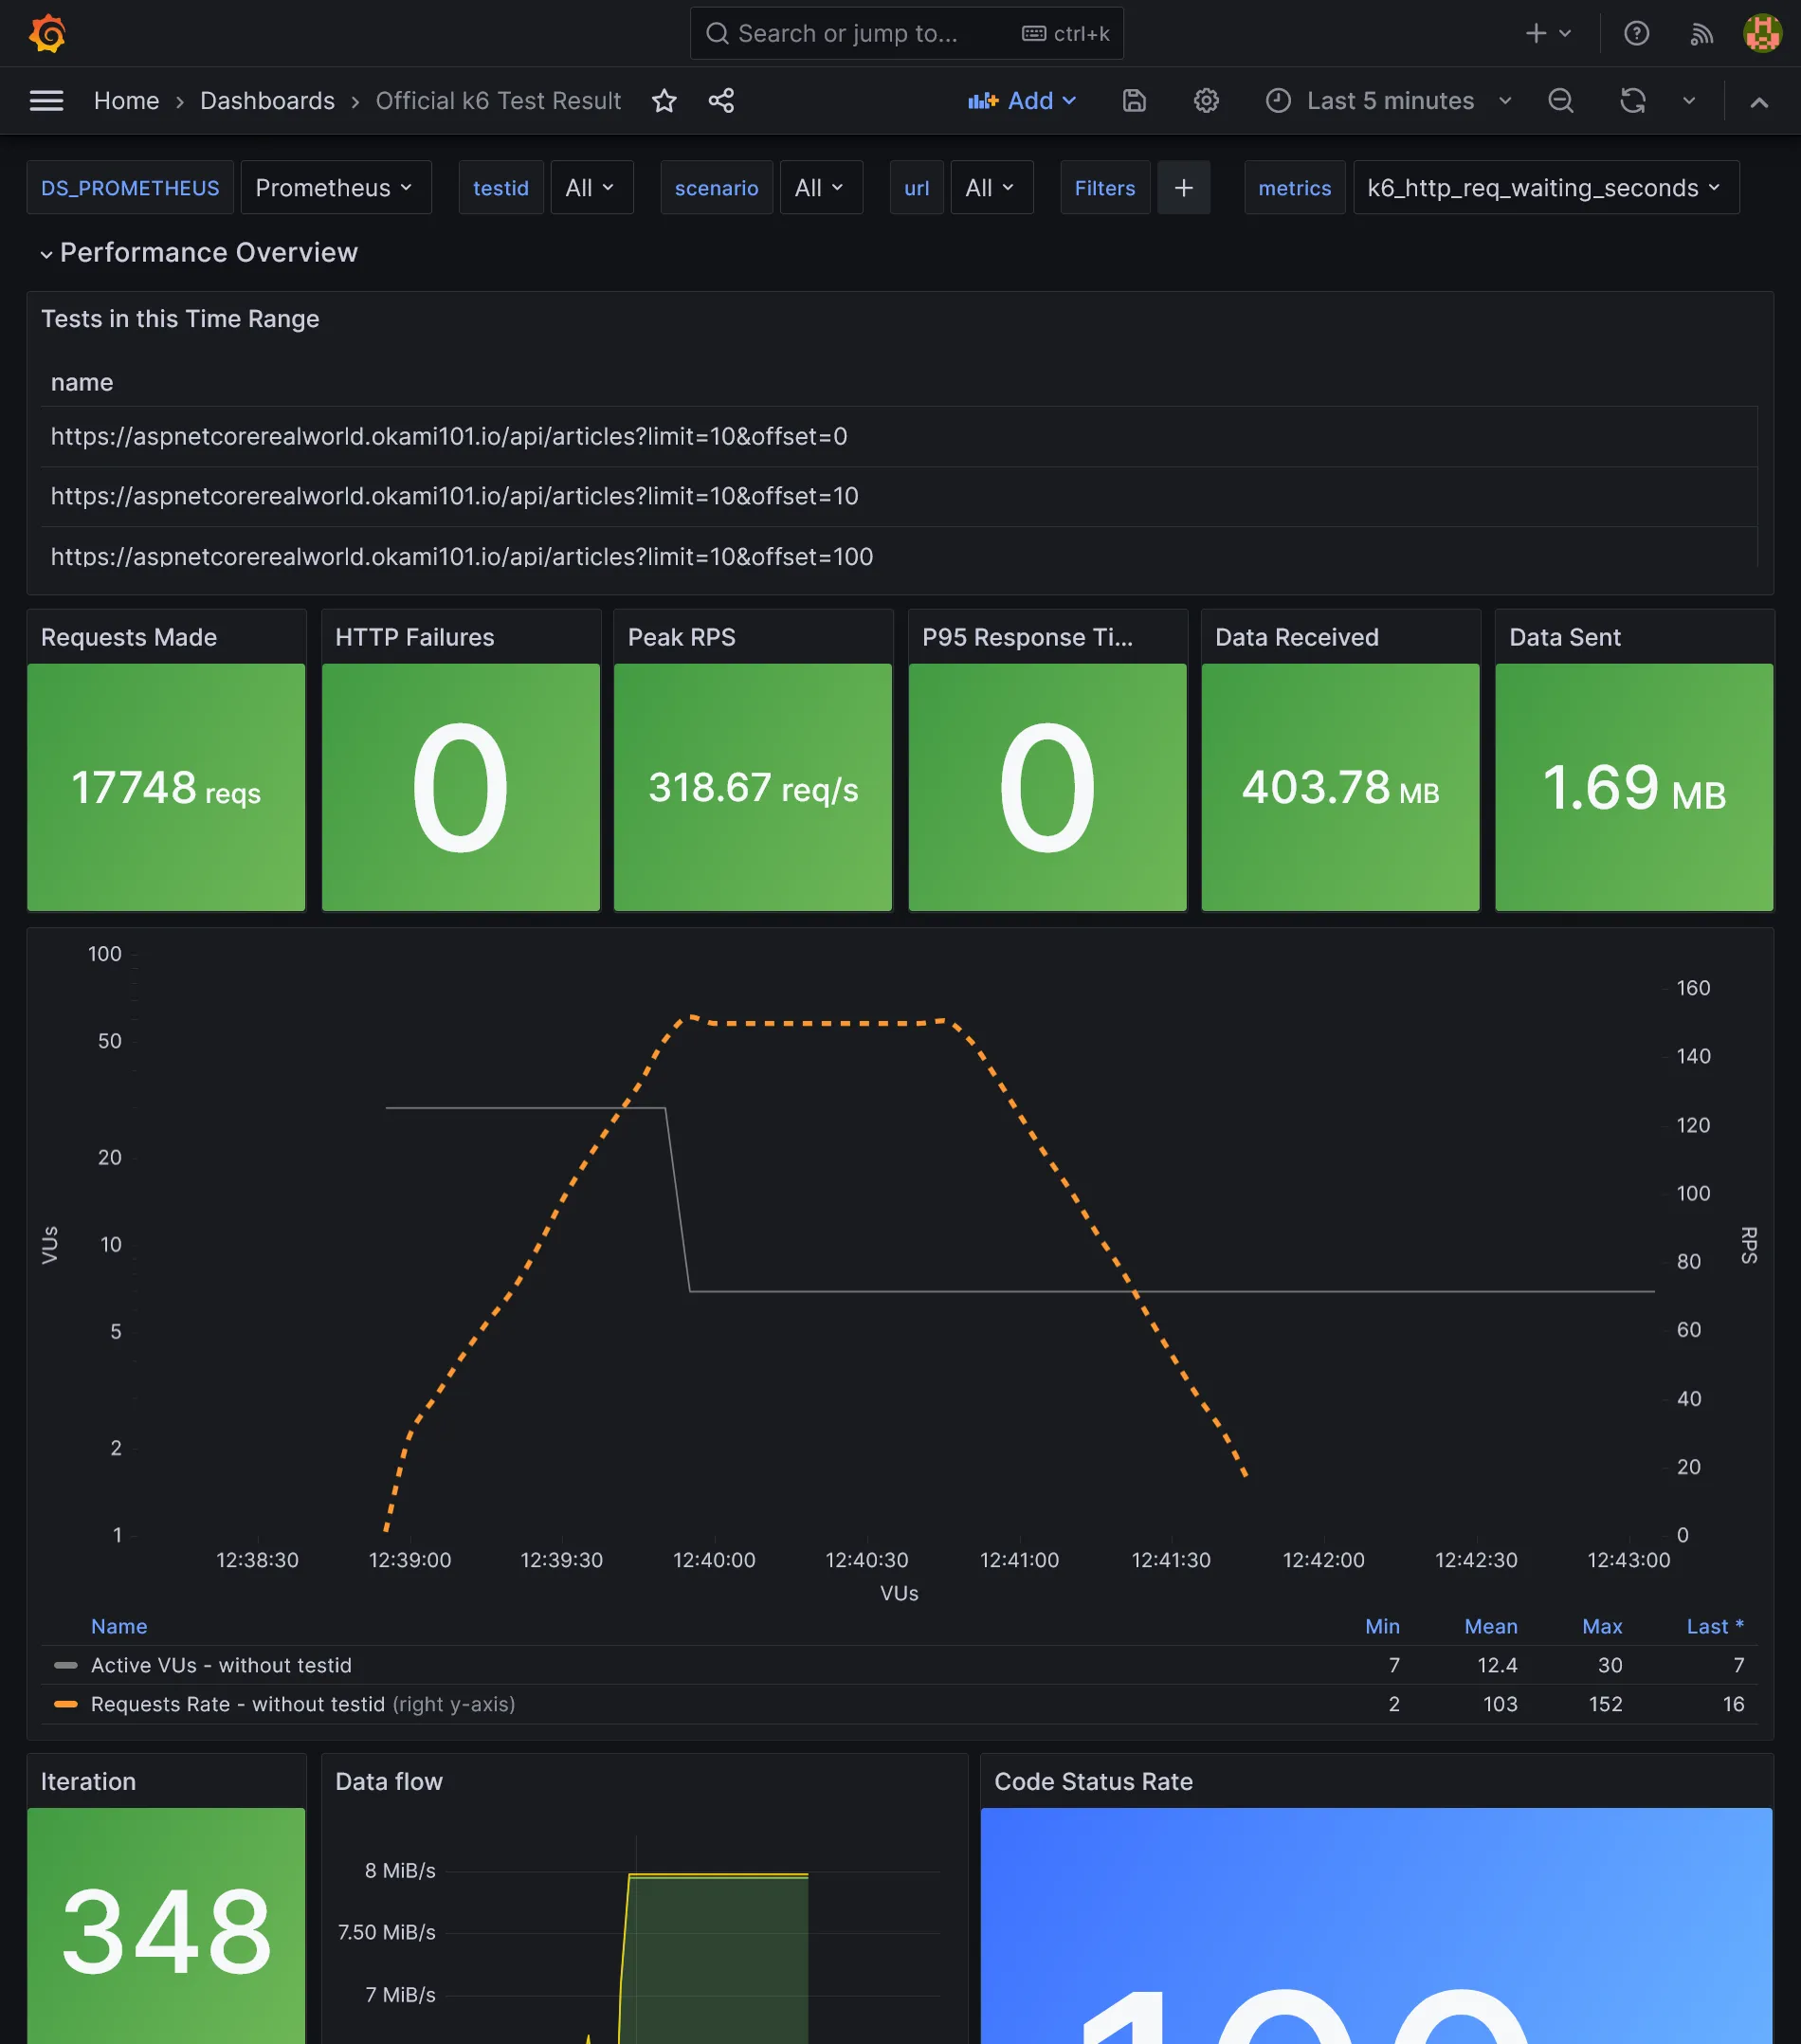
As we use Kubernetes, increase the loading performance horizontally is dead easy. Go to the deployment configuration of demo app for increasing replicas count, as well as Traefik, and compare the results.
Load balancing database
So far, we only load balanced the stateless API, but what about the database part ? We have set up a replicated PostgreSQL cluster, however we have no use of the replica that stay sadly idle. But for that we have to distinguish write queries from scalable read queries.
We can make use of the Bitnami PostgreSQL HA instead of simple one. It adds the new component Pgpool-II as main load balancer and detect failover. It’s able to separate in real time write queries from read queries and send them to the master or the replica. The pros: works natively for all apps without any changes. The cons: it consumes far more resources and add a new component to maintain.
A 2nd solution is to separate query typologies from where it counts: the application. It requires some code changes, but it’s clearly a far more efficient solution. Let’s do this way.
As Npgsql support load balancing natively, we don’t need to add any Kubernetes service. We just have to create a clear distinction between read and write queries. One simple way is to create a separate RO DbContext.
namespace KubeRocks.Application.Contexts;
using KubeRocks.Application.Entities;
using Microsoft.EntityFrameworkCore;
public class AppRoDbContext : DbContext{ public DbSet<User> Users => Set<User>(); public DbSet<Article> Articles => Set<Article>(); public DbSet<Comment> Comments => Set<Comment>();
public AppRoDbContext(DbContextOptions<AppRoDbContext> options) : base(options) { }}Register it in DI:
public static class ServiceExtensions{ public static IServiceCollection AddKubeRocksServices(this IServiceCollection services, IConfiguration configuration) { return services //... .AddDbContext<AppRoDbContext>((options) => { options.UseNpgsql( configuration.GetConnectionString("DefaultRoConnection") ?? configuration.GetConnectionString("DefaultConnection") ); }); }}We fall back to the RW connection string if the RO one is not defined. Then use it in the ArticlesController which has only read endpoints:
//...
public class ArticlesController{ private readonly AppRoDbContext _context;
//...
public ArticlesController(AppRoDbContext context) { _context = context; }
//...}Push and let it pass the CI. In the meantime, add the new RO connection:
# ...spec: # ... template: # ... spec: # ... containers: - name: api # ... env: - name: DB_PASSWORD valueFrom: secretKeyRef: name: demo-db key: password - name: ConnectionStrings__DefaultConnection value: Host=postgresql-primary.postgres;Username=demo;Password='$(DB_PASSWORD)';Database=demo; - name: ConnectionStrings__DefaultRoConnection value: Host=postgresql-primary.postgres,postgresql-read.postgres;Username=demo;Password='$(DB_PASSWORD)';Database=demo;Load Balance Hosts=true;#...We simply have to add multiple hosts like postgresql-primary.postgres,postgresql-read.postgres for the RO connection string and enable LB mode with Load Balance Hosts=true.
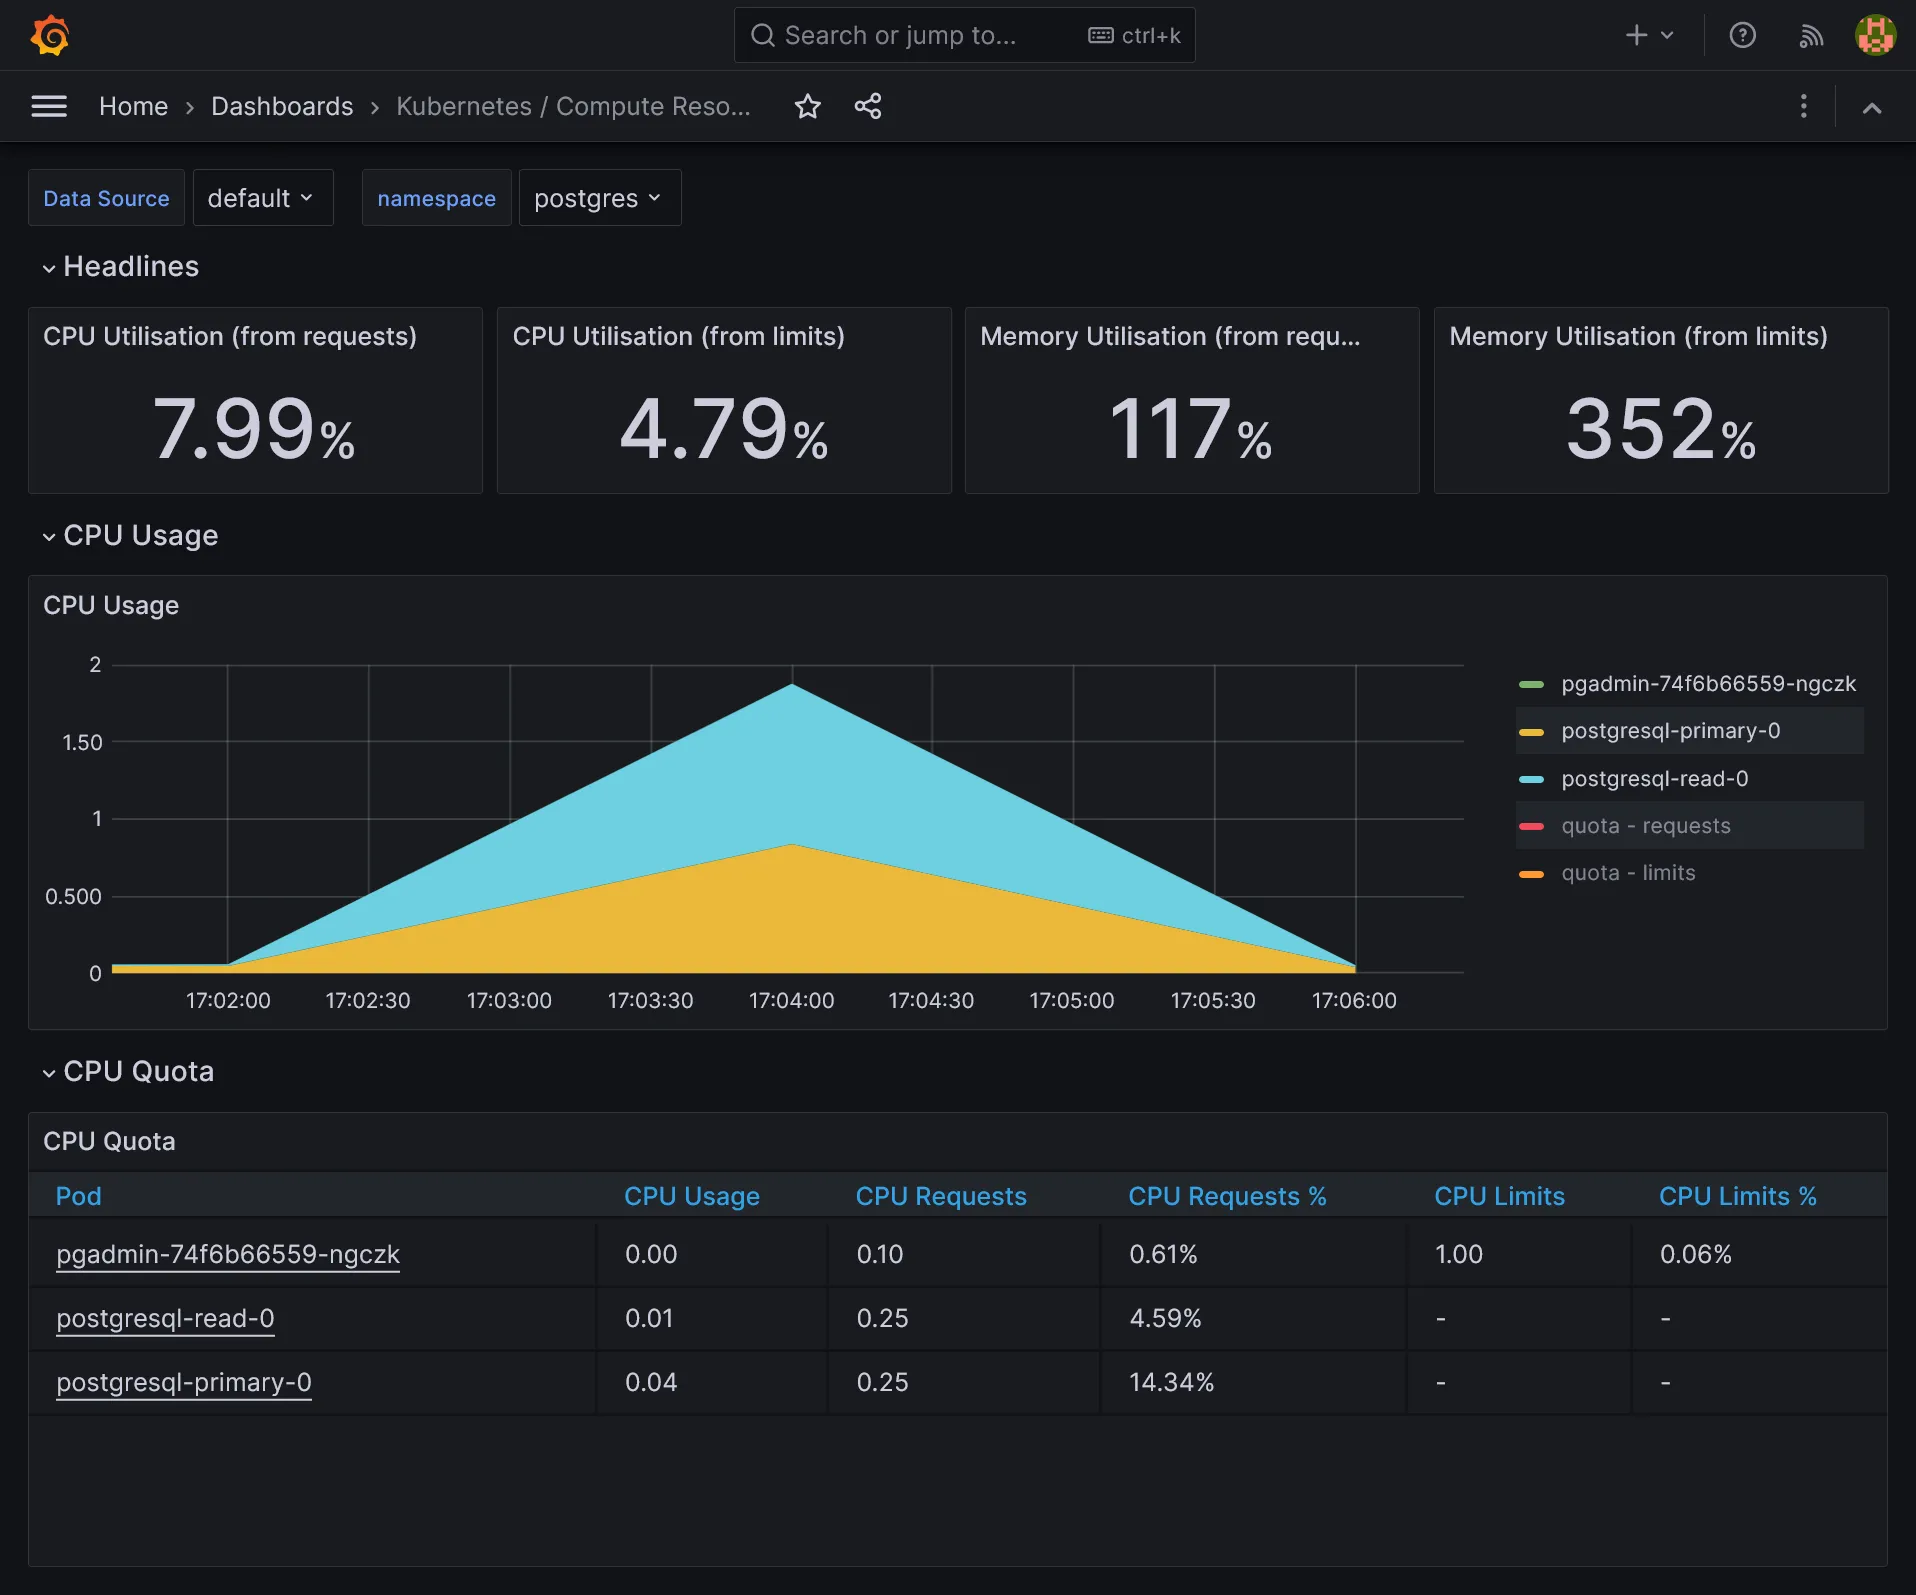
Once deployed, relaunch a load test with K6 and admire the DB load balancing in action on both storage servers with htop or directly on compute pods by namespace dashboard in Grafana.
Frontend
Let’s finish this guide by a quick view of SPA frontend development as a separate project from backend.
Vue TS
Create a new Vue.js project from vitesse starter kit (be sure to have pnpm, just a matter of scoop/brew install pnpm):
npx degit antfu/vitesse-lite kuberocks-demo-uicd kuberocks-demo-uigit initgit add .git commit -m "Initial commit"pnpm ipnpm devShould launch app in http://localhost:3333/. Create a new kuberocks-demo-ui Gitea repo and push this code into it. Now lets quick and done for API calls.
Get around CORS and HTTPS with YARP
As always when frontend is separated from backend, we have to deal with CORS. But I prefer to have one single URL for frontend + backend and get rid of CORS problem by simply call under /api path. Moreover, it’ll be production ready without need to manage any Vite variable for API URL and we’ll get HTTPS provided by dotnet. Back to API project.
For convenience, let’s change the randomly generated ASP.NET ports by predefined ones:
{ //... "profiles": { "http": { //... "applicationUrl": "http://localhost:5000", //... }, "https": { //... "applicationUrl": "https://localhost:5001;http://localhost:5000", //... }, //... }}dotnet add src/KubeRocks.WebApi package Yarp.ReverseProxy//...
var builder = WebApplication.CreateBuilder(args);
builder.Services.AddReverseProxy() .LoadFromConfig(builder.Configuration.GetSection("ReverseProxy"));
//...
var app = builder.Build();
app.MapReverseProxy();
//...
app.UseRouting();
//...Note as we must add app.UseRouting(); too in order to get Swagger UI working.
The proxy configuration (only for development):
{ //... "ReverseProxy": { "Routes": { "ServerRouteApi": { "ClusterId": "Server", "Match": { "Path": "/api/{**catch-all}" }, "Transforms": [ { "PathRemovePrefix": "/api" } ] }, "ClientRoute": { "ClusterId": "Client", "Match": { "Path": "{**catch-all}" } } }, "Clusters": { "Client": { "Destinations": { "Client1": { "Address": "http://localhost:3333" } } }, "Server": { "Destinations": { "Server1": { "Address": "https://localhost:5001" } } } } }}Now your frontend app should appear under https://localhost:5001, and API calls under https://localhost:5001/api. We now benefit from HTTPS for all app. Push API code.
Typescript API generator
As we use OpenAPI, it’s possible to generate typescript client for API calls. Before tackle the generation of client models, go back to backend for forcing required by default for attributes when not nullable when using Swashbuckle.AspNetCore:
using Microsoft.OpenApi.Models;
using Swashbuckle.AspNetCore.SwaggerGen;
namespace KubeRocks.WebApi.Filters;
public class RequiredNotNullableSchemaFilter : ISchemaFilter{ public void Apply(OpenApiSchema schema, SchemaFilterContext context) { if (schema.Properties is null) { return; }
var notNullableProperties = schema .Properties .Where(x => !x.Value.Nullable && !schema.Required.Contains(x.Key)) .ToList();
foreach (var property in notNullableProperties) { schema.Required.Add(property.Key); } }}//...
builder.Services.AddSwaggerGen(o =>{ o.SupportNonNullableReferenceTypes(); o.SchemaFilter<RequiredNotNullableSchemaFilter>();});
//...You should now have proper required attributes for models in swagger UI:
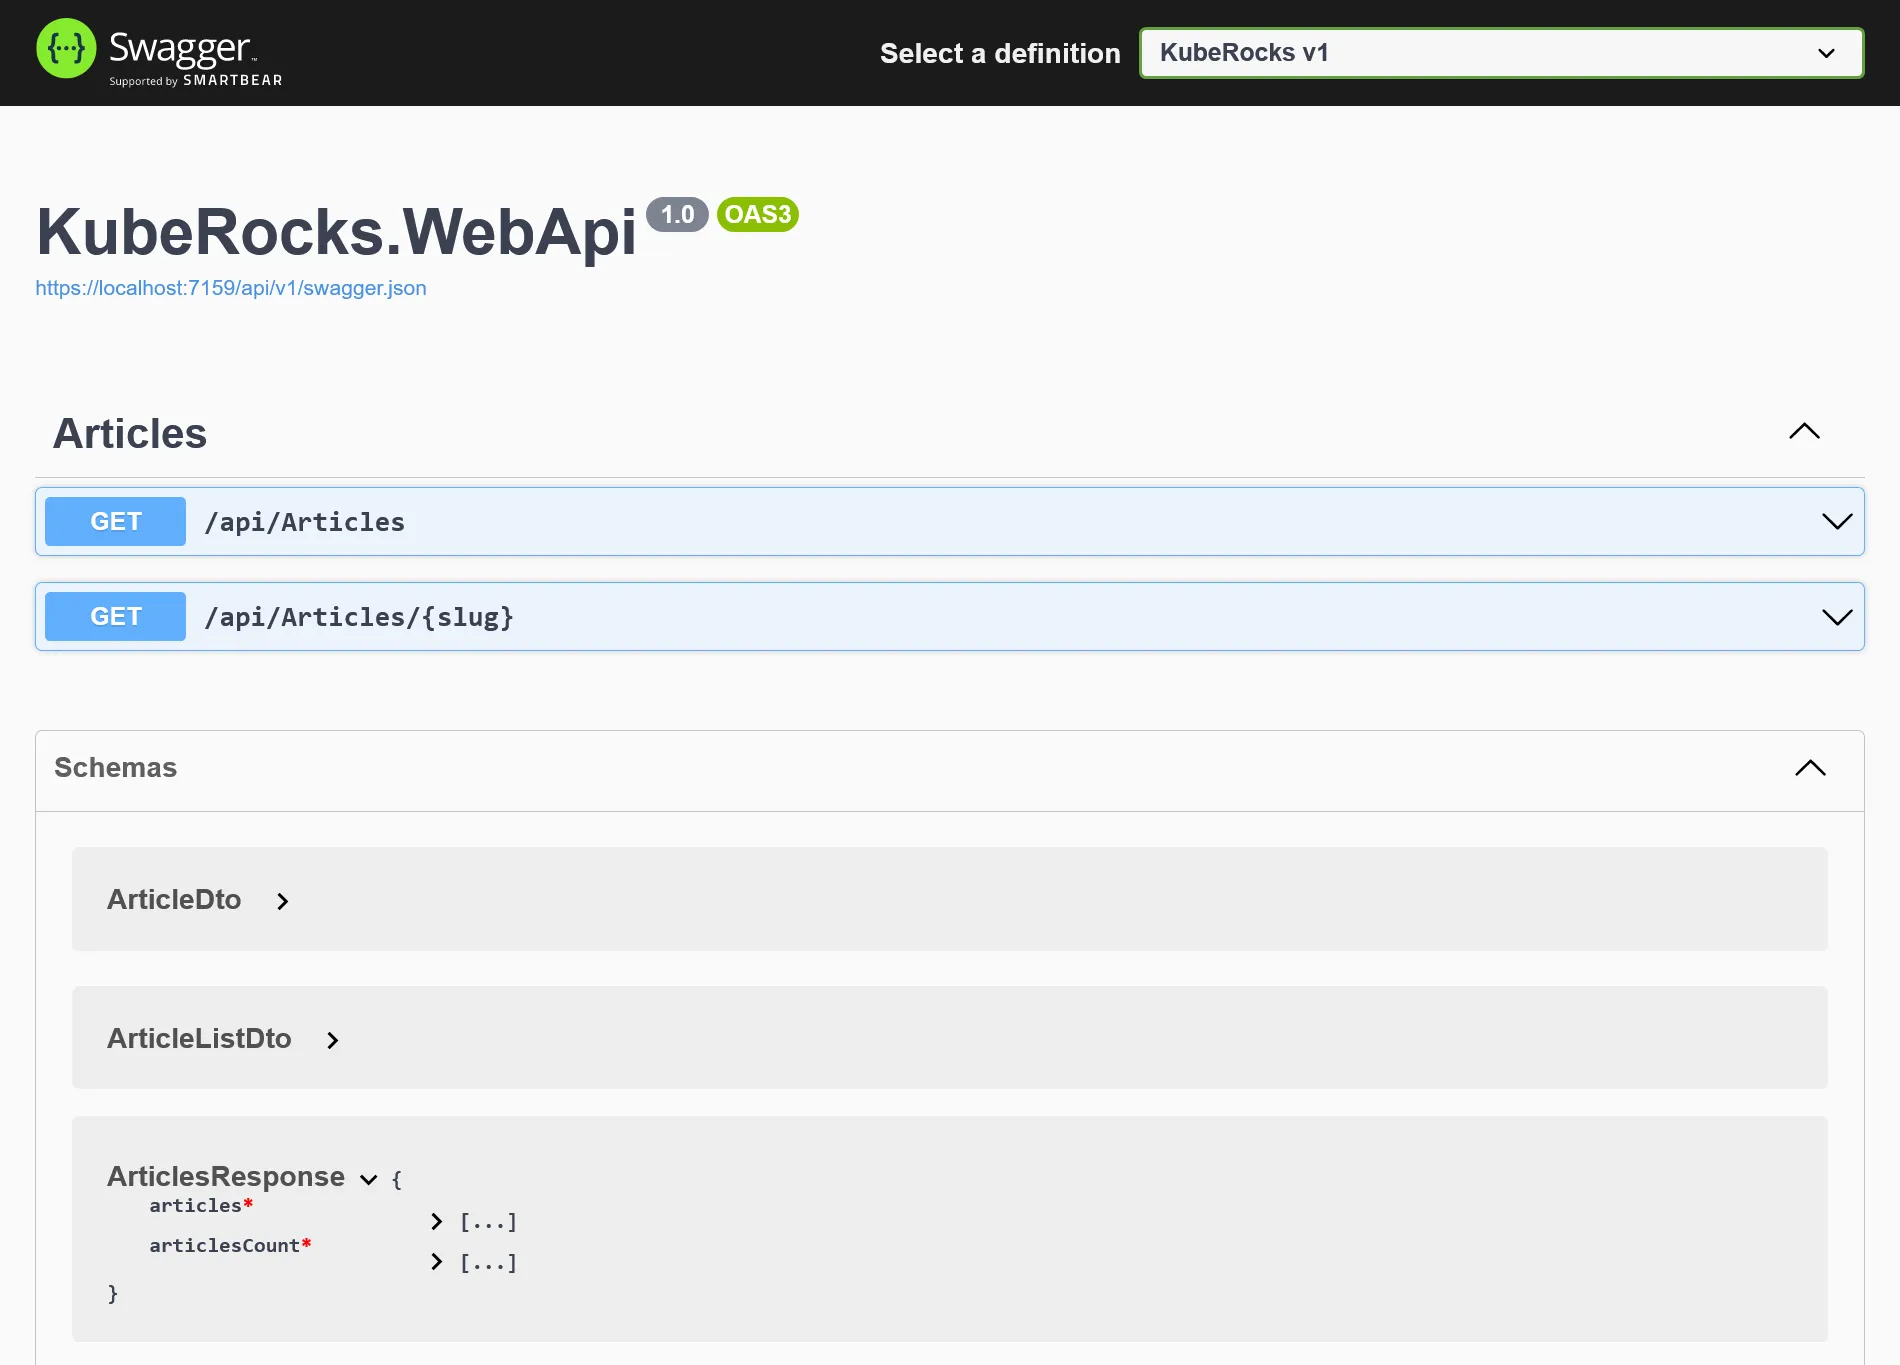
Note
Sadly, without this boring step, many attributes will be nullable when generating TypeScript models, and leads to headaches from client side by forcing us to manage nullable everywhere.
Now back to the kubrerocks-demo-ui project and add the following dependencies:
pnpm add openapi-typescript -Dpnpm add openapi-typescript-fetchNow generate the models by adding this script:
{ //... "scripts": { //... "openapi": "openapi-typescript http://localhost:5000/api/v1/swagger.json --output src/api/openapi.ts" }, //...}Use the HTTP version of swagger as you’ll get a self certificate error. Then use pnpm openapi to generate full TS model. Finally, describe API fetchers like so:
import { Fetcher } from 'openapi-typescript-fetch'
import type { components, paths } from './openapi'
const fetcher = Fetcher.for<paths>()
type ArticleList = components['schemas']['ArticleListDto']type Article = components['schemas']['ArticleDto']
const getArticles = fetcher.path('/api/Articles').method('get').create()const getArticleBySlug = fetcher.path('/api/Articles/{slug}').method('get').create()
export type { Article, ArticleList }export { getArticles, getArticleBySlug,}We are now fully typed compliant with the API.
Call the API
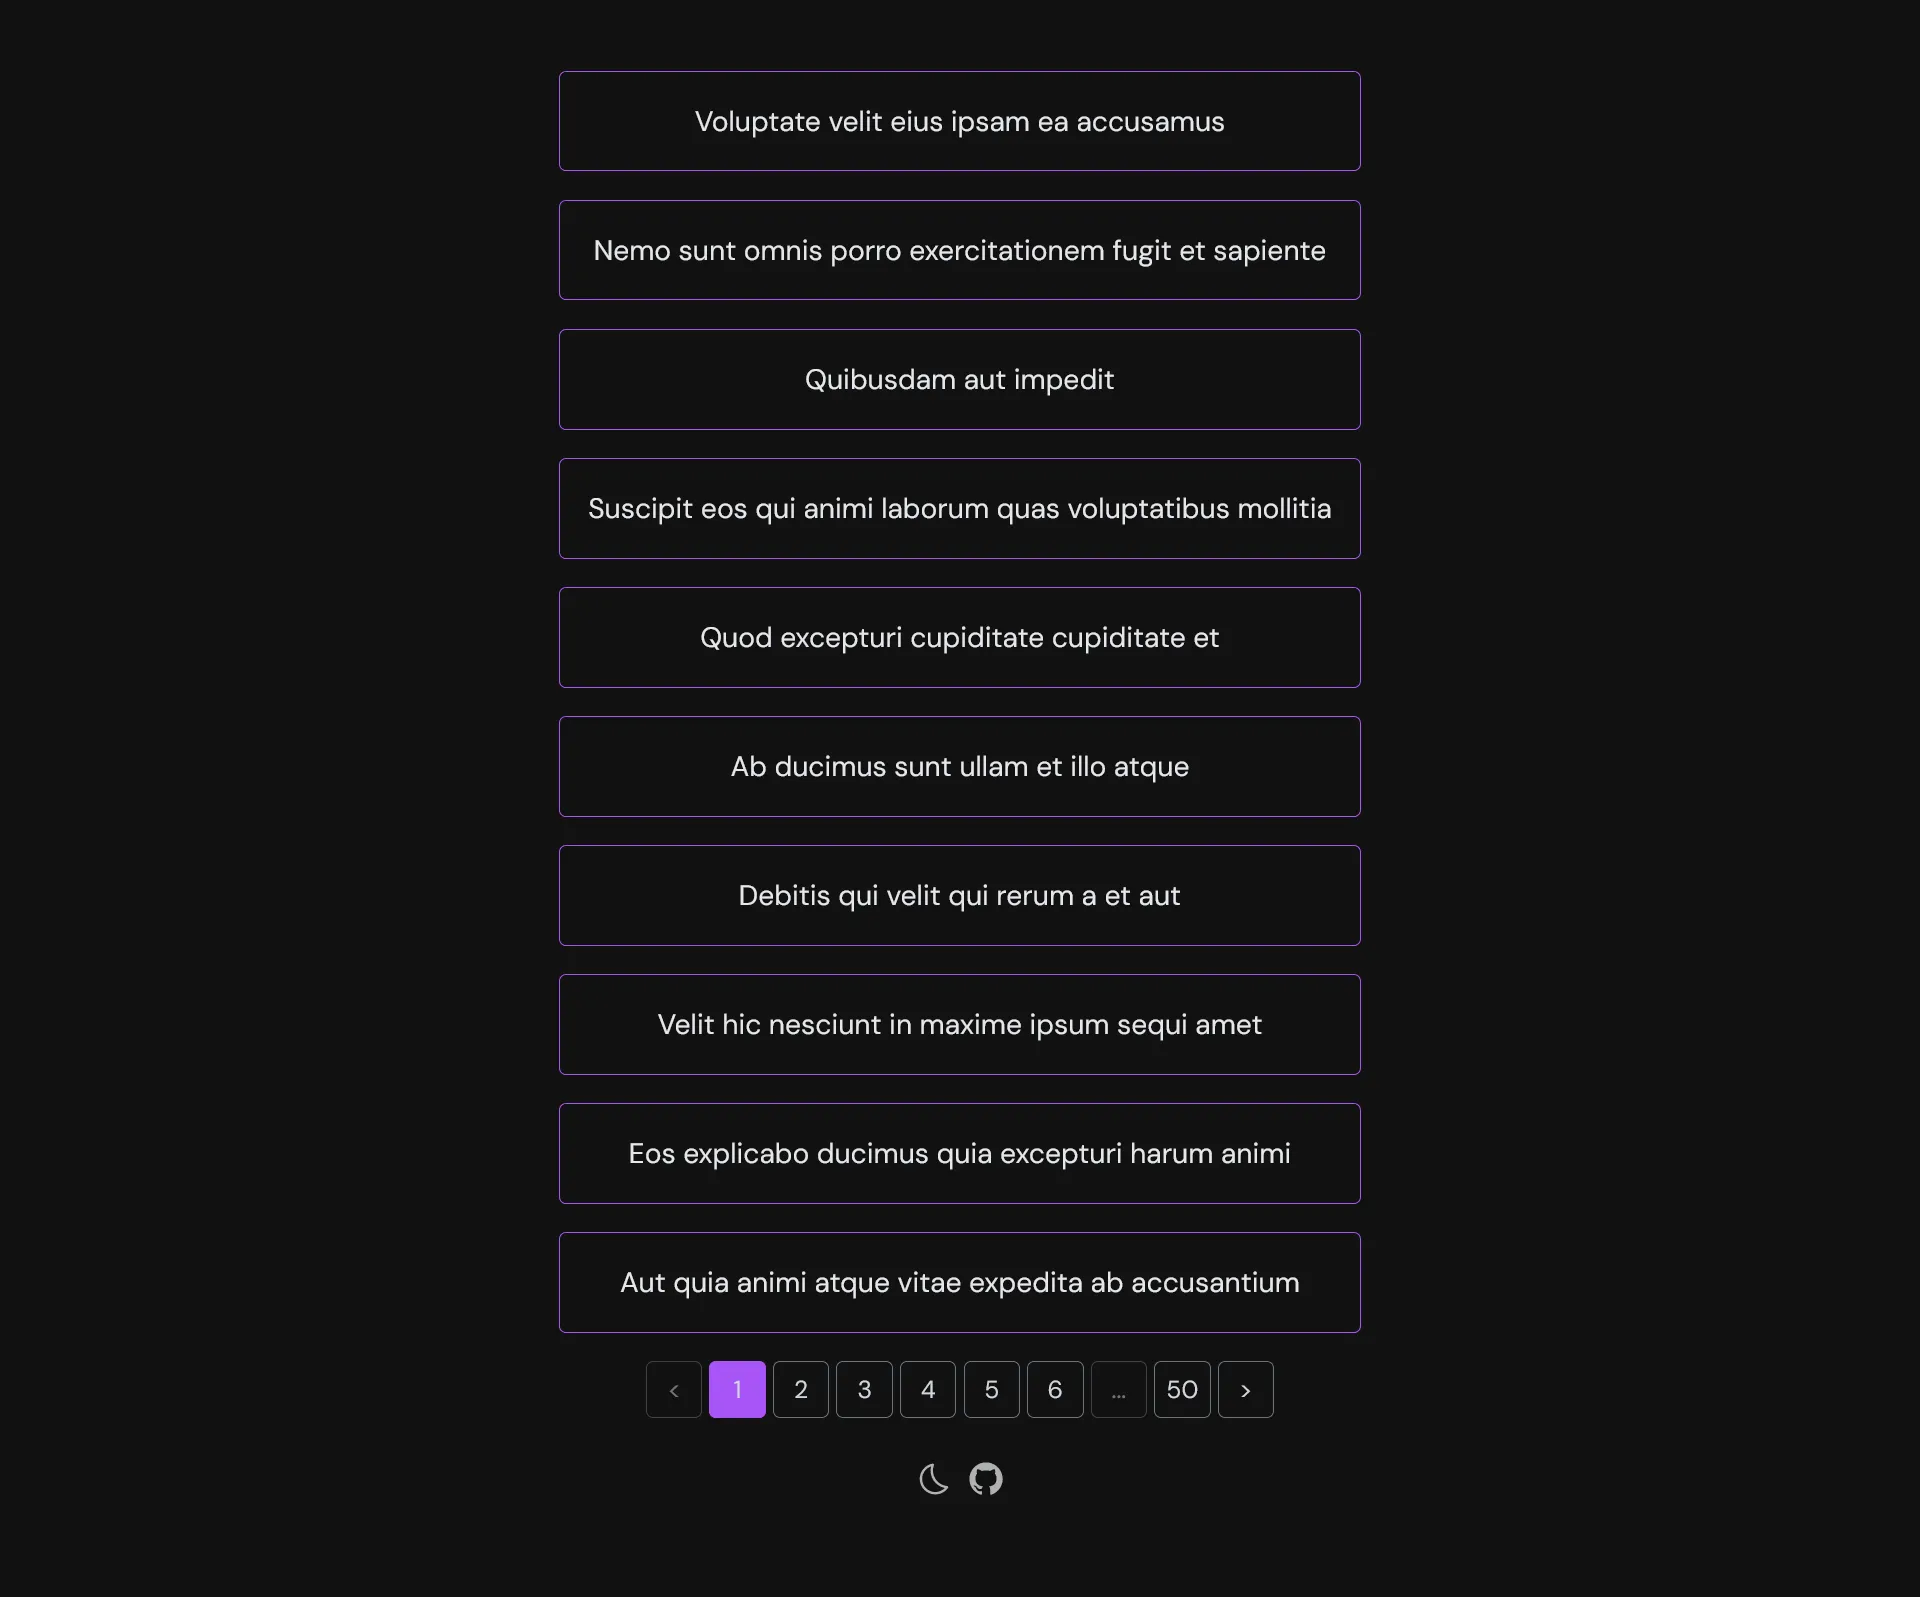
Let’s create a pretty basic paginated list and detail vue pages:
<script lang="ts" setup>import { getArticles } from '~/api'import type { ArticleList } from '~/api'
const articles = ref<ArticleList[]>([])const articlesCount = ref<number>(0)
const page = ref<number>(1)const size = ref<number>(10)
async function loadArticles() { const { data } = await getArticles({ page: page.value, size: size.value, })
articles.value = data.articles articlesCount.value = data.articlesCount}
function fetchDataOnPage({ currentPage }: { currentPage: number }) { page.value = currentPage loadArticles()}
loadArticles()</script>
<template> <div inline-flex flex-col gap-4> <RouterLink v-for="(article, i) in articles" :key="i" :to="`/articles/${article.slug}`" inline-block border-1 border-purple-500 rounded p-4 > <h3>{{ article.title }}</h3> </RouterLink> </div>
<div mt-4 flex justify-center> <OffsetPagination :page="page" :size="size" :total="articlesCount" :fetch-data="fetchDataOnPage" /> </div></template>The reusable pagination component that use useOffsetPagination from VueUse:
<script lang="ts" setup>const props = defineProps<{ total: number size: number page: number fetchData: ({ currentPage }: { currentPage: number }) => Promise<void> | void}>()
const pagination = computed(() => useOffsetPagination({ total: props.total, page: props.page, pageSize: props.size, onPageChange: props.fetchData, onPageSizeChange: props.fetchData, }),)
function usePagesBuilder(currentPage: number, pageCount: number) { const pages = [] const maxPages = 5 const half = Math.floor(maxPages / 2) const start = Math.max(currentPage - half, 1) const end = Math.min(start + maxPages, pageCount)
for (let i = start; i <= end; i++) pages.push(i)
if (start > 1) { pages.unshift('...') pages.unshift(1) }
if (end < pageCount) { pages.push('...') pages.push(pageCount) }
return pages}
const classes = 'flex items-center justify-center border rounded-1 text-sm font-sans text-gray-300 border-gray-500 w-8 h-8'</script>
<template> <div flex flex-wrap gap-1> <button :disabled="pagination.isFirstPage.value" :class="[ classes, { 'opacity-50': pagination.isFirstPage.value, }, ]" @click="pagination.prev" > < </button> <button v-for="item in usePagesBuilder( pagination.currentPage.value, pagination.pageCount.value, )" :key="item" :disabled=" pagination.currentPage.value === item || !Number.isInteger(item) " :class="[ classes, { 'opacity-50': !Number.isInteger(item), 'text-white border-purple-500 bg-purple-500': pagination.currentPage.value === item, }, ]" @click="pagination.currentPage.value = Number(item)" > {{ item }} </button> <button :disabled="pagination.isLastPage.value" :class="[ classes, { 'opacity-50': pagination.isLastPage.value, }, ]" @click="pagination.next" > > </button> </div></template>The view detail:
<script lang="ts" setup>import { getArticleBySlug } from '~/api'import type { Article } from '~/api'
const props = defineProps<{ slug: string }>()
const article = ref<Article>()
const router = useRouter()
async function getArticle() { const { data } = await getArticleBySlug({ slug: props.slug })
article.value = data}
getArticle()</script>
<template> <div v-if="article"> <h1 mb-6 text-2xl font-bold> {{ article.title }} </h1> <p mb-4 italic> {{ article.description }} </p> <div prose v-html="article.body" /> <div> <button m-3 mt-8 text-sm btn @click="router.back()"> Back </button> </div> </div></template>Frontend CI/CD
The CI frontend is far simpler than backend. Create a new demo-ui pipeline:
resources: - name: version type: semver source: driver: git uri: ((git.url))/kuberocks/demo-ui branch: main file: version username: ((git.username)) password: ((git.password)) git_user: ((git.git-user)) commit_message: ((git.commit-message)) - name: source-code type: git icon: coffee source: uri: ((git.url))/kuberocks/demo-ui branch: main username: ((git.username)) password: ((git.password)) - name: docker-image type: registry-image icon: docker source: repository: ((registry.name))/kuberocks/demo-ui tag: latest username: ((registry.username)) password: ((registry.password))
jobs: - name: build plan: - get: source-code trigger: true
- task: build-source config: platform: linux image_resource: type: registry-image source: repository: node tag: 18-buster inputs: - name: source-code path: . outputs: - name: dist path: dist caches: - path: .pnpm-store run: path: /bin/sh args: - -ec - | corepack enable corepack prepare pnpm@latest-8 --activate pnpm config set store-dir .pnpm-store pnpm i pnpm lint pnpm build
- task: build-image privileged: true config: platform: linux image_resource: type: registry-image source: repository: concourse/oci-build-task inputs: - name: source-code path: . - name: dist path: dist outputs: - name: image run: path: build - put: version params: { bump: patch } - put: docker-image params: additional_tags: version/number image: image/image.tarpnpm build take care of TypeScript type-checks and assets building.
#...
jobs: - name: configure-pipelines plan: #... - set_pipeline: demo-ui file: ci/pipelines/demo-ui.yamlApply it and put this nginx config alongside the Dockerfile on frontend root project:
server { listen 80; server_name localhost;
root /usr/share/nginx/html;
location / { try_files $uri /index.html; }}FROM nginx:alpine
COPY docker/nginx.conf /etc/nginx/conf.d/default.confCOPY dist /usr/share/nginx/htmlNote
Without nginx config, as it’s an SPA, it will not handle properly the JS routes.
After push all CI should build correctly. Then the image policy for auto update:
apiVersion: image.toolkit.fluxcd.io/v1beta2kind: ImageRepositorymetadata: name: demo-ui namespace: flux-systemspec: image: gitea.kube.rocks/kuberocks/demo-ui interval: 1m0s secretRef: name: dockerconfigjson---apiVersion: image.toolkit.fluxcd.io/v1beta2kind: ImagePolicymetadata: name: demo-ui namespace: flux-systemspec: imageRepositoryRef: name: demo-ui namespace: flux-system policy: semver: range: 0.0.xThe deployment:
apiVersion: apps/v1kind: Deploymentmetadata: name: demo-ui namespace: kuberocksspec: replicas: 2 selector: matchLabels: app: demo-ui template: metadata: labels: app: demo-ui spec: imagePullSecrets: - name: dockerconfigjson containers: - name: front image: gitea.kube.rocks/kuberocks/demo-ui:latest # {"$imagepolicy": "flux-system:image-demo-ui"} ports: - containerPort: 80---apiVersion: v1kind: Servicemetadata: name: demo-ui namespace: kuberocksspec: selector: app: demo-ui ports: - name: http port: 80After push, the demo UI container should be deployed. The very last step is to add a new route to existing IngressRoute for frontend:
#...apiVersion: traefik.io/v1alpha1kind: IngressRoute#...spec: #... routes: - match: Host(`demo.kube.rocks`) kind: Rule services: - name: demo-ui port: http - match: Host(`demo.kube.rocks`) && PathPrefix(`/api`) #...Go to https://demo.kube.rocks to confirm that front app can call the API.
Final check 🎊🏁🎊
You just made a vast tour of building an on-premise Kubernetes cluster following GitOps workflow from the ground up. Congratulation if you’re getting that far !!!
I highly encourage you to buy this book from Aurélie Vache, it’s the best cheat sheet for Kubernetes in the place.