
Build your own cheap but powerful self-hosted cluster and be free from any SaaS solutions by following this opinionated guide 🎉
This is the Part III of more global topic tutorial. Back to first part for intro.
Docker 🐳
Now we must do the classic Docker installation on each stateless servers. Repeat following commands on manager-01, worker-01 and runner-01.
curl -fsSL https://download.docker.com/linux/ubuntu/gpg | sudo gpg --dearmor -o /usr/share/keyrings/docker-archive-keyring.gpgecho \  "deb [arch=$(dpkg --print-architecture) signed-by=/usr/share/keyrings/docker-archive-keyring.gpg] https://download.docker.com/linux/ubuntu \  $(lsb_release -cs) stable" | sudo tee /etc/apt/sources.list.d/docker.list > /dev/null
sudo apt-get updatesudo apt-get install -y docker-ce docker-ce-cli containerd.io docker-compose-plugin
sudo usermod -aG docker $USER
Then logout and use docker run hello-world and be sure all is OK. Follow official installation if not.
Hetzner & MTU
Note
Just one last important thing before continue, specific to Hetzner. Their private network is set to 1450 MTU by default, which is not compatible with Docker Swarm overlay network. You must change it to 1450 MTU in order to avoid any further dysfunctions between node swarm communication. Many thanks to DcapCode to reported it ❤️. See here for further explanation.
Thankfully since version 24 of Moby, we can set a default MTU for all future networks created through next docker stacks. For this create following JSON file on manager-01 :
{ "default-network-opts": { "overlay": { "com.docker.network.driver.mtu": "1450" } }}Then restart docker daemon with sudo service docker restart. And that’s it, we don’t need to carry about anymore.
Enable Docker Swarm
Finally, enable Swarm mode on manager-01 :
docker swarm init --advertise-addr 10.0.0.2Note
Use private network IP of manager, it’ should be the same defined on /et/hosts on other worker servers.
The above command will show the command to launch to other worker nodes. Apply it on worker-01 and runner-01.
When done use docker node ls on manager node in order to confirm the presence of the 2 workers with Ready status and active.
Yeah, cluster is already properly configured. Far less overwhelming than Kubernetes, I should say.
CLI tools & environment labels
ctop is a very useful CLI tools that works like htop but dedicated for docker containers. Install it on every docker hosts :
echo "deb http://packages.azlux.fr/debian/ buster main" | sudo tee /etc/apt/sources.list.d/azlux.listwget -qO - https://azlux.fr/repo.gpg.key | sudo apt-key add -sudo apt updatesudo apt install -y docker-ctopBefore continue, let’s add some labels on nodes in order to differentiate properly production from build nodes :
# worker-01 is intended for running production app containerdocker node update --label-add environment=production worker-01
# runner-01 is intended to build docker image through CI/CD pipelinedocker node update --label-add environment=build runner-01
Installing the Traefik - Portainer combo 💞
It’s finally time to start our first container services. The minimal setup will be :
- Traefik as main proxy with dynamic services discovery through that Docker API
- Portainer as main GUI for docker containers management and deployement
This 2 services will be deployed as docker services on manager-01.
Traefik 🛣️
The main task of traefik will be to redirect correct URL path to corresponding app service, according to regex rules (which domain or subdomain, which prefix URL path, etc.).
Thankfully, Traefik can be configured to take cares of all SSL certificates generation automatically without any intervention. We will use simple Let’s encrypt for this.
The static Traefik configuration
I should say that Traefik is not really easy to setup for new comers. The essential part to keep in mind is that this reverse proxy has 2 types of configuration, static and dynamic. Go here for detail explication of difference between these types of configuration.
Here we’ll talk about static configuration. Create next YAML file (TOML is also supported) :
entryPoints: https: address: :443 http: middlewares: - gzip tls: certResolver: le http: address: :80 http: redirections: entryPoint: to: https scheme: https permanent: true ssh: address: :22certificatesResolvers: le: acme: email: admin@sw.dockerswarm.rocks storage: /certificates/acme.json tlsChallenge: {}providers: docker: defaultRule: Host(`{{ index .Labels "com.docker.stack.namespace" }}.sw.dockerswarm.rocks`) exposedByDefault: false swarmMode: true network: traefik_publicapi: {}accessLog: {}metrics: prometheus: {}| name | description |
|---|---|
| HTTPS (443) | Main Web access, I added a global middleware called gzip that will be configured on next dynamic configuration for proper on-demand compression as well as le, aka Let’s encrypt, as main certificate resolver |
| HTTP (80) | Automatic permanent HTTPS redirection, so every web service will be assured to be accessed through HTTPS only (and you should) |
| SSH (22) | For specific advanced case, such as give possibility of SSH clone through your main self-hosted Git provider |
Note
Don’t forget to have your main SSH for terminal operations on different port than 22 as explained, as the 22 port will be taken by Traefik.
The certificate resolver (aka Let’s encrypt) will be configured with TLS-ALPN-01 challenge. The certificate results of this challenge will be stored on acme.json local cache file on the host in order to obviously avoid a certificate regeneration on every Traefik service restart.
This is the famous source of Traefik dynamic configuration. We only need of Docker as main provider here, but it supports plenty else.
It indicates Traefik to read through Docker API in order to discover any new services and apply automatic configurations as well as SSL certificate without any restart. Docker labels will be used for dynamic configuration.
| name | description |
|---|---|
swarmMode | Tell Traefik to uses labels found on services instead of individual containers (case of Docker Standalone mode). |
exposedByDefault | When false, force us to use traefik.enable=true as explicit label for automatic docker service discovery |
network | Default network connection for all exposed containers |
defaultRule | Default rule that will be applied to HTTP routes, in order to redirect particular URL to the right service. Each service container can override this default value with traefik.http.routers.my-service.rule label. |
As a default route rule, I set here a value adapted for an automatic subdomain discovery. {{ index .Labels "com.docker.stack.namespace" }}.sw.dockerswarm.rocks is a dynamic Go template string that means to use the com.docker.stack.namespace label that is applied by default on Docker Swarm on each deployed service. So if I deploy a swarm stack called myapp, Traefik will automatically set myapp.sw.dockerswarm.rocks as default domain URL to my service, with automatic TLS challenge !
All I have to do is to add a specific label traefik.enable=true inside the Docker service configuration and be sure that it’s on the same docker network.
| name | description |
|---|---|
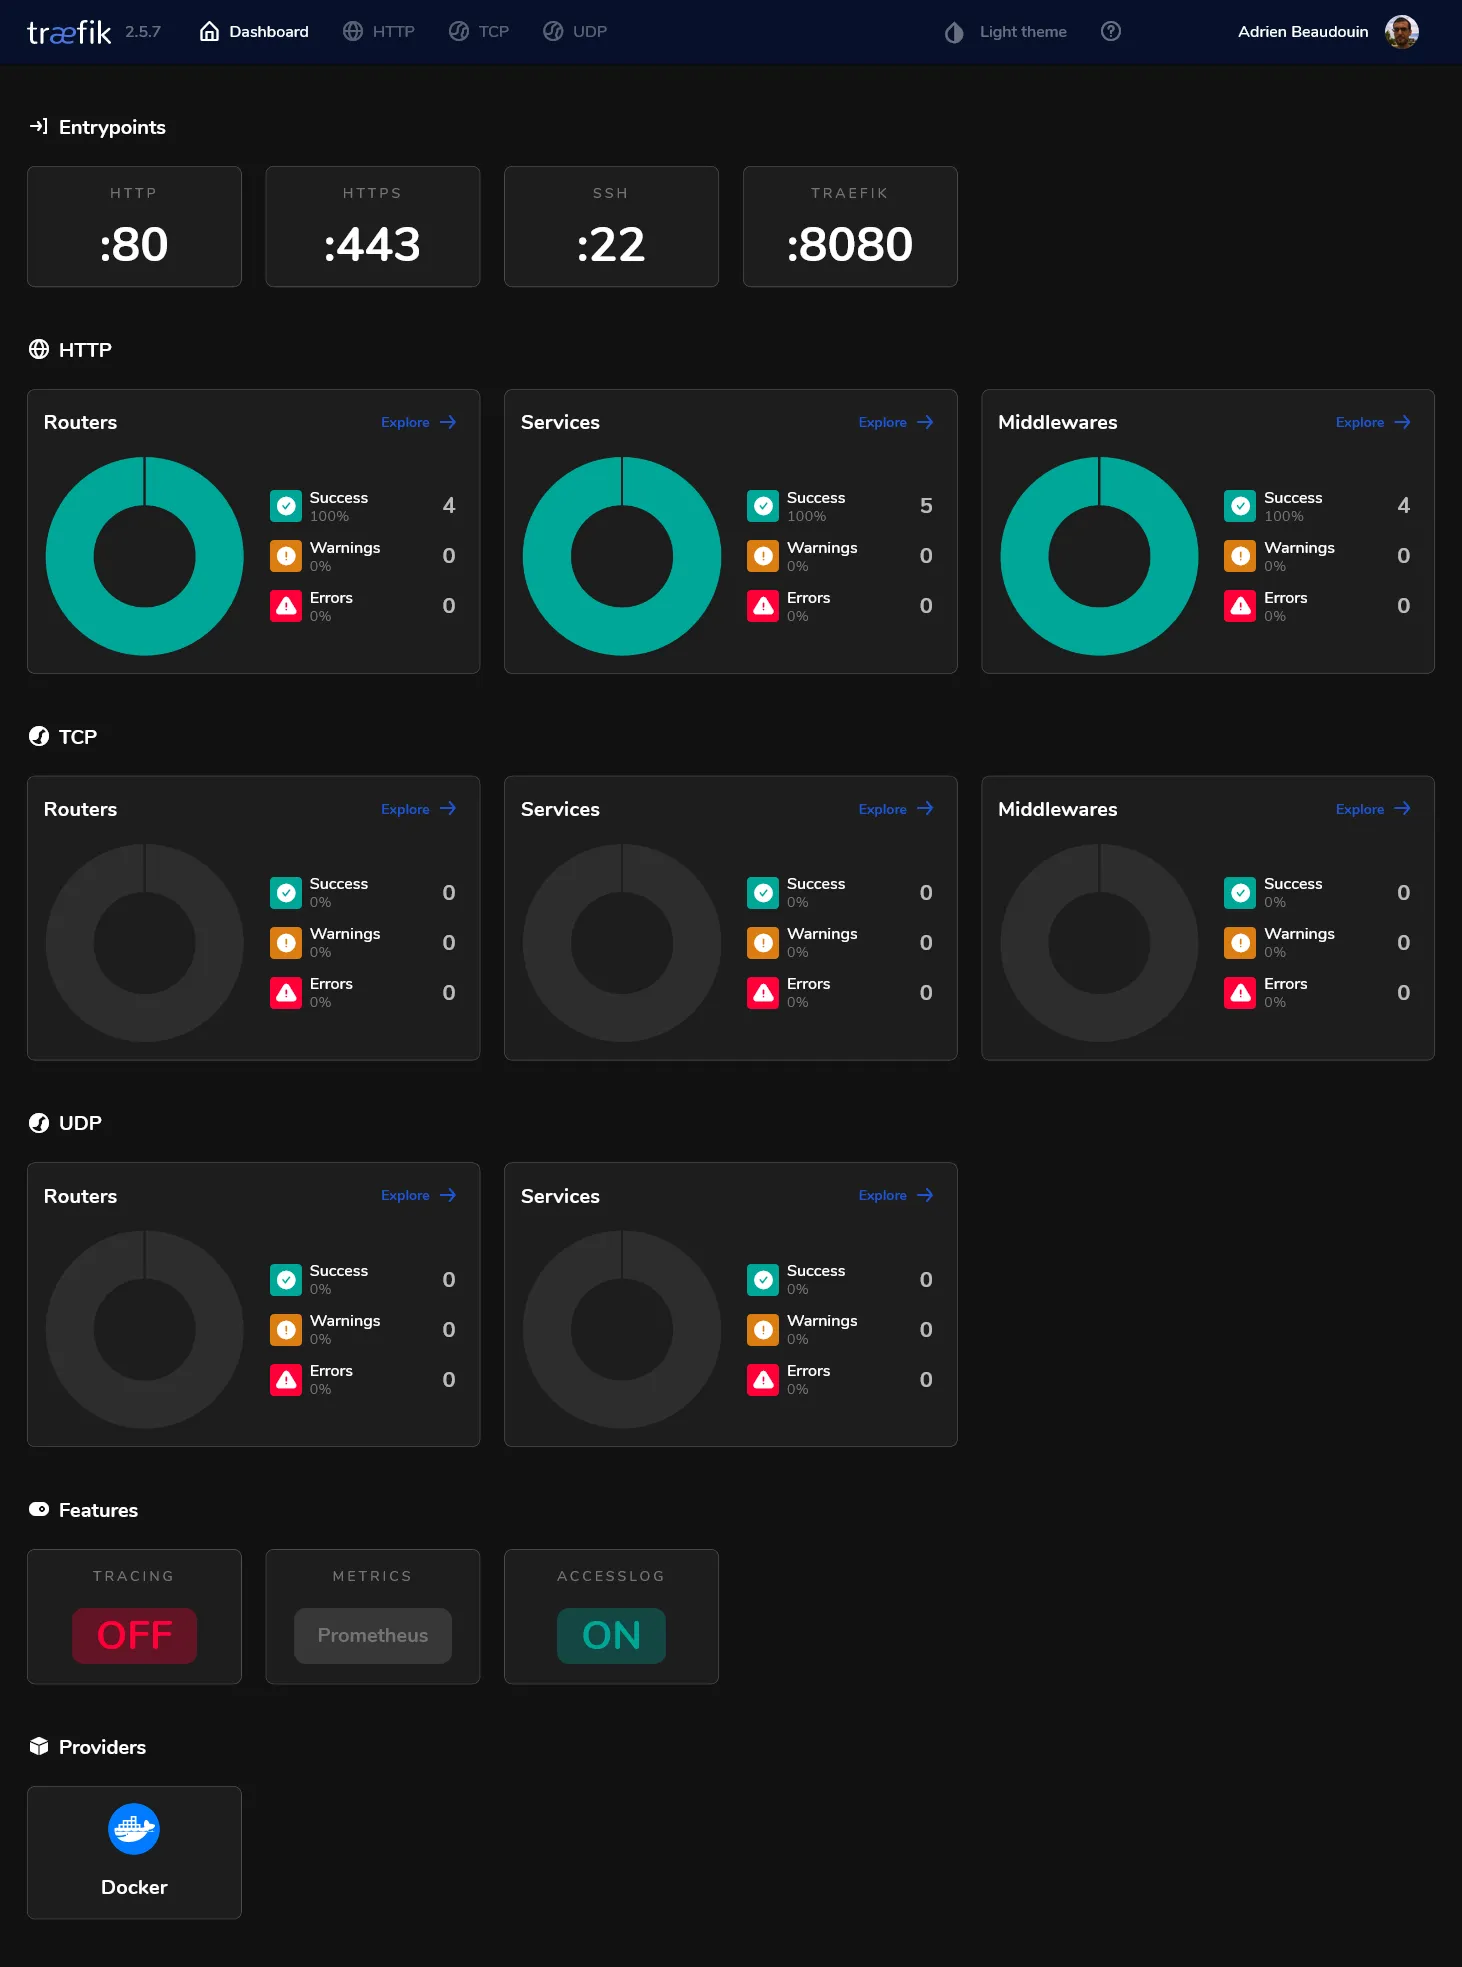
api | Enable a nice Traefik dashboard (with dark theme support !) that will be exposed on the local 8080 port by default |
accessLog | Show all incoming requests through Docker STDOUT |
metrics | Expose a /metrics REST endpoint in order to provide all request metrics. It’ll be consumed by Prometheus that we’ll install later on the monitoring part. |
Traefik deployment
In order to deploy Traefik on our shiny new Docker Swarm, we must write a Docker Swarm deployment file that looks like to a classic Docker compose file. Create next file :
version: '3.8'
services: traefik: image: traefik:v2.6 ports: - target: 22 published: 22 mode: host - target: 80 published: 80 mode: host - target: 443 published: 443 mode: host networks: - public volumes: - /etc/traefik:/etc/traefik - /var/run/docker.sock:/var/run/docker.sock:ro - certificates:/certificates deploy: placement: constraints: - node.labels.traefik-public.certificates == true labels: - traefik.enable=true - traefik.http.middlewares.gzip.compress=true - traefik.http.middlewares.admin-auth.basicauth.users=admin:${HASHED_PASSWORD?Variable not set} - traefik.http.middlewares.admin-ip.ipwhitelist.sourcerange=82.82.82.82 - traefik.http.routers.traefik-public-api.entrypoints=https - traefik.http.routers.traefik-public-api.service=api@internal - traefik.http.routers.traefik-public-api.middlewares=admin-ip,admin-auth - traefik.http.services.traefik-public.loadbalancer.server.port=8080
networks: public:
volumes: certificates:We declare 3 ports for each entry point, note as I will use host mode, for extra performance and getting real IPs from clients.
Then we create a public network that will be created with overlay driver (this is by default on swarm). This is the very important part in order to have a dedicated NAT across all nodes for container services that will be exposed to the internet.
We’ll declare 3 volumes :
| name | description |
|---|---|
/etc/traefik | Location where we putted our above static configuration file |
/var/run/docker.sock | Required for allowing Traefik to access to Docker API in order to have automatic dynamic docker configuration working. |
certificates | Named docker volume in order to store our acme.json generated file from all TLS challenge by Let’s Encrypt. |
Note
Note as we add node.labels.traefik-public.certificates inside deploy.constraints in order to ensure Traefik will run on the same server where certificates are located every time when Docker Swarm does service convergence.
This is the Traefik dynamic configuration part. I declare here many services that I will use later. Adapt for your own needs !
| name | type | description |
|---|---|---|
traefik.enable=true | global | Tell Traefik to expose himself through the network |
gzip | middleware | Provides on-demand gzip compression. It’s applied globally on the above static configuration. |
admin-auth | middleware | Provides basic HTTP authorization. basicauth.users will use standard htpasswd format. I use HASHED_PASSWORD as dynamic environment variable. |
admin-ip | middleware | Provides IP whitelist protection, given a source range. Use your own IP. |
traefik-public-api | router | For proper redirection to internal dashboard Traefik API from traefik.sw.dockerswarm.rocks, which is already defined by default rule. It’s configured with above admin-auth and admin-ip for proper access protection. |
traefik-public | service | Allow proper redirection to the default exposed 8080 port of Traefik container. This is sadly mandatory when using Docker Swarm |
Note
Keep in mind that the middlewares here are just declared as available for further usage in our services, but not applied globally, except for gzip that been declared globally to HTTPS entry point above in the static configuration.
It’s finally time to test all this configuration !
Go to the manager-01, be sure to have above /etc/traefik/traefik.yml file, and do following commands :
# declare the current node manager as main certificates host, required in order to respect above deploy constraintdocker node update --label-add traefik-public.certificates=true manager-01
# generate your main admin password hash for any admin HTTP basic auth access into specific environment variableexport HASHED_PASSWORD=$(openssl passwd -apr1 aNyR4nd0mP@ssw0rd)
# deploy our 1st stack and cross the fingers...docker stack deploy -c traefik-stack.yml traefik
# check status of the service, it should have 1 replicadocker service ls
# check logs for detail or any errorsdocker service logs traefik_traefik
After few seconds, Traefik should launch and generate proper SSL certificate for its own domain. You can finally go to https://traefik.sw.dockerswarm.rocks. http:// should work as well thanks to permanent redirection.
If properly configured, you will be prompted for access. After entering admin as user and your own chosen password, you should finally access to the traefik dashboard !
Portainer ⛵
The hard part is done, we’ll finish this 2nd part by installing Portainer. Portainer is constituted of :
- A main GUI that can be exposed through Traefik
- An active agent for each docker node, done by the global deployment mode of Docker Swarm. This agent will be responsible for getting all running dockers through API and send them to Portainer manager.
Create portainer-agent-stack.yml swarm stack file with follogin content :
version: '3.8'
services: agent: image: portainer/agent:latest volumes: - /var/run/docker.sock:/var/run/docker.sock - /var/lib/docker/volumes:/var/lib/docker/volumes networks: - agent_network deploy: mode: global
portainer: image: portainer/portainer-ce:latest command: -H tcp://tasks.agent:9001 --tlsskipverify volumes: - /mnt/storage-pool/portainer:/data networks: - agent_network - traefik_public deploy: placement: constraints: [node.role == manager] labels: - traefik.enable=true - traefik.http.routers.portainer.entrypoints=https - traefik.http.routers.portainer.middlewares=admin-ip - traefik.http.services.portainer.loadbalancer.server.port=9000
networks: agent_network: traefik_public: external: trueThis is an adapted file from the official Portainer Agent Stack.
We use agent_network as overlay network for communication between agents and portainer. No need of admin-auth middleware here as Portainer has its own authentication.
For Traefik dynamic configuration, as you’ll see for the most of next stacks to be exposed, it’s required to :
- Set
traefik.enable=trueexplicitly, when aboveexposedByDefaultis set tofalse. - Specify router
entrypointsparameter tohttps, in order to force service discovery only to the abovehttpsTraefik entry point configured in its static configuration. - Specify the web port of internal container where the HTTP request should be redirected with
loadbalancer.server.port, this is required in Swarm mode because the services doesn’t use theEXPOSEinstruction from containers.
Note
Note as traefik_public must be set to external in order to reuse the original Traefik network.
Deploy the portainer stack :
# create the local storage for portainer in Gluster storagesudo mkdir /mnt/storage-pool/portainer
# deploy portainer stackdocker stack deploy -c portainer-agent-stack.yml portainer
# check statusdocker service ls
As soon as the main portainer service has successfully started, Traefik will detect it and configure it with SSL. The specific router for Portainer should appear in Traefik dashboard on HTTP section as below.
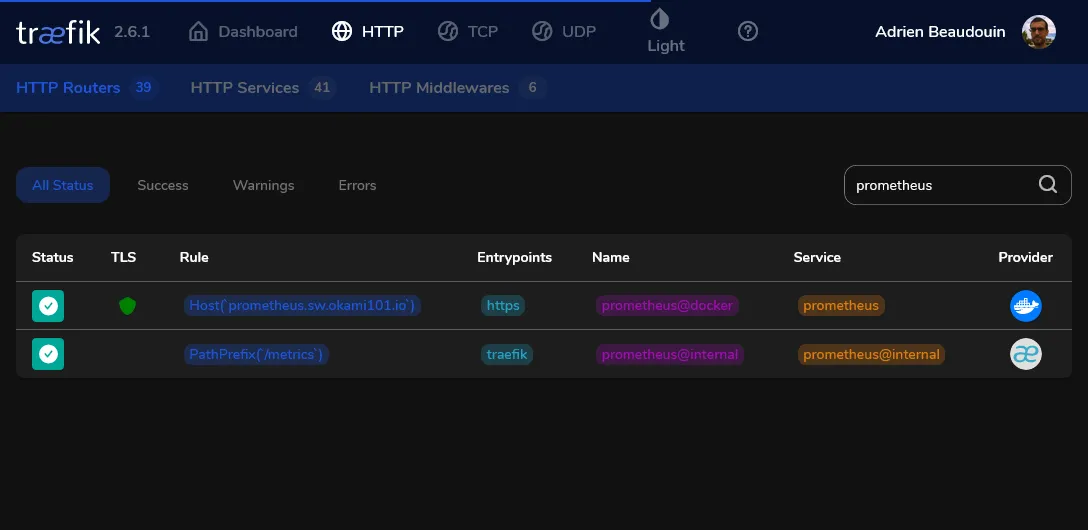
Go to the router detail for checking currently applied middlewares :

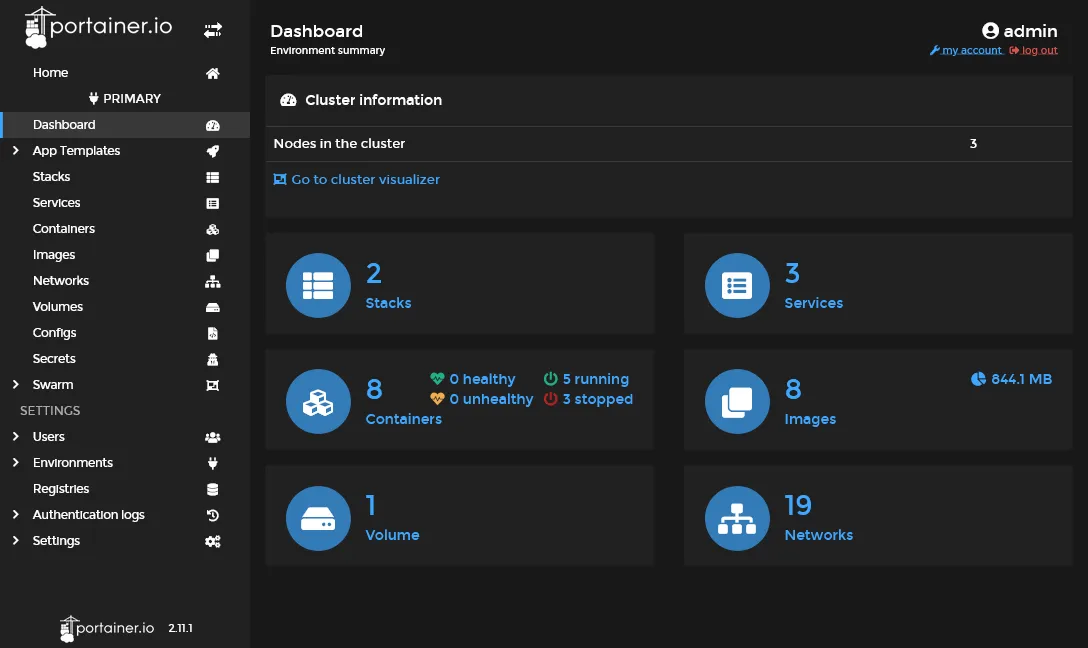
It’s time to create your admin account through https://portainer.sw.dockerswarm.rocks. If all goes well, a primary environment should be appearing, and you should have access to your cluster home environment with 2 stacks active.
Note as this primary endpoint was automatically created by the above tcp://tasks.agent:9001 command, which is the address of all portainer agents globally deployed. But you can add any other endpoints, aka clusters via the environments’ menu.
Note
If you go to the stacks menu, you will note that both traefik and portainer are Limited control, because these stacks were done outside Portainer. From now, we’ll create and deploy stacks directly from Portainer GUI.
Some maintenance cluster tools 🐕🦺
It’s finally time to test our new cluster environment by testing some stacks through the Portainer GUI !
Keep the containers image up-to-date ⬆️
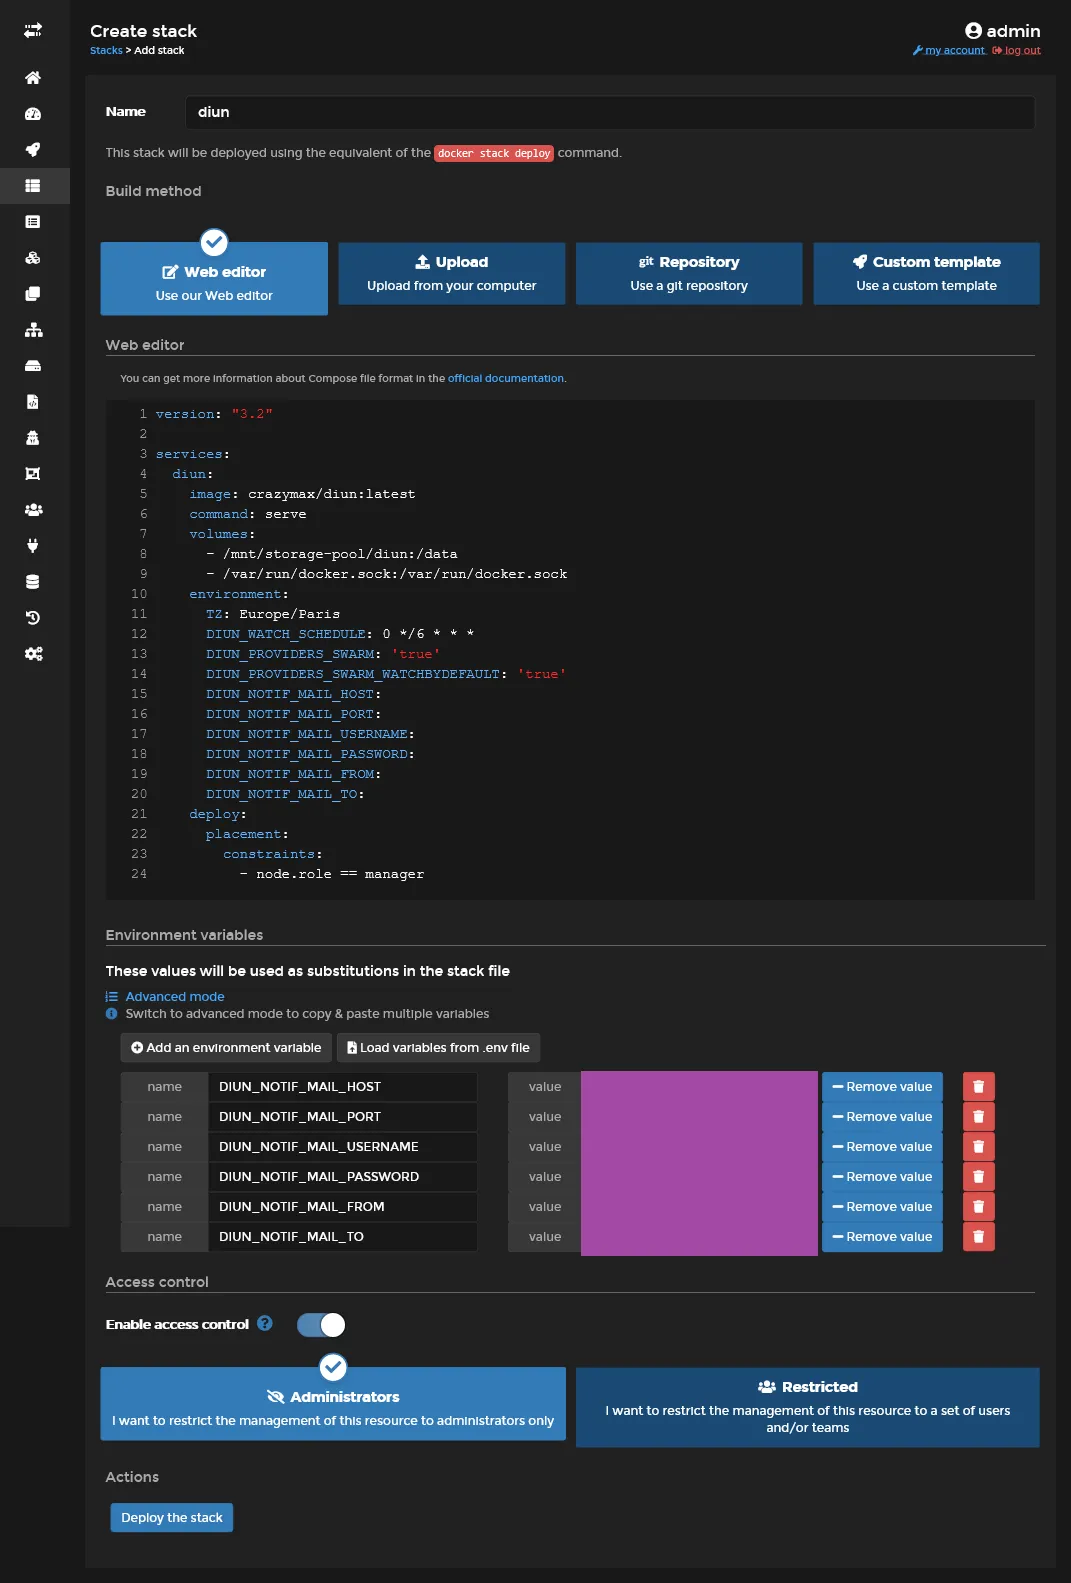
We’ll start by installing Diun, a very useful tool which notify us when used docker images has available update in its Docker registry.
Create the next stack through Portainer :
version: '3.8'
services: diun: image: crazymax/diun:latest command: serve volumes: - /mnt/storage-pool/diun:/data - /var/run/docker.sock:/var/run/docker.sock environment: TZ: Europe/Paris DIUN_WATCH_SCHEDULE: 0 */6 * * * DIUN_PROVIDERS_SWARM: 'true' DIUN_PROVIDERS_SWARM_WATCHBYDEFAULT: 'true' DIUN_NOTIF_MAIL_HOST: DIUN_NOTIF_MAIL_PORT: DIUN_NOTIF_MAIL_USERNAME: DIUN_NOTIF_MAIL_PASSWORD: DIUN_NOTIF_MAIL_FROM: DIUN_NOTIF_MAIL_TO: deploy: placement: constraints: - node.role == manager| name | description |
|---|---|
/mnt/storage-pool/diun | It will be used for storage of Diun db location, Diun need it for storing detection of new images version and avoid notification spams. Don’t forget to create a new dedicated folder in the GlusterFS volume with sudo mkdir /mnt/storage-pool/diun. |
/var/run/docker.sock | For proper current docker images used detection through Docker API |
| name | description |
|---|---|
TZ | Required for proper timezone schedule |
DIUN_WATCH_SCHEDULE | The standard linux cron schedule |
DIUN_PROVIDERS_SWARM | Required for detecting all containers on all nodes |
DIUN_PROVIDERS_SWARM_WATCHBYDEFAULT | If true, no need of explicit docker label everywhere |
DIUN_NOTIF_MAIL_* | Set all according to your own mail provider, or use any other supported notification |
Note
Use below section of Portainer for setting all personal environment variable. In all cases, all used environment variables must be declared inside YML.
Finally click on Deploy the stack, it’s equivalent of precedent docker stack deploy, nothing magic here. At the difference that Portainer will store the YML inside its volume, allowing full control, contrary to limited Traefik and Portainer cases.
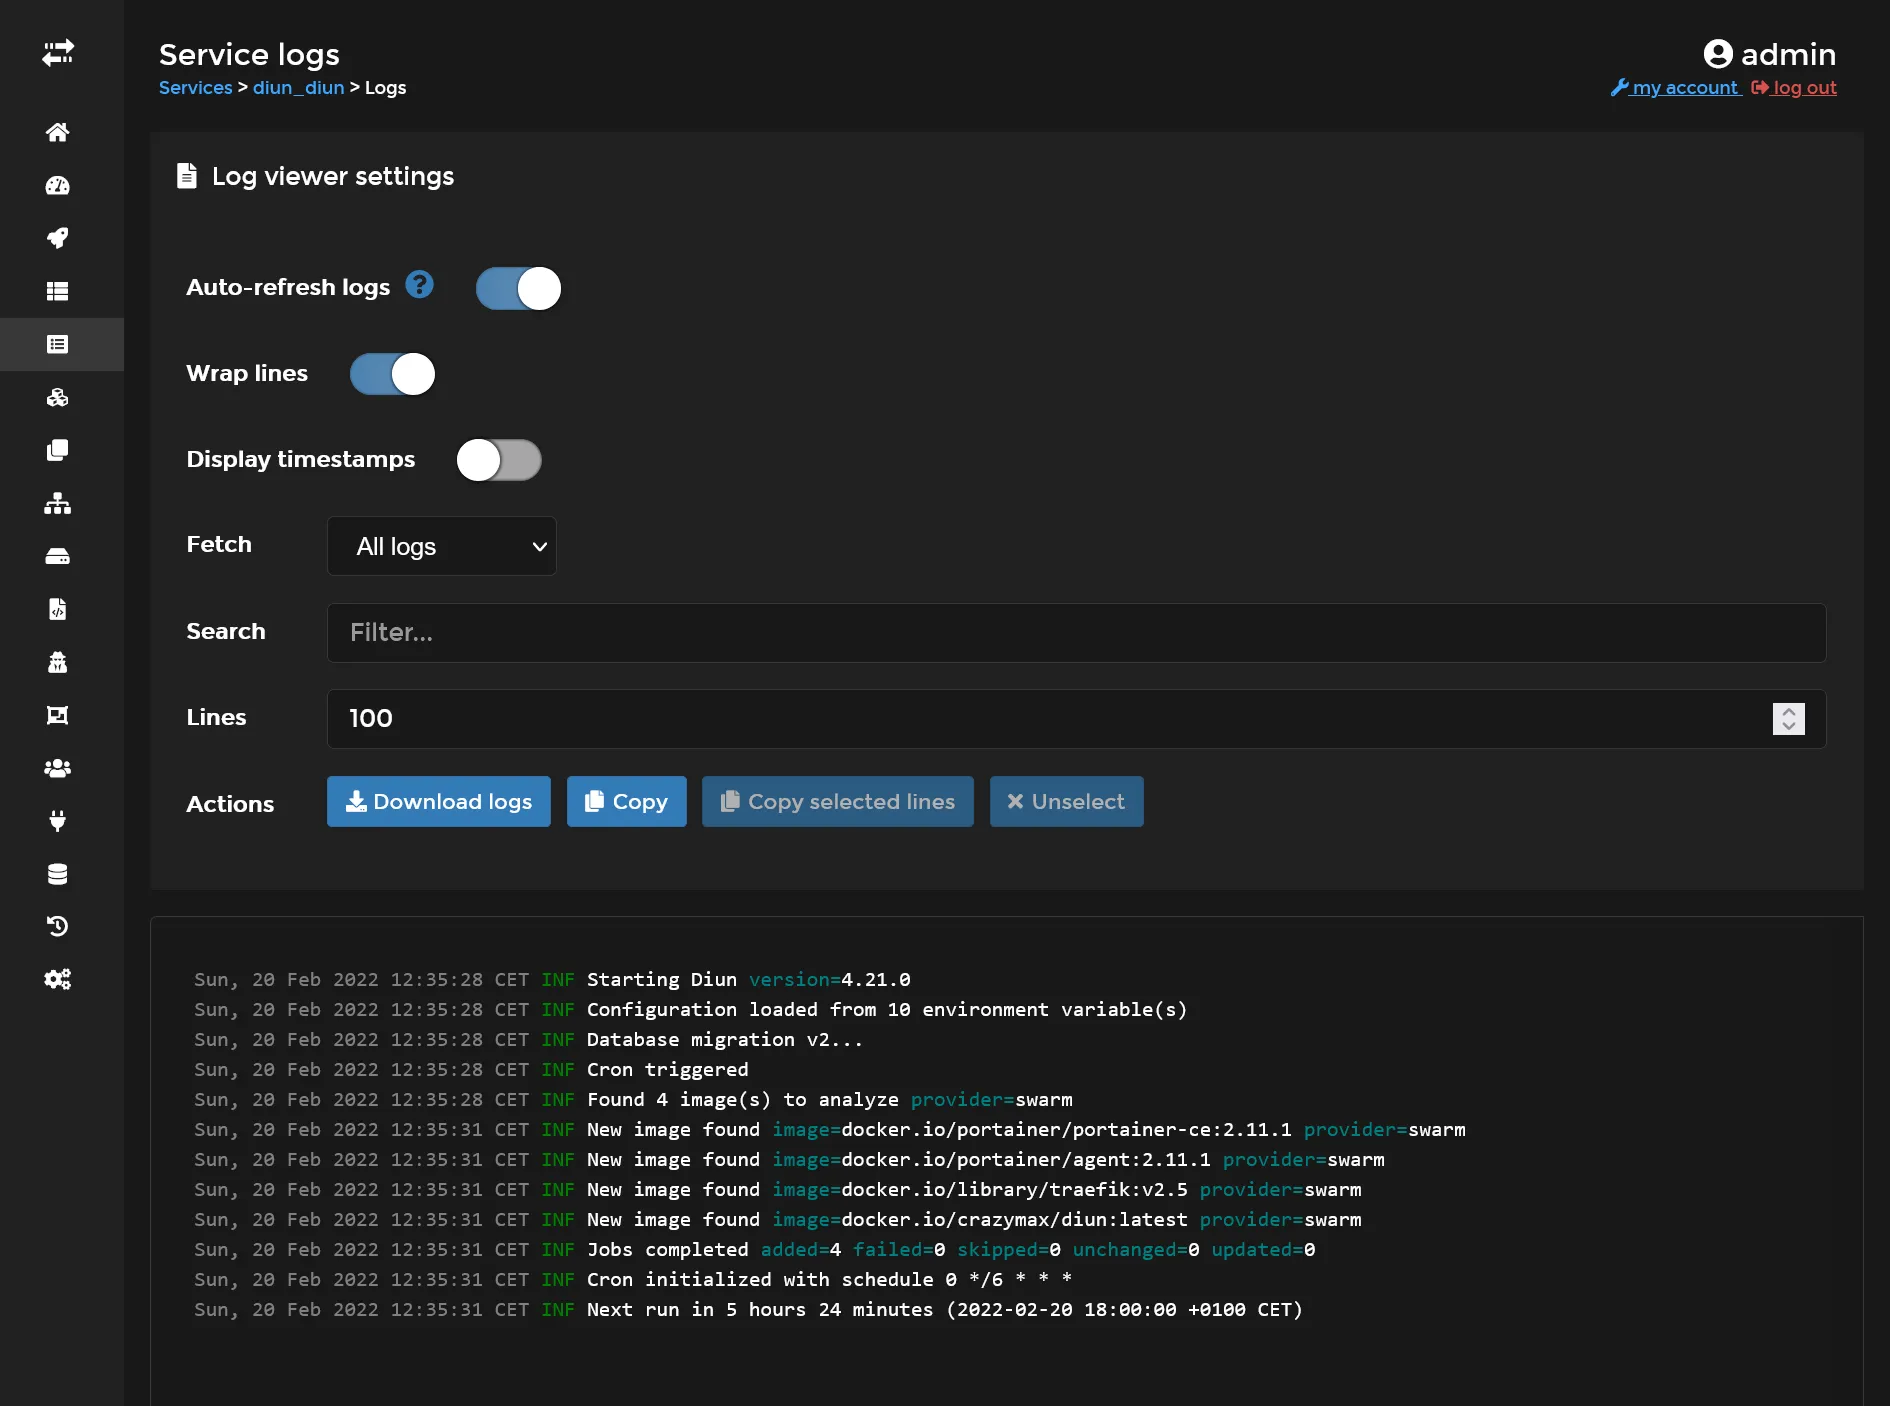
Diun should now be deployed and manager host and ready to scan images for any updates !
You can check the full service page which will allows manual scaling, on-fly volumes mounting, environment variable modification, and show current running tasks (aka containers).

You can check the service logs which consist of all tasks logs aggregate.
Distributed cron jobs 🕰️
It’s frequent to have some crontab jobs for long-running maintenance tasks as database dumping, backups, exports and so on. But can we achieve that on this cluster environment ? Actually crazy-max has developed Cron precisely for this purpose ! Let’s add this service into same above maintenance stack.
#... cronjob: image: crazymax/swarm-cronjob volumes: - /var/run/docker.sock:/var/run/docker.sock environment: TZ: Europe/Paris LOG_LEVEL: info LOG_JSON: 'false' deploy: placement: constraints: - node.role == managerThis service will now search for any crontab related docker service labels across all Swarm cluster, and launch it accordingly schedule settings which uses standard crontab format. All you have to do is to use following structure for any service you want to run periodically :
#... deploy: labels: - swarm.cronjob.enable=true - swarm.cronjob.schedule=5 * * * * - swarm.cronjob.skip-running=true replicas: 0 restart_policy: condition: none#...| name | description |
|---|---|
swarm.cronjob.enable | Enable cron launch |
swarm.cronjob.schedule | The standard linux cron schedule |
swarm.cronjob.skip-running | Prevent overlapping |
replicas | Set to 0 in order to prevent launching service after stack creation |
restart_policy.condition | Set none to prevent infinite restart after completion of job |
Get your own S3 💽
Let’s try with a tool with a web UI. Here is how get your own S3 bucket and be free from any external S3 provider. We’ll use our GlusterFS volume as a real storage.
Do sudo /mnt/storage-pool/minio on manager-01 and create following stack :
version: '3.8'
services: app: image: minio/minio volumes: - /mnt/storage-pool/minio:/data command: server /data --console-address ":9001" environment: MINIO_ROOT_USER: swarm MINIO_ROOT_PASSWORD: MINIO_BROWSER_REDIRECT_URL: https://minio.sw.dockerswarm.rocks networks: - traefik_public deploy: labels: - traefik.enable=true - traefik.http.routers.minio.entrypoints=https - traefik.http.routers.minio.rule=Host(`s3.sw.dockerswarm.rocks`) - traefik.http.routers.minio.service=minio - traefik.http.routers.minio-console.entrypoints=https - traefik.http.services.minio.loadbalancer.server.port=9000 - traefik.http.routers.minio-console.service=minio-console - traefik.http.services.minio-console.loadbalancer.server.port=9001 placement: constraints: - node.labels.environment == production
networks: traefik_public: external: trueNote
Note as we use node.labels.environment == production in order to force the container service to be launch in the worker-01 server.
The particularity of Minio is to have 2 web endpoints, one for web UI admin manager, and other as S3 API endpoint. So we need 2 Traefik routes in this case. Create an environment variable for MINIO_ROOT_PASSWORD and set your own admin password.
When deployed, wait few seconds for SSL auto generation (you can check it in the Traefik Dashboard) and go to https://minio.sw.dockerswarm.rocks in order to access the web administration by entering above credentials.
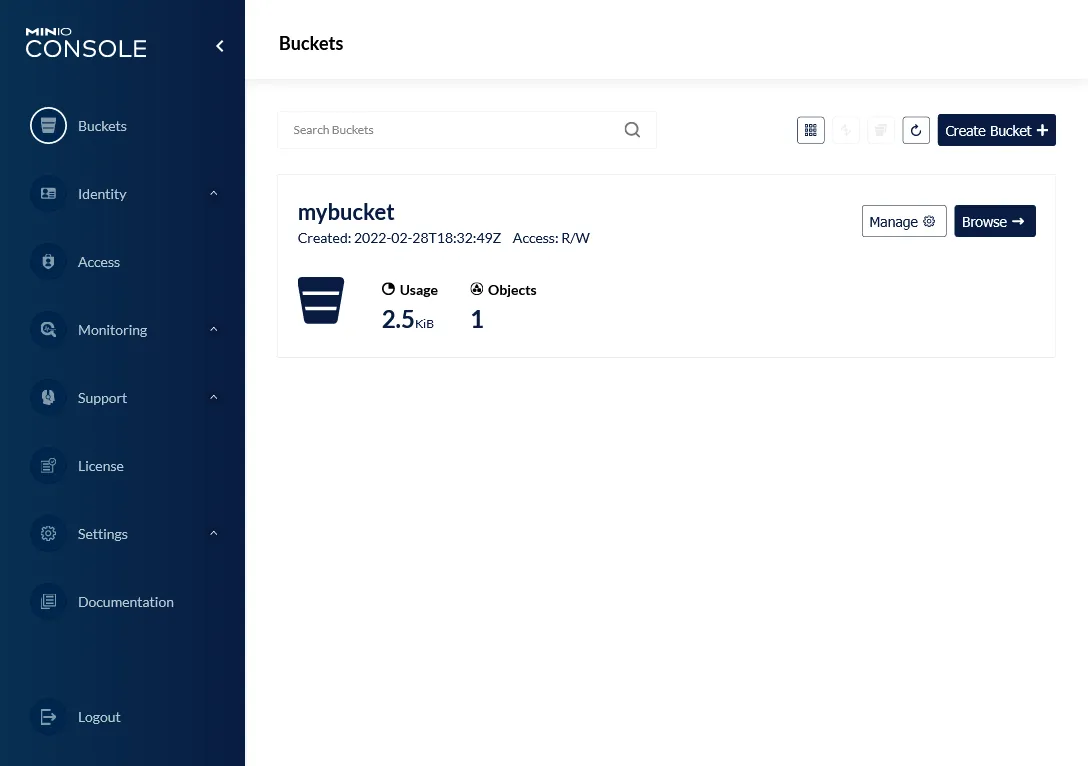
And yup, it’s done, create your 1st bucket through admin UI and you are ready to test the S3 API locally with https://s3.sw.dockerswarm.rocks/mybucket.
2nd check ✅
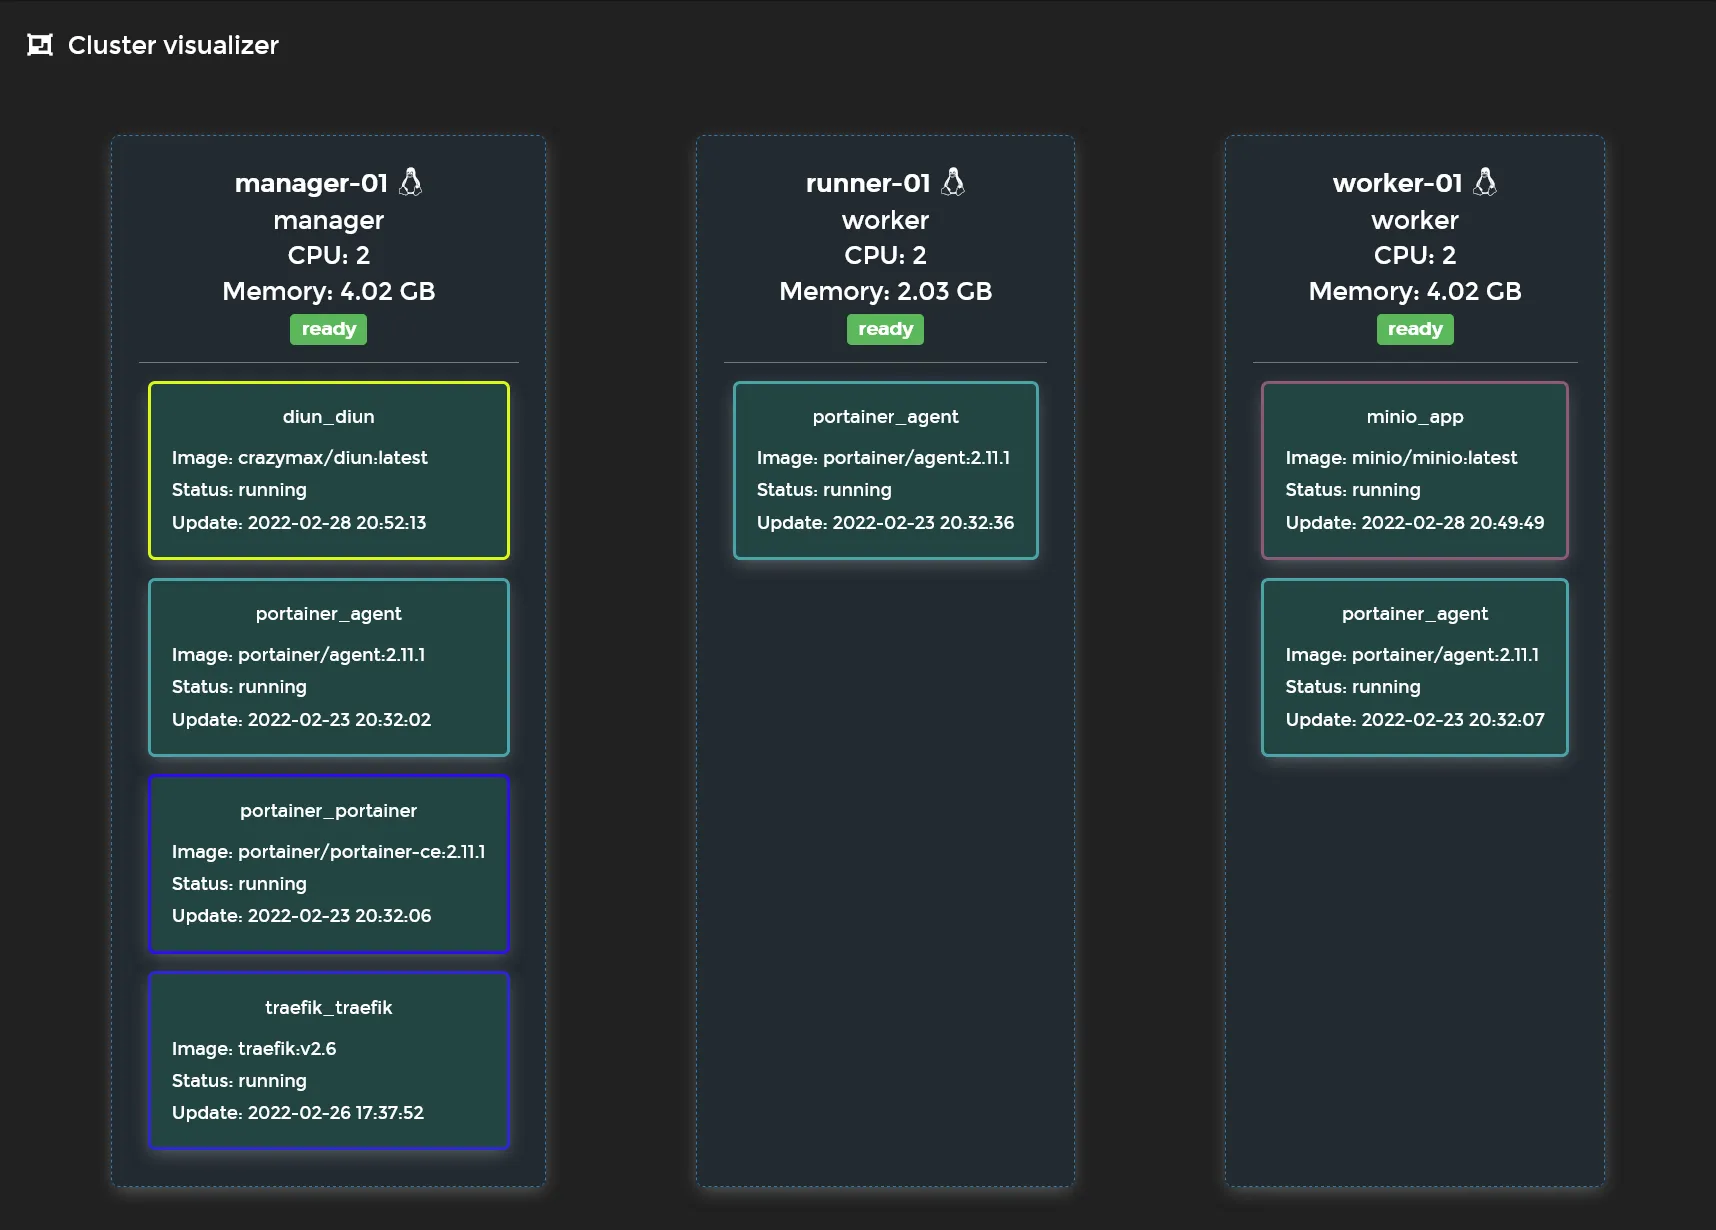
We’ve done the minimal viable Swarm setup with a nice cloud native reverse proxy, a containers GUI manager, and some other container sample tools. You can get a quick view of the current status of your cluster via the portainer visualizer !
It’s time to go further with self-hosted managed databases in next part.