
Build your own cheap but powerful self-hosted cluster and be free from any SaaS solutions by following this opinionated guide 🎉
This is the Part VIII of more global topic tutorial. Back to first part for intro.
Tracing with OpenTelemetry 🕰️
Now it’s time to test our Jaeger tracing for further integration to our cluster. For that we’ll use OpenTelemetry toolkit.
Install all the required libraries to above weather project :
# we use prerelease for better .NET 6 compatibilitydotnet add package OpenTelemetry.Extensions.Hosting --prereleasedotnet add package OpenTelemetry.Instrumentation.AspNetCore --prereleasedotnet add package OpenTelemetry.Exporter.Jaeger --prereleaseThen add automatic ASP.NET instrumentation and configure Jaeger exporter in Program.cs by adding following lines before builder.Build() :
using OpenTelemetry.Resources;using OpenTelemetry.Trace;
//...
builder.Services.AddOpenTelemetryTracing(b => b .SetResourceBuilder(ResourceBuilder .CreateDefault() .AddService("Weather API")) .AddAspNetCoreInstrumentation() .AddJaegerExporter(o => { o.AgentHost = builder.Configuration.GetValue<string>("Jaeger:Host"); o.AgentPort = builder.Configuration.GetValue<int>("Jaeger:Port"); }));
//...Push the code and ensure all CI/CD workflow passes.
Then edit the weather docker stack and configure Jaeger connection.
version: '3.8'
services: app: image: registry.sw.dockerswarm.rocks/adr1enbe4udou1n/my-weather-api environment: ASPNETCORE_ENVIRONMENT: Development Jaeger__Host: tasks.jaeger_agent Jaeger__Port: 6831 networks: - traefik_public - jaeger_private #...
networks: traefik_public: external: true jaeger_private: external: trueEnsure the weather API is deployed and do some API calls. Finally, go back to Jaeger UI, a second service Weather API should appear, select it and click on Find Traces. You should get all API call traces detail !
Feel free to add any other traces. There are 2 types of traces :
- Automatic : like above ASP.NET instrumentation, for any standardized library integration. If you use PostgreSQL, use Npgsql OpenTelemetry package for each SQL call traces.
- Manual : simple manual traces inside your application, for even further granular view.
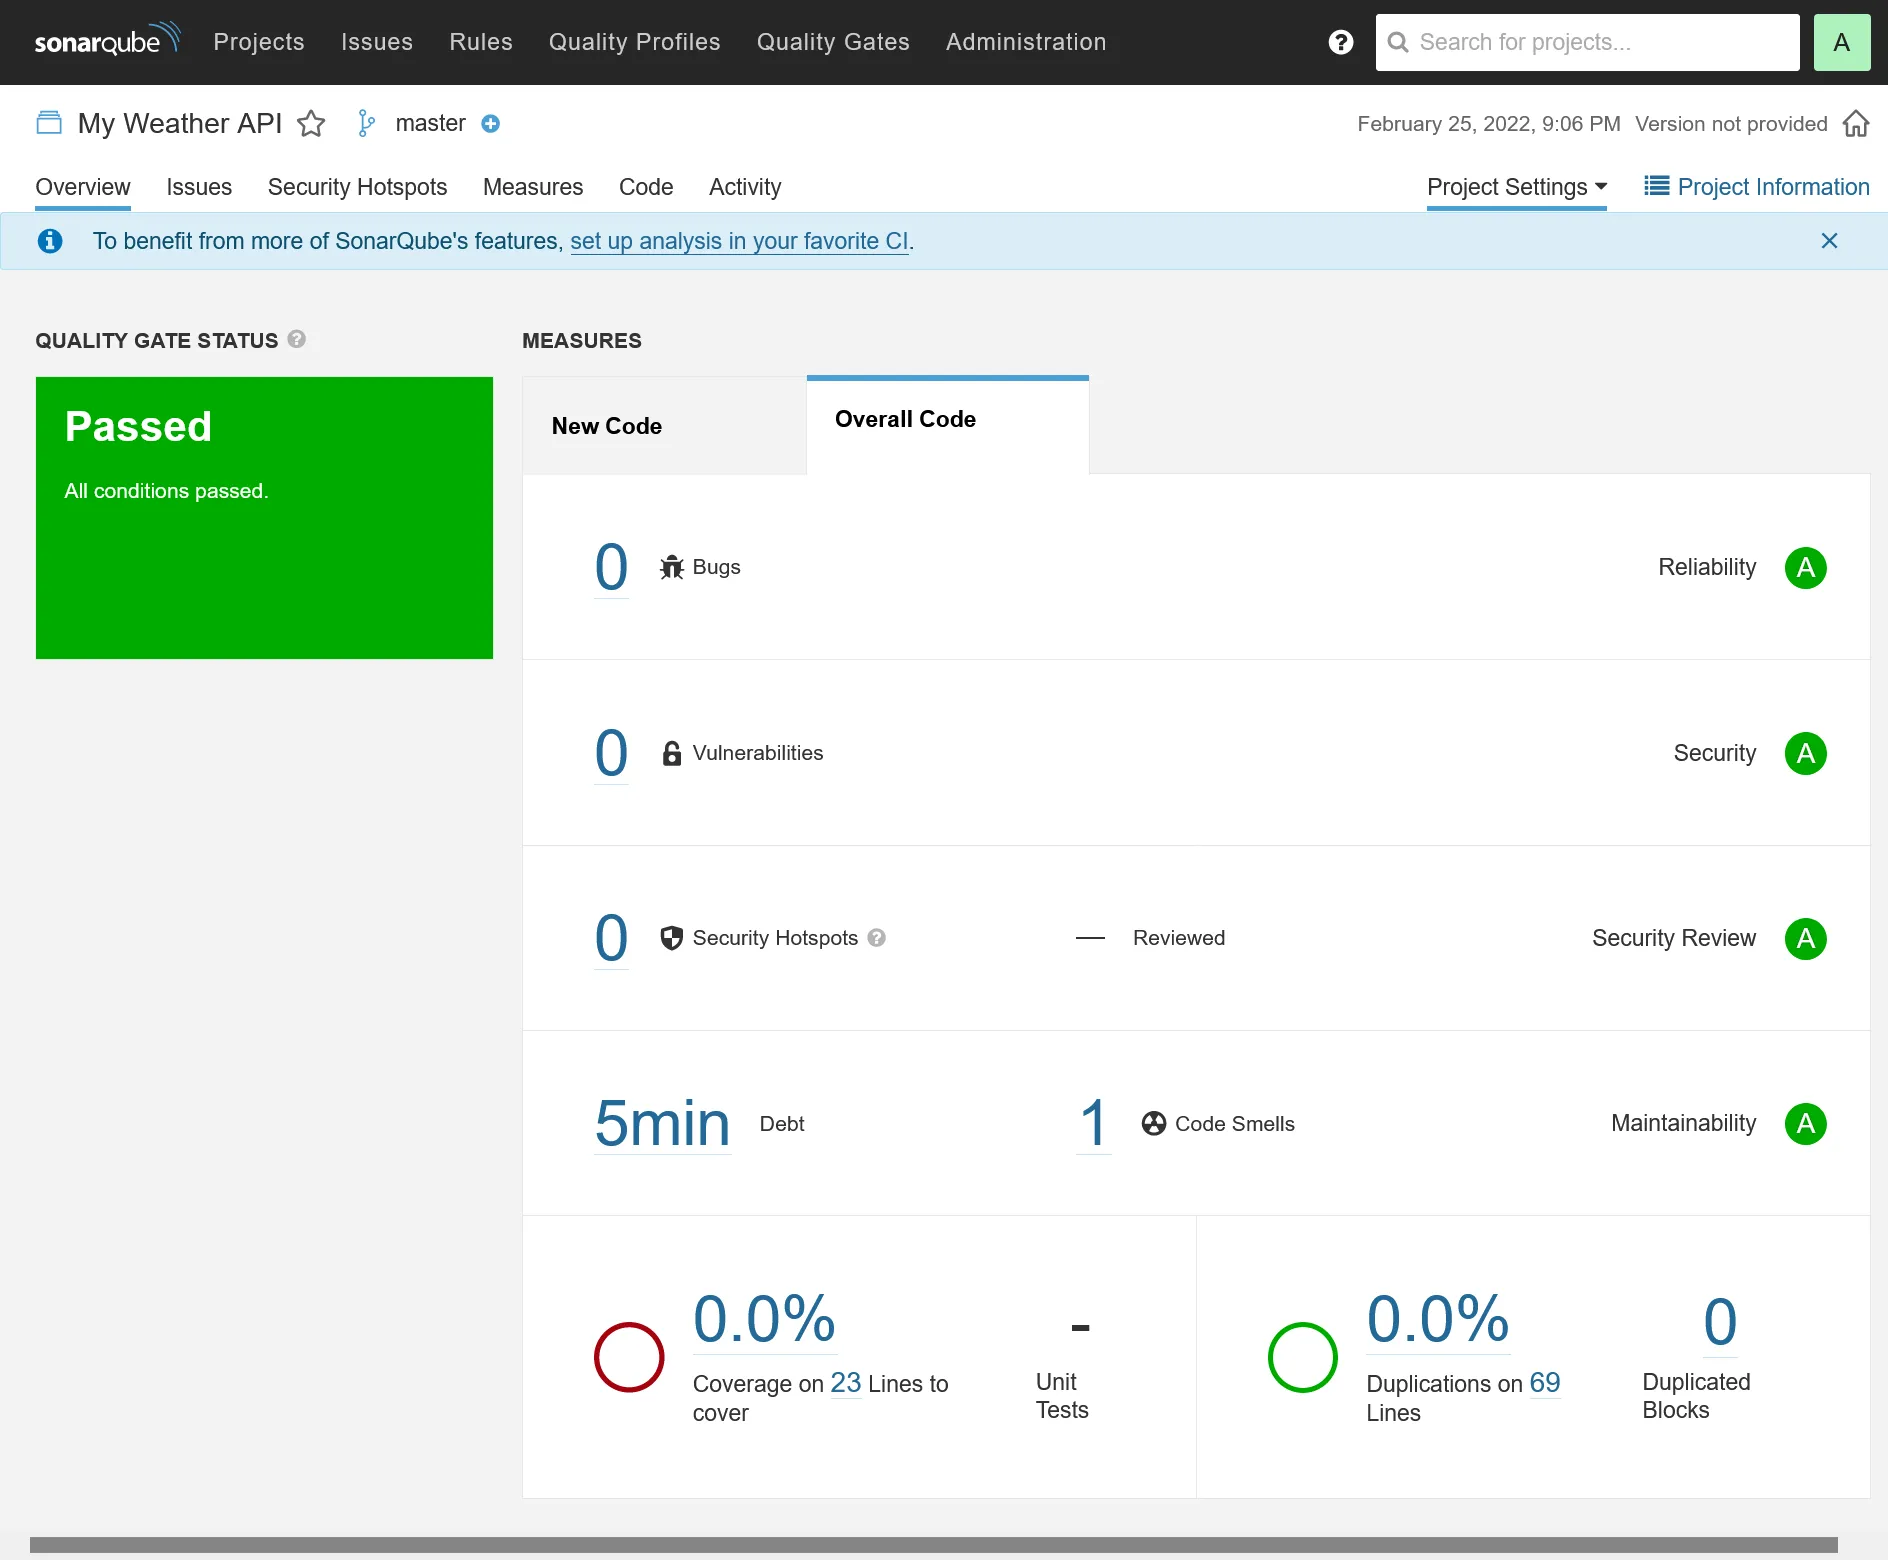
SonarQube 📈
Let’s get some automatic quality code metrics.
On manager-01 :
sudo mkdir -p /mnt/storage-pool/sonar/datasudo mkdir -p /mnt/storage-pool/sonar/logssudo mkdir -p /mnt/storage-pool/sonar/extensions
# specific thing for embed elasticsearch of sonarqubeecho "vm.max_map_count=262144" | tee /etc/sysctl.d/local.confsudo service procps restart
Create a sonar PostgresSQL database, and create next stack :
version: '3.8'
services: server: image: sonarqube:9-community volumes: - /etc/hosts:/etc/hosts - ${ROOT_PATH}/data:/opt/sonarqube/data - ${ROOT_PATH}/logs:/opt/sonarqube/logs - ${ROOT_PATH}/extensions:/opt/sonarqube/extensions environment: SONAR_JDBC_URL: jdbc:postgresql://data-01:5432/sonar SONAR_JDBC_USERNAME: sonar SONAR_JDBC_PASSWORD: networks: - traefik_public deploy: labels: - traefik.enable=true - traefik.http.routers.sonar.entrypoints=https - traefik.http.services.sonar.loadbalancer.server.port=9000 placement: constraints: - node.role == manager
networks: traefik_public: external: trueSet proper ROOT_PATH with /mnt/storage-pool/sonar and SONAR_JDBC_PASSWORD with above DB password.
Go to https://sonar.sw.dockerswarm.rocks, use admin / admin credentials and update password.
Project analysis
Create manual project “My Weather API” and go to Other CI. Generate a token, select .NET project, back to above my-weather-api project, and go through all prerequisite.
Note
You must have at least Java 11 installed locally.
dotnet tool install --global dotnet-sonarscanner
dotnet sonarscanner begin /k:"My-Weather-API" /d:sonar.host.url="https://sonar.sw.dockerswarm.rocks"  /d:sonar.login="above-generated-token"
dotnet build
dotnet sonarscanner end /d:sonar.login="above-generated-token"
Wait few minutes and the final rapport analysis should automatically appear. Add .sonarqube to .gitignore.
CI integration
Because running scanner manually is boring, let’s integrate it in our favorite CI. Create following secrets through Drone UI :
| name | level | description |
|---|---|---|
sonar_host_url | organization | Set the sonar host URL https://sonar.sw.dockerswarm.rocks |
sonar_token | repository | Set the above token |
Change the build step on .drone.yml file :
#... - name: build image: mcr.microsoft.com/dotnet/sdk:6.0 commands: - apt-get update - apt-get install --yes openjdk-11-jre - dotnet tool install --global dotnet-sonarscanner - export PATH="$PATH:$HOME/.dotnet/tools" - dotnet sonarscanner begin /k:"My-Weather-API" /d:sonar.login="$SONAR_TOKEN" /d:"sonar.host.url=$SONAR_HOST_URL" - dotnet build - dotnet sonarscanner end /d:sonar.login="$SONAR_TOKEN" - dotnet publish -c Release -o ./publish#...And voilà ! You should have automatic code analysis on every code push.
Note
This is not an optimized build for sonar analysis, because the first 3 command lines will be done every time !
You should build a proper custom dedicated docker image for build, based on .NET SDK and with JRE and dotnet-sonarscanner preinstalled.
Besides, you should cache /root/.sonar/cache directory for quickest analysis.
This above 2 methods will speed up CI drastically.
Load testing 💣
We have now a perfect environment for a well-balanced load testing ! There are 2 popular options :
- Locust, from Python world, which offers a nice integrated chart web UI and master-workers architecture which allows distributed loading. Load scripts are written on Python.
- k6, written in Go, which is more efficient and less resource demanding for the same load. Load scripts are written on JavaScript.
Here I’ll cover usage of k6. Note that it can be integrated to a time series database for a nice graphical extraction. And guess what, Grafana is the perfect tool for that ! Let’s profit of our powerful tools we have !
TSDB with InfluxDB
Create a new influxdb stack :
version: '3.8'
services: db: image: influxdb:1.8 volumes: - data:/var/lib/influxdb networks: - private deploy: placement: constraints: - node.labels.influxdb.data=true == true
networks: private:
volumes: data:Note
Add proper influxdb.data=true docker label in the node you want to store the influx data. Here I chose to put in the runner-01 node by taping this command in manager-01 : docker node update --label-add influxdb.data=true runner-01.
Add InfluxDB private network to Grafana stack :
version: '3.8'
services: grafana: #... networks: - influxdb_private - traefik_public #...
networks: influxdb_private: external: true traefik_public: external: trueTest loading with k6
First create a simple JS script as docker swarm Config named k6_weather_test_01 through Portainer UI :
import http from "k6/http";import { check } from "k6";
export default function () { http.get('https://weather.sw.dockerswarm.rocks/WeatherForecast');}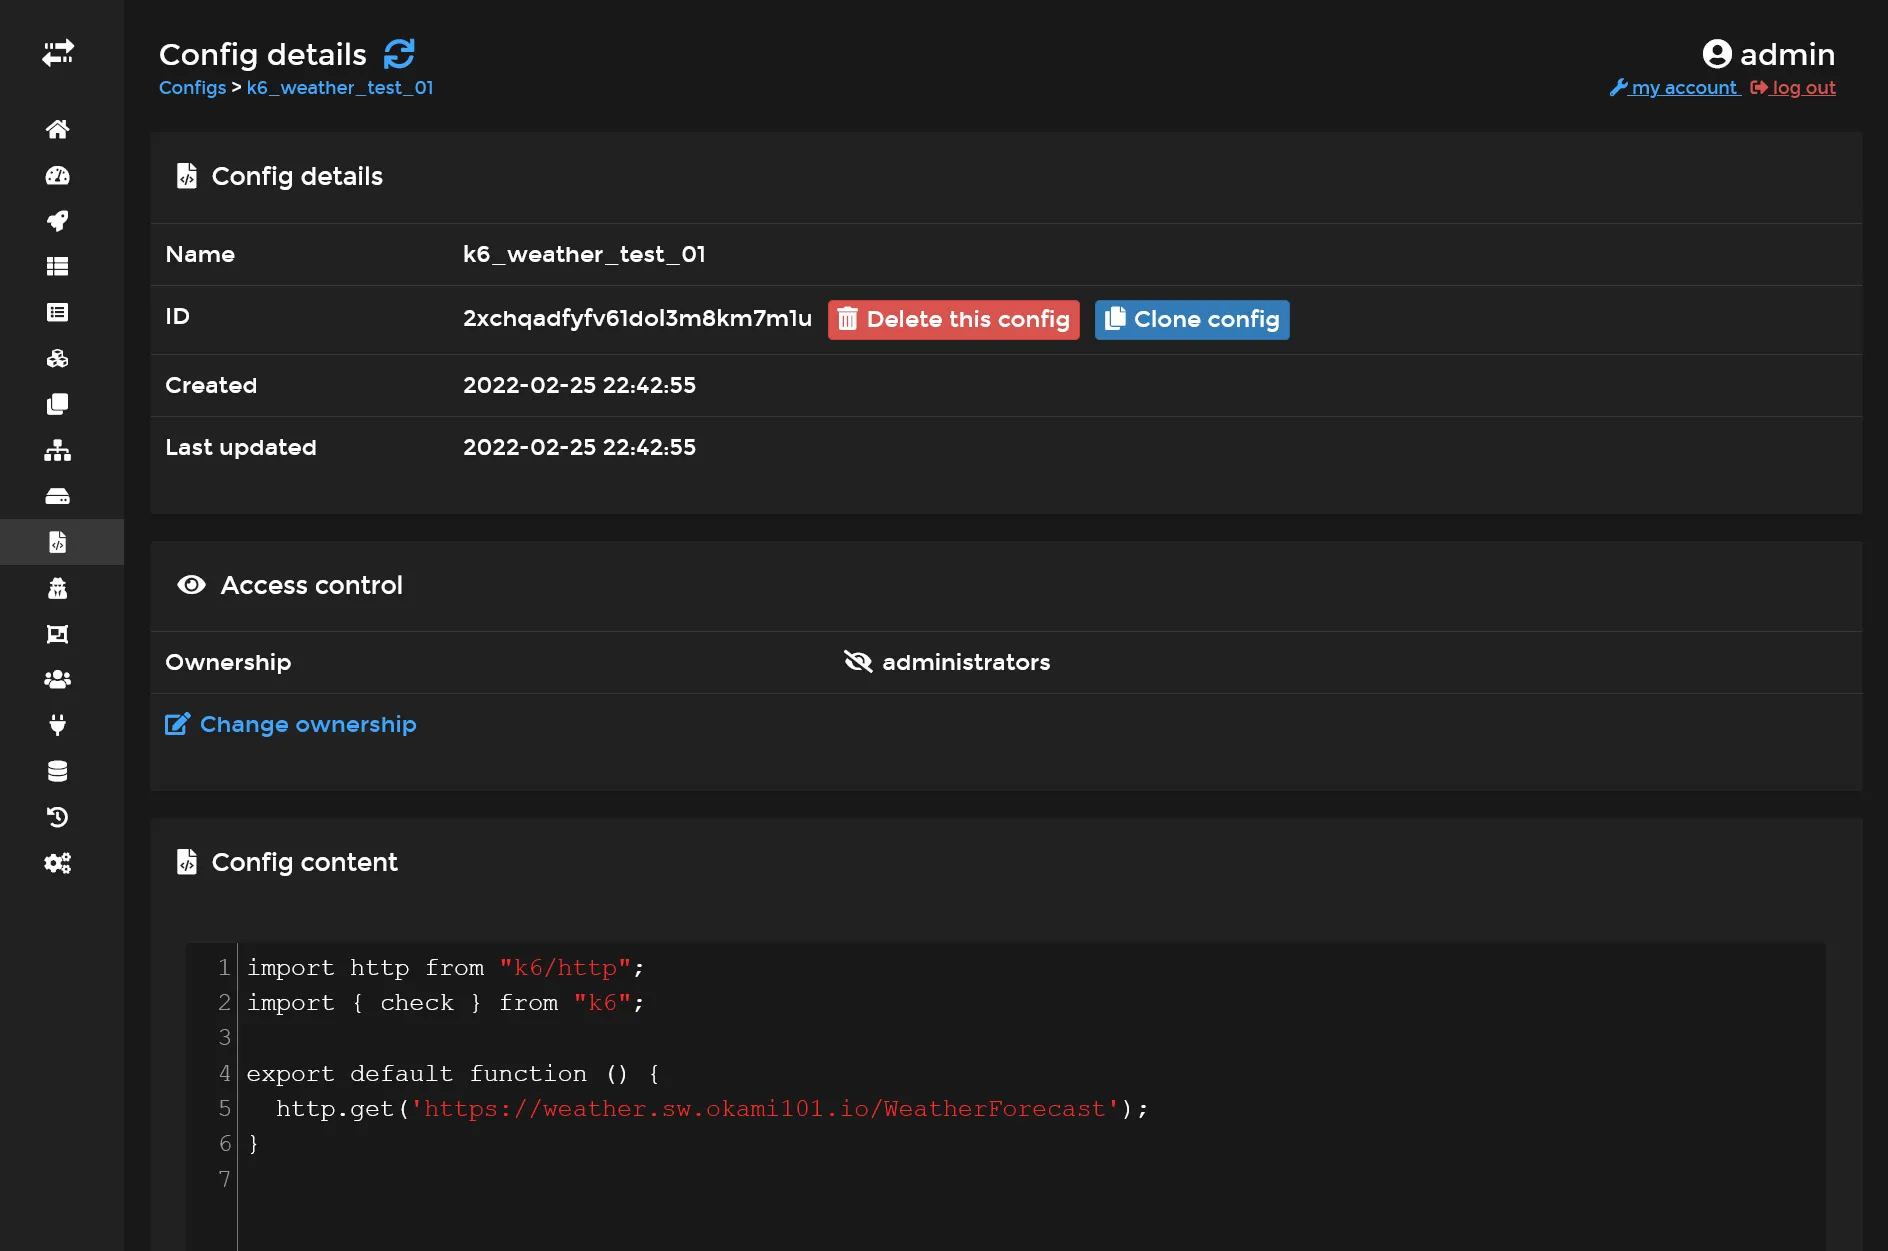
Then create the following stack :
version: '3.8'
services: load: image: grafana/k6 configs: - source: k6_weather_test_01 target: /scripts/k6-weather.js environment: - K6_VUS=100 - K6_DURATION=1m - K6_OUT=influxdb=http://db:8086/k6weather entrypoint: ['k6', 'run', '/scripts/k6-weather.js'] networks: - influxdb_private deploy: restart_policy: condition: none placement: constraints: - node.labels.environment == build
networks: influxdb_private: external: true
configs: k6_weather_test_01: external: true| variable | description |
|---|---|
K6_VUS | The number of active user connections. |
K6_DURATION | Duration of test. |
K6_OUT | The data source where to store current results. |
Note
The restart_policy in above deploy section is important here, as we don’t want the service restarting every time. This is a specific stack intended to be launch once manually.
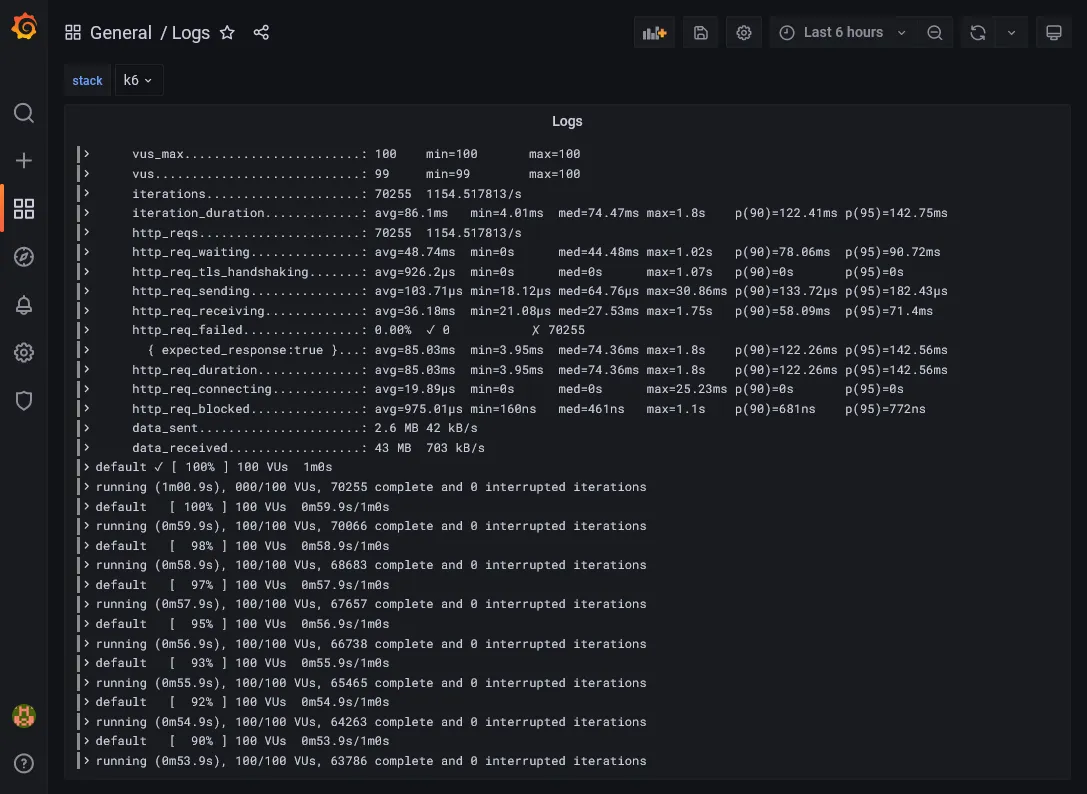
Deploy the stack, and it should launch a load testing for 1 minute. In the end, the task status of docker service should indicate complete status.
With Loki as the default log driver, we get only current logs of running tasks in Portainer, so when completed, the logs are wiped. You must go through Grafana in the Logs dashboard that we built on previous part in order to check the final raw results.
Visualization through Grafana
It’s now time to go back to Grafana and try to get some charts from influxdb ! First Add a new InfluxDB Data source. Set http://influxdb_db:8086 inside URL field and k6weather in Database field, then Save & test.
Now create a new dashboard, a new panel, and keep Time series as main graph system. Select above InfluxDB data source and switch to raw query expression. Finally, put following query SELECT sum("value") FROM "http_reqs" WHERE $timeFilter GROUP BY time(1s) in fields. Some graph should appear, select the right time interval where you have done previous load testing and voilà !
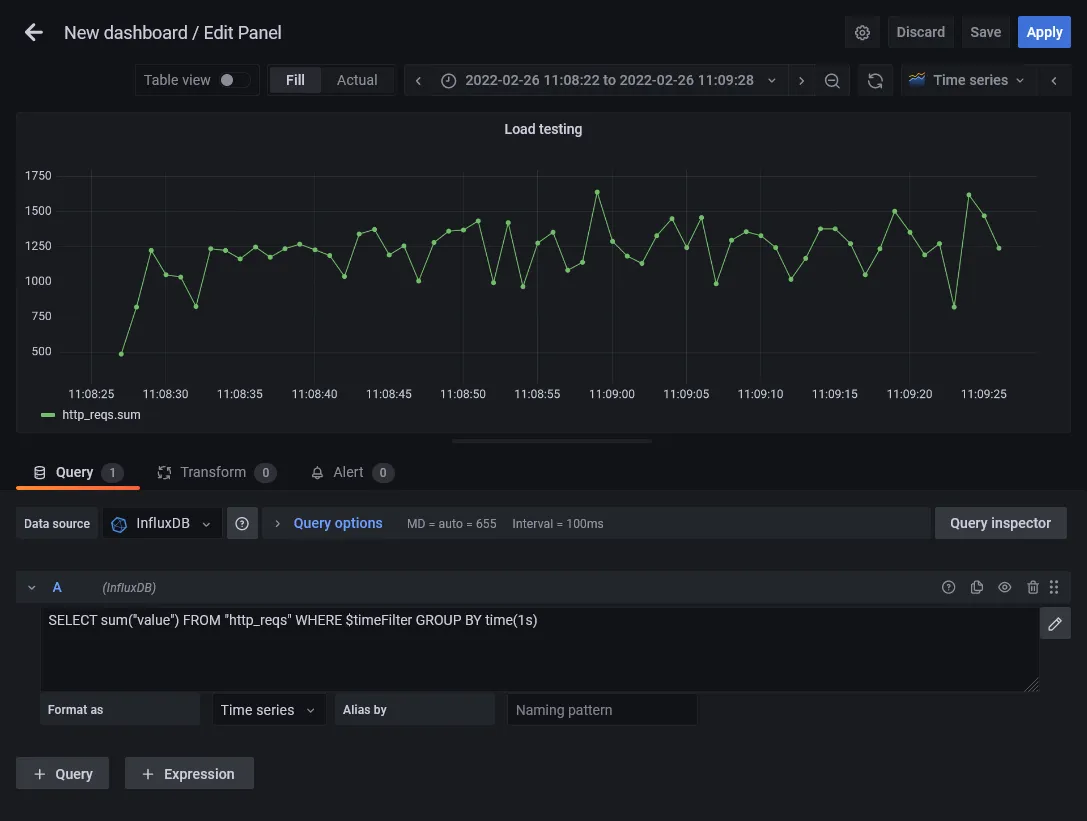
We now have the current HTTP requests count for every second. Below the Chart.js result of my own loading test.
Test loading scenario
You can go even further with more progressive scenario. Create a new k6_weather_test_02 docker config script :
import http from "k6/http";import { check } from "k6";
export const options = { stages: [ { duration: '5m', target: 200 }, ],};
export default function () { http.get('https://weather.sw.dockerswarm.rocks/WeatherForecast');}This is a progressive 5 minutes load testing scenario from 1 user to 200 concurrent users.
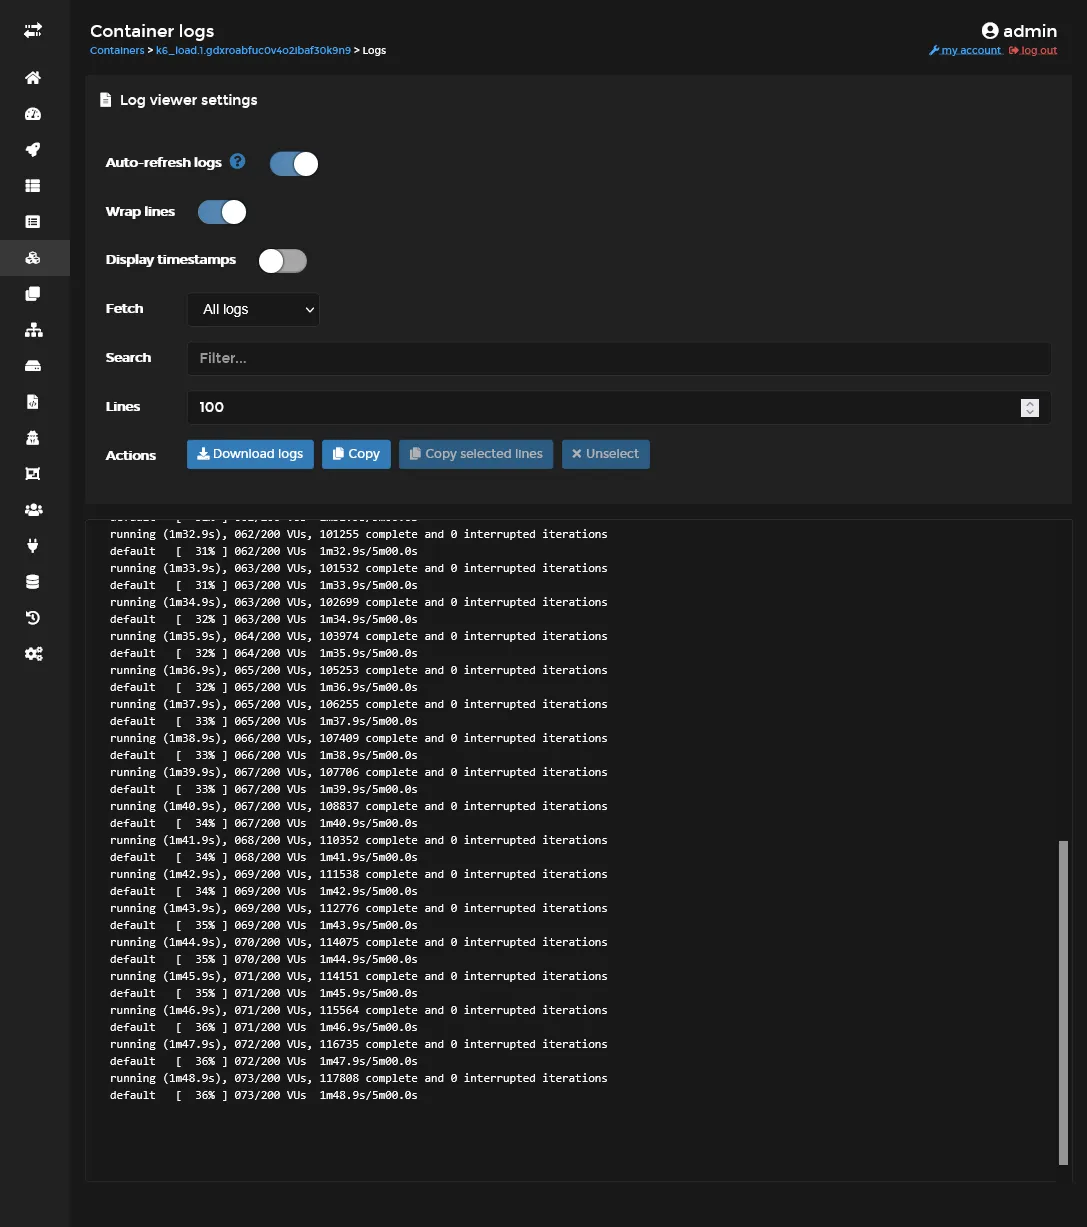
Use this script on above k6 stack and be sure to comment K6_VUS and K6_DURATION environment variables. Check the logs to ensure that you have correct scenario :
Then check the raw and graph result in Grafana. Here the corresponding Chart.js result in my case for the 1st minute :
Final check 🎊🏁🎊
Congratulation if you’re getting that far !!!
I’m personally happy to finish this pretty massive tutorial…
You’ve done all the basic parts of installing, using, testing a professional grade Docker Swarm cluster.